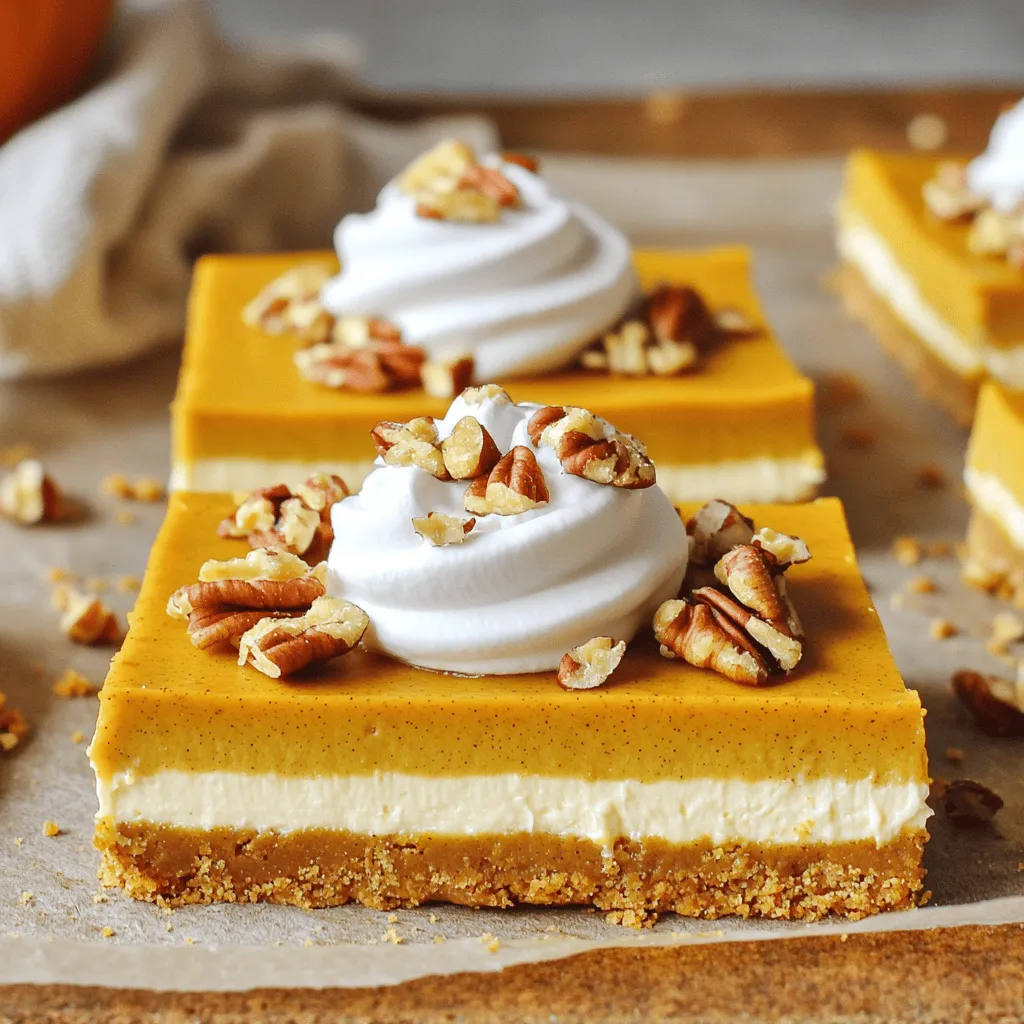
Fall is here, and what better way to celebrate than with No Bake Pumpkin Cheesecake Bars? They are easy to make and oh-so-delicious! With simple ingredients like graham crackers, cream cheese, and pumpkin puree, you can whip these up in no time. Forget about baking; I’ll show you step-by-step how to create this creamy treat that’s perfect for any gathering. Let’s dive in and make dessert magic together!
Ingredients
To make No Bake Pumpkin Cheesecake Bars, you need a few simple ingredients. Here’s the list:
– 1 ½ cups graham cracker crumbs
– ½ cup unsalted butter, melted
– 2 tablespoons brown sugar
– 16 oz cream cheese, softened
– 1 cup powdered sugar
– 1 cup canned pumpkin puree
– 1 teaspoon vanilla extract
– 1 teaspoon pumpkin pie spice
– 1 cup whipped cream (for topping)
– Crushed pecans or walnuts (for garnish)
Each ingredient plays a key role in the final taste and texture. The graham cracker crumbs create a sweet, crunchy base. The melted butter helps bind the crumbs together. Brown sugar adds extra sweetness and a hint of caramel flavor.
Cream cheese forms the rich and creamy filling. Powdered sugar sweetens the mix without being grainy. Canned pumpkin puree gives that classic fall flavor and color. Vanilla extract enhances the overall taste, while pumpkin pie spice adds warmth and aroma.
Whipped cream on top makes each bite light and airy. Crushed nuts add a nice crunch and depth. Using these fresh, quality ingredients will make your cheesecake bars stand out.
Step-by-Step Instructions
Preparing the Crust
To make the crust, start by mixing the graham cracker crumbs, melted butter, and brown sugar. Use a medium bowl for this. Stir until the crumbs look like wet sand. Next, press the mixture firmly into the bottom of a 9×9-inch baking dish. Make sure it is even. After that, chill the crust in the fridge for about 10-15 minutes. This helps it set nicely.
Making the Filling
Now it’s time to make the filling. In a large mixing bowl, beat the softened cream cheese with an electric mixer. Mix until it is smooth and creamy. Next, gradually add the powdered sugar. Keep mixing until it is well combined. Then, add the pumpkin puree, vanilla extract, and pumpkin pie spice. Beat until everything is fully mixed and the filling looks smooth.
Assembling and Chilling
Once your filling is ready, pour it over the chilled crust. Use a spatula to spread it evenly. Make sure the top is nice and smooth. Now cover the dish with plastic wrap. Place it in the fridge for at least 4-6 hours to set. For the best results, let it chill overnight. When it is set, take it out and cut into squares or rectangles. Each piece should look delicious. Top with whipped cream and sprinkle crushed pecans or walnuts on top for extra crunch. Enjoy these easy and delicious No Bake Pumpkin Cheesecake Bars!
Tips & Tricks
Tips for the Perfect Crust
To get the best crust, start with quality graham cracker crumbs. You can buy them or crush whole crackers. The key is to make sure they are fine and even. This gives your crust a nice, smooth base.
Chilling the crust is also really important. After pressing the crumb mixture into the dish, let it chill for 10-15 minutes. This helps the butter set and keeps the crust firm. A firm crust ensures your cheesecake bars hold their shape when you cut them.
Tips for the Filling
For a smooth and creamy filling, start with softened cream cheese. Beat it well until it’s fluffy. Gradually add sugar, mixing it in slowly. This method avoids lumps in your filling.
If you don’t have pumpkin pie spice, you can make your own. Use cinnamon, nutmeg, and ginger for great flavor. Just mix them together in equal parts. This will give your filling the warm, spiced taste you want.
Presentation Ideas
When serving your cheesecake bars, think about fun ways to make them stand out. You can cut them into fun shapes or use colorful plates. This makes a simple dessert feel special.
For garnishing, add a dollop of whipped cream on top. Sprinkle crushed pecans or walnuts for a nice crunch. This not only adds texture but also makes your bars look pretty. Enjoy the gorgeous presentation just as much as the taste!
Variations
Flavor Variations
You can make your No Bake Pumpkin Cheesecake Bars even better with a few simple tweaks. For a fun twist, try adding chocolate or caramel swirls. Just melt your favorite chocolate or caramel sauce and swirl it into the filling. This adds a rich taste that pairs well with pumpkin. You can also mix in different spices like nutmeg or extra cinnamon. These spices deepen the flavor and bring warmth to every bite.
Ingredient Substitutions
If you want a dairy-free version, use vegan cream cheese and whipped cream. They work well and keep the texture creamy. For a gluten-free option, swap graham cracker crumbs with gluten-free crumbs or nuts. Both substitutions keep the crust tasty and crunchy.
Serving Suggestions
Serving your cheesecake bars is where the fun begins! Pair them with a scoop of vanilla ice cream for a cold treat. The creaminess of the ice cream balances the rich pumpkin flavor. You can also serve them with seasonal fruits like apples or pears. A drizzle of warm caramel or a berry sauce adds a nice touch. These ideas make your dessert even more special.
Storage Info
How to Store
To keep your No Bake Pumpkin Cheesecake Bars fresh, refrigerate them right after cutting. Use an airtight container to prevent drying out. If you have leftovers, place parchment paper between the bars. This keeps them from sticking together.
Freezing the bars is an option for longer storage. Wrap each bar in plastic wrap. Then, place them in a freezer-safe bag. This method helps maintain flavor and texture.
Shelf Life
In the fridge, these bars last about 4 to 5 days. Always check for signs of spoilage. If you see any mold or smell an off odor, it’s best to discard them.
If you freeze the bars, they can last up to 2 months. When you’re ready to eat, thaw them in the fridge overnight. Enjoy the deliciousness again with the same great taste!
FAQs
Can I make No Bake Pumpkin Cheesecake Bars ahead of time?
Yes, you can. These bars are perfect for preparing in advance. They need time to chill in the fridge, so I suggest making them the night before. This gives the flavors time to blend. Aim for a chilling time of at least 4-6 hours. For best results, let them set overnight. This way, you will have a tasty treat ready to serve when you need it.
What can I use instead of graham cracker crumbs?
If you want a change, there are many options. You can use crushed cookies like Oreos for a chocolate twist. If you need a gluten-free option, almond flour or gluten-free cookies work well too. For a healthier choice, try crushed nuts or oats. Each option gives a unique taste and texture. Pick what fits your needs best.
How long can I keep these cheesecake bars?
These cheesecake bars can last in the fridge for about 5-7 days. To keep them fresh, store them in an airtight container. If you want to keep them longer, you can freeze them for up to 2 months. Just remember to wrap them well. Before serving, let them thaw in the fridge. Enjoy your delicious bars at their best!
This blog post covered how to make no-bake pumpkin cheesecake bars. We discussed the ingredients, from graham cracker crumbs to whipped cream. You learned step-by-step instructions for preparing the crust and filling. We also shared tips for the perfect texture and creative presentation ideas.
You can enjoy these bars in many ways, with fun variations and smart storage tips. With this guide, you’ll impress friends and family. Making these delicious treats is simple and fun. Enjoy your baking adventure!