Looking for a fall treat that’s easy and fun to make? You’re in the right place! These No-Bake Pumpkin Cheesecake Cups are simple to whip up and bursting with flavor. Perfect for any gathering or a sweet snack at home, they combine creamy pumpkin filling with a crunchy crust. Let’s dive into how to make these delicious cups that will impress family and friends. You won’t want to miss this!
Ingredients
Complete List of Ingredients
To make these no-bake pumpkin cheesecake cups, you need the following:
– 1 cup graham cracker crumbs
– 1/4 cup unsalted butter, melted
– 2 cups cream cheese, softened
– 1 cup pumpkin puree
– 1 cup powdered sugar
– 1 tsp vanilla extract
– 1 tsp ground cinnamon
– 1/2 tsp ground nutmeg
– 1/2 tsp ground ginger
– 1 cup whipped cream (store-bought or homemade)
– Extra whipped cream for topping
– Crushed graham crackers and pumpkin seeds for garnish
These ingredients create a rich and creamy dessert that tastes like fall.
Recommended Ingredients for Best Flavor
For the best taste, use high-quality cream cheese. It gives the cheesecake a smooth texture. Fresh pumpkin puree also enhances flavor. You can buy it or make it at home. Use unsalted butter for the crust to control the saltiness. Fresh spices, like ground cinnamon and ginger, add warmth and depth.
Optional Add-Ins and Toppings
You can customize your cups with fun add-ins. Consider adding a splash of maple syrup for sweetness. A pinch of clove can give a warm spice note. For toppings, try adding crushed pecans or walnuts for crunch. You can also use chocolate shavings for a sweet twist. Get creative and make this dessert your own!
Step-by-Step Instructions
Detailed Instructions for Preparing the Crust
To start, grab a bowl. Add 1 cup of graham cracker crumbs to it. Then, melt 1/4 cup of unsalted butter in the microwave or on the stove. Pour the melted butter into the bowl with crumbs. Mix them well until you see a sandy texture.
Next, take your serving cups. Spoon the crumb mixture into each cup. Press the crumbs down firmly with your fingers or a small spoon. This step is key for a solid base. After that, place the cups in the refrigerator. Let them chill while you prepare the filling.
How to Make the Pumpkin Cheesecake Filling
Now, move to a large mixing bowl. Add 2 cups of softened cream cheese to it. Beat the cream cheese with a mixer until it is smooth and creamy. This takes about one minute.
Next, add 1 cup of pumpkin puree to the bowl. Then, add 1 cup of powdered sugar, 1 teaspoon of vanilla extract, 1 teaspoon of ground cinnamon, 1/2 teaspoon of ground nutmeg, and 1/2 teaspoon of ground ginger. Beat the mixture until everything blends well. It should look smooth and orange.
Now, take 1 cup of whipped cream. Gently fold it into the pumpkin mixture. Use a spatula for this step. Be careful not to mix too hard. You want to keep the fluffy texture.
Assembly Tips for Perfectly Layered Cups
Now comes the fun part! Take your chilled cups from the fridge. Use a spoon or a piping bag to add the pumpkin cheesecake filling. Fill each cup to the top, making sure to keep it neat.
Once they are filled, return the cups to the fridge. Let them chill for at least 2 hours. This helps the layers set nicely.
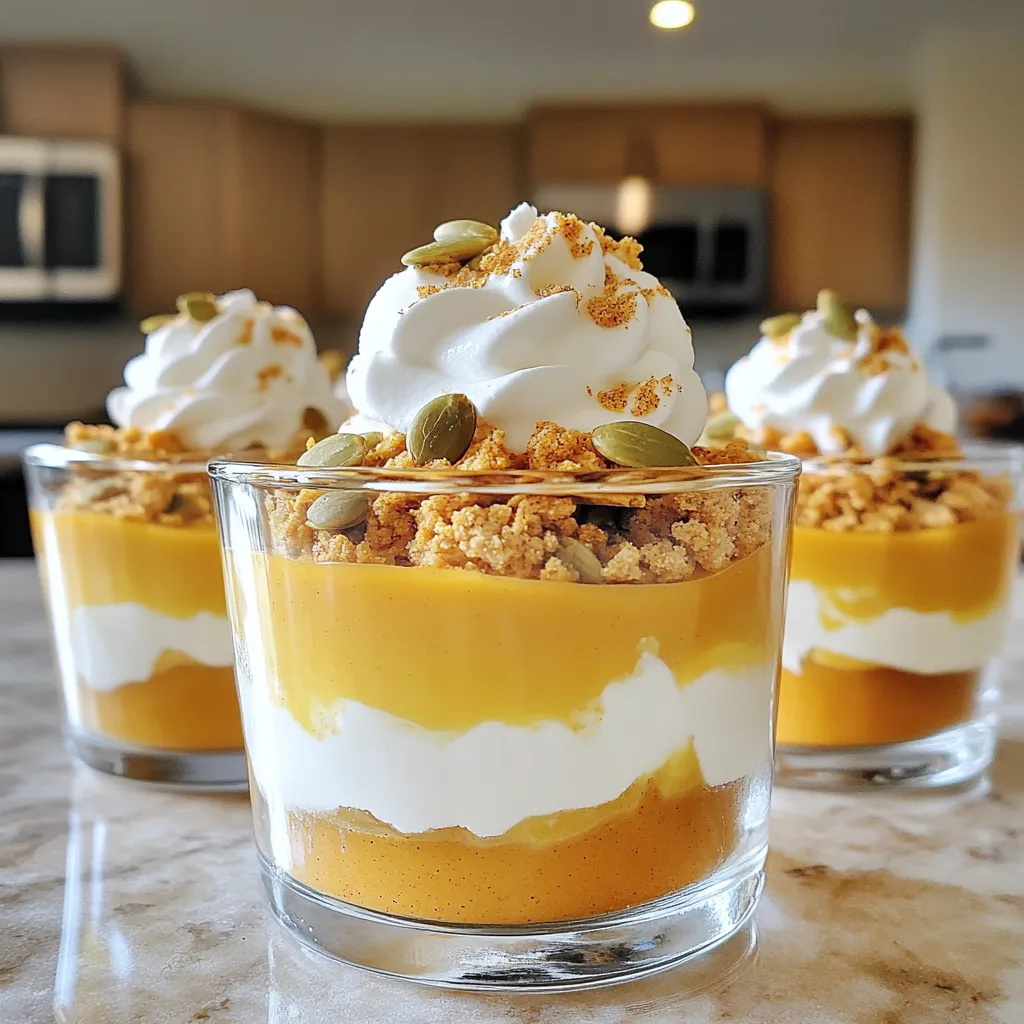
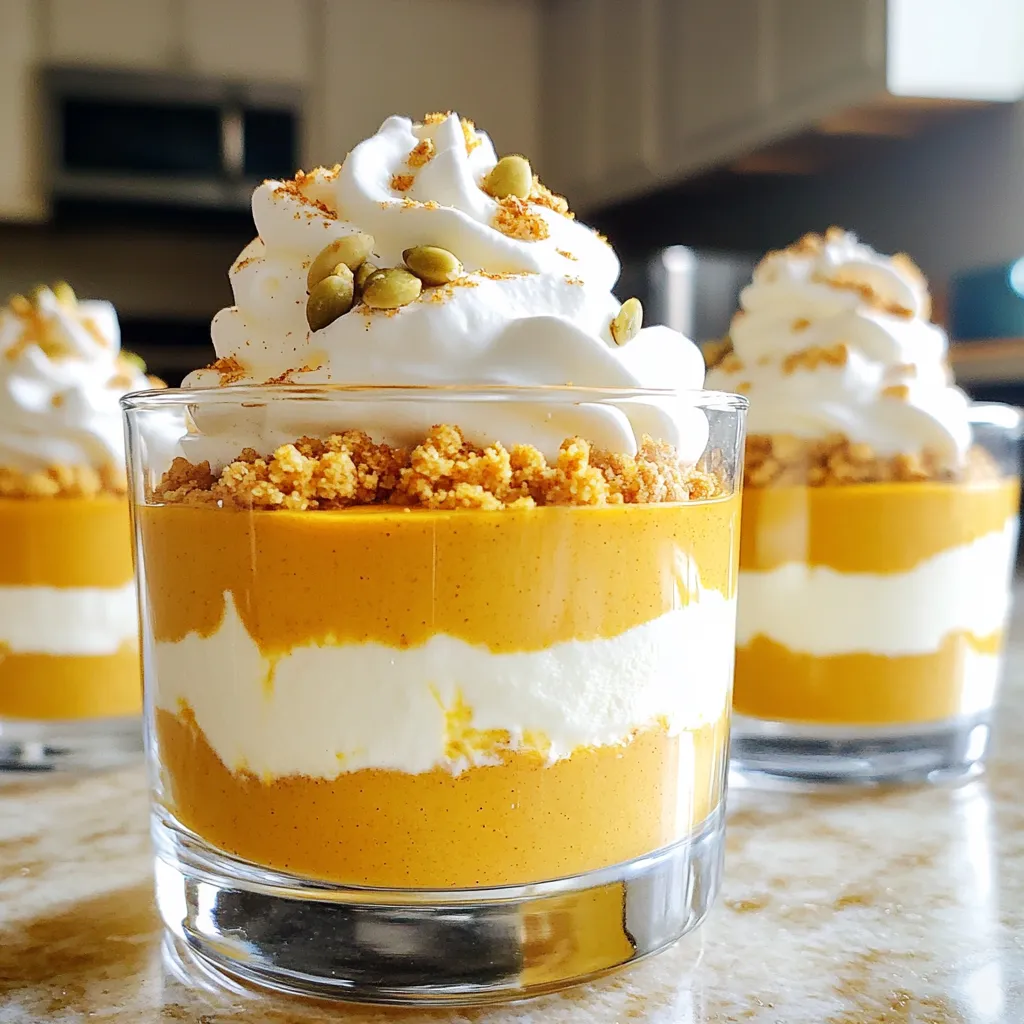
When you are ready to serve, add a dollop of extra whipped cream on top. Sprinkle crushed graham crackers and pumpkin seeds for a tasty crunch. Enjoy your beautiful and delicious pumpkin cheesecake cups!
Tips & Tricks
Common Mistakes to Avoid
When making no-bake pumpkin cheesecake cups, avoid overmixing the cream cheese. This can lead to a gummy texture. Also, don’t skip chilling the crust. If you don’t chill it, it will not hold together well. Lastly, make sure to use softened cream cheese. Cold cream cheese will not blend smoothly.
Best Practices for Creamy Texture
To get a creamy texture, whip the cream cheese until smooth first. Add the pumpkin puree and other ingredients slowly. This helps keep the mixture light and fluffy. When folding in the whipped cream, use a gentle hand. This keeps air in the mixture for that perfect creaminess.
Serving Suggestions for Presentation
For a fun presentation, layer your cheesecake cups neatly. Start with the crust, then add the pumpkin filling. Top each cup with a dollop of whipped cream. Sprinkle crushed graham crackers and pumpkin seeds on top for a nice crunch. Use clear cups to show off those beautiful layers.
Variations
Flavor Variations
You can change up these no-bake pumpkin cheesecake cups in fun ways. Try adding chocolate for a rich taste. Mix in melted chocolate chips or cocoa powder for a chocolate twist. For a maple flavor, add maple syrup to the pumpkin mixture. This gives a warm, cozy taste perfect for fall.
Dairy-Free and Vegan Options
If you want a dairy-free or vegan version, use vegan cream cheese instead of regular cream cheese. You can also swap the whipped cream for coconut whipped cream. Use a plant-based butter for the crust. This keeps the recipe creamy and delicious while fitting your diet.
Ingredient Swaps for Healthier Options
For a healthier treat, use whole grain graham crackers or oats for the crust. Instead of powdered sugar, you can use honey or maple syrup for a natural sweetener. You can reduce the sugar to fit your needs. Adding Greek yogurt can make the filling tangy and boost protein. These swaps help make the dessert a little lighter without losing flavor.
Storage Info
How to Properly Store Pumpkin Cheesecake Cups
To keep your pumpkin cheesecake cups fresh, cover them tightly. You can use plastic wrap or a lid. This helps avoid any strange smells from your fridge. Store them in the fridge where it’s cool. They should stay great for up to four days.
Freezing Instructions for Long-Term Storage
Want to save some for later? You can freeze these cups! Wrap each cup tightly in plastic wrap. Then, place them in a freezer-safe bag or container. This keeps them from getting freezer burn. They can last up to three months in the freezer. When you’re ready to eat, let them thaw in the fridge overnight.
Shelf Life in the Refrigerator
These tasty treats can last in the fridge for about four days. After that, the texture may change. The whipped cream might lose its fluffiness. For the best taste and texture, try to eat them within the first few days. Always check for any signs of spoilage before serving.
FAQs
Can I make these cheesecake cups in advance?
Yes, you can make these cheesecake cups ahead of time. I often prepare them the night before. This allows the flavors to blend well. Just store them in the fridge until you’re ready to serve. They taste even better after chilling overnight.
How do I achieve a firmer filling?
To make a firmer filling, use less whipped cream. You can also add a bit of gelatin. First, dissolve the gelatin in warm water. Then, mix it into your cheese and pumpkin blend. This gives the filling a nice, firm texture. Refrigerate for a longer time if you want it even firmer.
What can I use instead of graham cracker crumbs?
If you don’t have graham cracker crumbs, try crushed cookies. Digestive biscuits work well too. You can also use vanilla wafers for a sweet twist. For a gluten-free option, almond flour is a great choice. Just mix it with melted butter, like you would with graham crackers.
You now have all the tools to make delicious pumpkin cheesecake cups. We covered the key ingredients, easy steps, helpful tips, and tasty variations. Remember to avoid common mistakes and focus on texture for the best results. These cups can be stored or frozen, making them perfect for any occasion. Embrace your creativity with flavors and enjoy sharing your treats. Making your own dessert can be fun and rewarding. Now, get started and impress yourself and your guests!