Are you craving a sweet treat that requires no baking? Look no further! My No-Bake Peanut Butter Bars are a quick, tasty solution for any dessert lover. With just a few simple ingredients like creamy peanut butter and rolled oats, you’ll whip up a delicious snack in no time. Stick around to learn how to make these easy bars and discover fun variations and tips for the perfect finish!
Ingredients
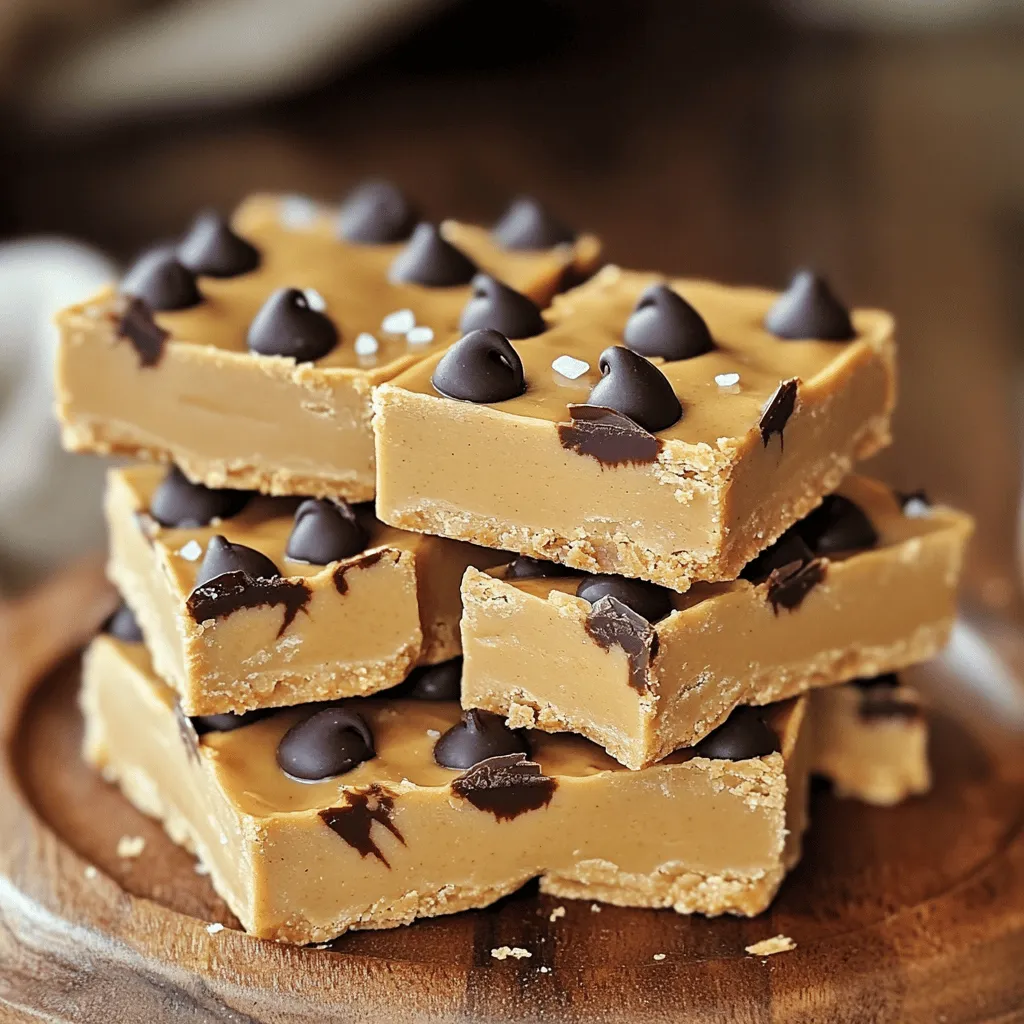
Main Ingredients for No-Bake Peanut Butter Bars
– 1 cup natural creamy peanut butter
– 1/2 cup honey or maple syrup
– 2 cups rolled oats
– 1 cup coconut flour
– 1/2 cup dark chocolate chips
– 1/4 teaspoon sea salt
– 1 teaspoon vanilla extract
Each ingredient plays a key role in making these bars tasty and easy to prepare. Natural creamy peanut butter gives a rich flavor and smooth texture. Honey or maple syrup adds sweetness, while rolled oats provide fiber and a chewy bite. Coconut flour helps bind everything together and adds a subtle coconut flavor. Dark chocolate chips give a sweet and slightly bitter contrast, making every bite delightful. Sea salt enhances all the flavors, and vanilla extract adds warmth to the mix.
Ingredient Substitutions
– You can try different sweeteners, like agave or coconut sugar.
– For nut butter, almond or cashew work well.
– If you need gluten-free options, look for gluten-free oats.
These substitutions let you customize the bars to your taste. Whether you prefer a different nut butter or sweetener, feel free to swap them in. Using gluten-free oats ensures everyone can enjoy these bars, no matter their dietary needs.
Step-by-Step Instructions
Preparation Steps
1. Combine peanut butter and honey in a bowl.
2. Mix in rolled oats, coconut flour, sea salt, and vanilla.
3. Fold in dark chocolate chips.
Making these bars is quick and easy. Start by taking a medium bowl. Add 1 cup of natural creamy peanut butter and 1/2 cup of honey or maple syrup. Stir until it’s smooth and creamy. Next, add 2 cups of rolled oats, 1 cup of coconut flour, 1/4 teaspoon of sea salt, and 1 teaspoon of vanilla extract. Mix it all up until you see no dry bits. This ensures every bite is tasty.
Now, gently fold in 1/2 cup of dark chocolate chips. This adds a rich flavor that pairs well with peanut butter.
Assembling the Bars
– Line the baking pan with parchment paper.
– Press the mixture firmly into the pan.
Get an 8×8 inch baking pan and line it with parchment paper. Leave some paper hanging over the sides. This makes it easy to lift out the bars later. Next, pour the peanut butter mixture into the pan. Use a spatula or your hands to press it down evenly. Make sure it’s packed tightly. This helps the bars hold their shape.
Chilling and Serving
– Refrigerate for at least 2 hours.
– Cut into squares and presentation tips.
Place the pan in the refrigerator. Let it chill for at least 2 hours. This makes the bars firm and easy to cut. Once they are set, lift them out using the parchment paper. Cut them into squares or rectangles.
For a fun touch, arrange the bars on a nice platter. Drizzle some melted chocolate over the top or sprinkle a bit of sea salt before serving. Enjoy your delicious homemade no-bake peanut butter bars!
Tips & Tricks
Perfecting Your No-Bake Bars
To get the best no-bake peanut butter bars, focus on the right consistency. The mixture should be thick enough to hold its shape but still moist. If it’s too dry, add a bit more peanut butter or honey. If it’s too wet, mix in more oats or coconut flour.
When packing the mixture into your pan, use a spatula or your hands. Press it down firmly and evenly. This helps the bars hold together well after chilling.
Serving Suggestions
These bars taste great on their own, but you can enhance them. Serve with a scoop of ice cream for a fun dessert. Fresh fruits like bananas or strawberries add a nice touch too.
For a decadent twist, drizzle melted chocolate over the top. Just melt some chocolate chips in the microwave, then pour it on your bars. This will make them even more special!
Common Mistakes to Avoid
One mistake is overmixing the ingredients. This can make the bars tough. Mix just until everything combines.
Another common issue is not chilling long enough. Be patient! Let the bars chill for at least two hours. This makes them firm and easy to cut. Following these tips will help you create perfect no-bake peanut butter bars every time.

Variations
No-bake peanut butter bars are a blank canvas for flavor. You can easily tweak the recipe to fit your taste.
Flavor Enhancements
– Adding spices: A sprinkle of cinnamon or nutmeg can add warmth. Simply mix about a teaspoon into the peanut butter for a cozy flavor.
– Using different types of chocolate: Try milk or white chocolate instead of dark. Each type brings its own unique taste. Melt some on top for a fun look.
Nut-Free Options
– Using sunflower seed butter: If you need a nut-free choice, sunflower seed butter works great. It has a similar texture and taste.
– Alternative toppings: You can add seeds or dried fruit on top. They give a nice crunch and sweetness.
Vegan or Sugar-Free Modifications
– Vegan sweeteners and chocolate: If you want a vegan version, use agave syrup and dairy-free chocolate. They taste just as good!
– Omitting chocolate for a lighter version: You can skip the chocolate. This makes the bars lighter and lets the peanut butter shine.
Storage Info
Best Ways to Store No-Bake Bars
To keep your no-bake peanut butter bars fresh, you have two main options: the fridge or the freezer. In the refrigerator, the bars stay firm but soft enough to bite into. Use an airtight container to prevent them from drying out. If you want to save bars for later, the freezer works great. Just wrap them well in plastic wrap before placing them in a container. This method keeps the bars tasty for months.
Shelf Life
In the fridge, these bars last about a week. If you freeze them, they can last up to three months. Just remember to label your containers with dates. This helps you know when to enjoy them.
Ready-to-Eat Tips
When you’re ready to eat a frozen bar, take it out and let it sit at room temperature for about fifteen minutes. This makes it easier to chew. You can also cut them into smaller pieces for quick snacks. Portioning helps you grab a treat on the go without feeling guilty about overindulging. If you want, you can drizzle some melted chocolate over the top for a special touch.
FAQs
Can I use crunchy peanut butter instead?
Yes, you can use crunchy peanut butter. It will give your bars a different texture. You’ll enjoy extra crunch, which can be fun. The flavor remains rich and delicious.
How long do these bars take to set?
These bars need about 2 hours in the fridge to set. This time helps them firm up well. If you want them extra firm, chill them longer. Just be sure to cover them to keep them fresh.
Are No-Bake Peanut Butter Bars healthy?
Yes, No-Bake Peanut Butter Bars can be healthy. They have good fats from peanut butter. Oats add fiber, which is great for digestion. Using natural sweeteners like honey or maple syrup helps, too. Enjoy them in moderation for a balanced treat.
Can I make these bars in advance?
Absolutely! These bars are perfect for meal prep. Make a batch and store them in the fridge. They stay fresh for about a week. Just cut them into squares before serving for easy snacks.
What can I substitute for coconut flour?
If you don’t have coconut flour, try almond flour. Almond flour will change the texture a bit but still works well. You could also use whole wheat flour for a denser bar. Just remember to adjust the liquid if needed.
No-bake peanut butter bars are easy to make and delicious. You need just a few key ingredients, like peanut butter, honey, and oats. I shared tips on how to customize flavors and perfect your bars. Remember to chill them well for the best taste. These treats are great for snacking and can last for weeks. Enjoy experimenting with variations and find your favorite! Store them right, and you’ll always have a tasty treat ready to enjoy.