Are you craving a sweet treat that’s easy to make and healthy too? Look no further! In this post, I will guide you through making delicious No Bake Peanut Butter Bars. These bars are packed with wholesome ingredients like natural peanut butter and rolled oats, perfect for a snack. Let’s dive into this simple recipe that anyone can whip up in no time!
Why I Love This Recipe
- Quick and Easy: This recipe requires minimal effort and just 10 minutes of prep time, making it perfect for busy days.
- Nutritious Ingredients: With natural peanut butter, oats, and protein powder, these bars are a healthy snack that fuels your day.
- Delicious Flavor: The combination of chocolate and peanut butter creates a satisfying treat that pleases both kids and adults.
- No Baking Required: Skip the oven! These bars are set in the fridge, making them a hassle-free dessert option.
Ingredients
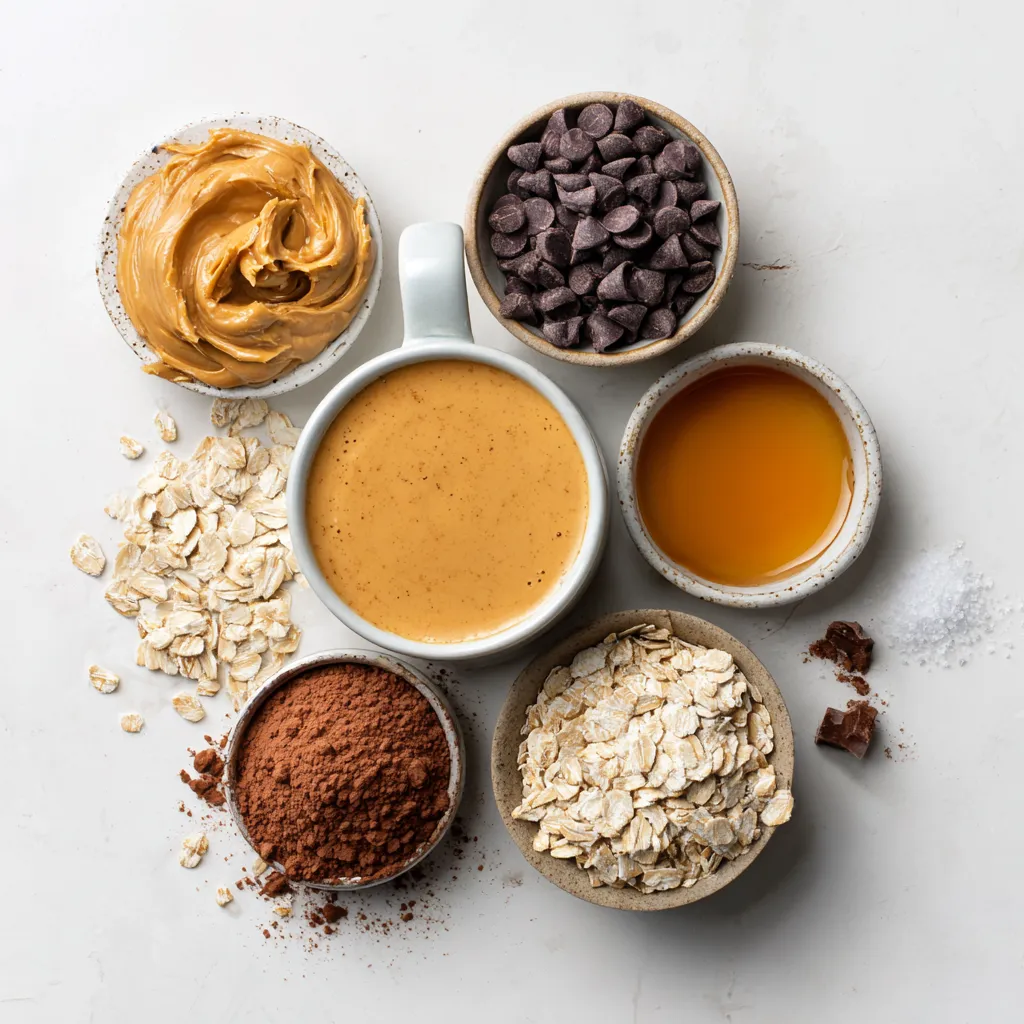
List of Ingredients
– 1 cup natural peanut butter (creamy or crunchy)
– 1/2 cup maple syrup or honey
– 1 cup rolled oats
– 1/2 cup protein powder (vanilla or chocolate)
– 1/2 cup mini chocolate chips (dark or semi-sweet)
– 1/4 cup unsweetened cocoa powder
– Pinch of salt
When making no bake peanut butter bars, the right ingredients matter. I love using natural peanut butter, either creamy or crunchy. It gives a rich flavor and a good texture. Maple syrup or honey adds sweetness and binds the mix well. Rolled oats provide a hearty base, making the bars filling.
Protein powder boosts nutrition. I often use vanilla or chocolate for extra flavor. Mini chocolate chips add a nice touch, giving bites of sweetness. Unsweetened cocoa powder brings a deep chocolate taste, while a pinch of salt balances the sweetness.
This mix of ingredients makes each bar not only tasty but also healthy. Each ingredient plays a role in flavor and texture. So, gather these items to create a delicious treat!
Step-by-Step Instructions
Preparation Instructions
1. Start by mixing the natural peanut butter and maple syrup in a large bowl. Blend them until they form a smooth mixture.
2. Next, add the rolled oats, protein powder, cocoa powder, and a pinch of salt. Mix everything well until all the dry ingredients disappear into the peanut butter blend. This step is key for flavor and texture.
3. Now, it’s time to fold in the mini chocolate chips. Gently stir them into the mixture. Make sure they spread evenly so each bite has a bit of chocolate.
Setting the Bars
1. Line an 8×8 inch baking pan with parchment paper. Leave some paper hanging over the edges. This makes it easy to lift out the bars later.
2. Transfer the peanut butter mixture into the lined pan. Use a spatula or your hands to press it down firmly. Make sure it is even across the bottom. This helps the bars hold their shape.
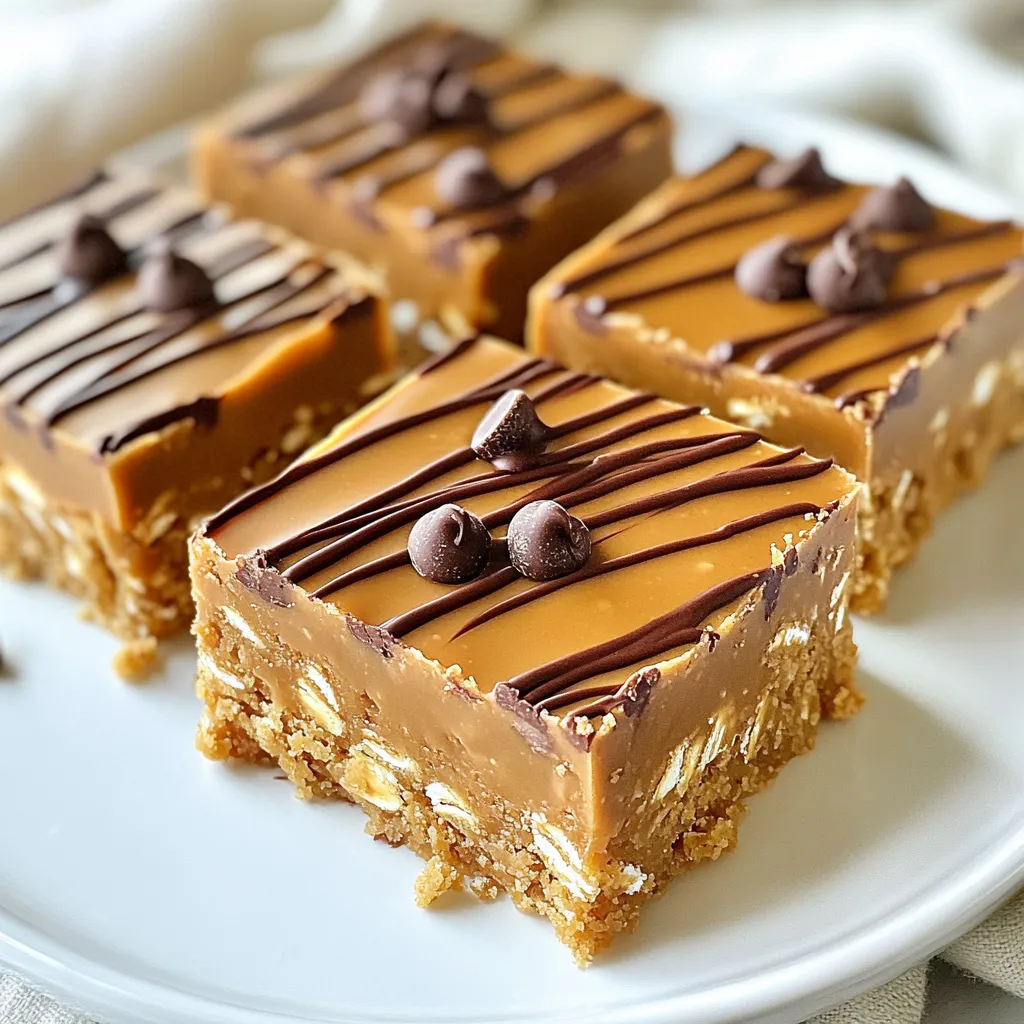
3. Finally, place the pan in the refrigerator for at least two hours. This chilling time is important for the bars to set properly. Once set, lift the bars out using the overhanging parchment paper and cut them into squares or rectangles. Enjoy your tasty no-bake treats!
Tips & Tricks
Perfecting the Texture
To get the right firmness in your no bake peanut butter bars, use the right mix of ingredients. A good balance of peanut butter and oats is key. If the mixture seems too wet, add more oats or protein powder. This will help the bars hold together. Make sure to press the mixture firmly into the pan. This step is vital for a solid bar.
Chilling time matters too. You should chill the bars for at least two hours. This allows them to set properly. The cold makes the bars firm and easy to cut. Don’t rush this step!
Serving Suggestions
For a great presentation, cut the bars into squares or rectangles. Place them on a pretty plate. A drizzle of melted peanut butter or chocolate on top adds flair. You can also sprinkle more mini chocolate chips for a fun look.
When it comes to drinks, pair these bars with milk or a smoothie. They taste great with almond milk or a nutty shake. This combo makes for a tasty and healthy snack. Enjoy every bite!
Pro Tips
- Use Room Temperature Ingredients: This helps the peanut butter and maple syrup mix more easily, ensuring a smoother consistency.
- Experiment with Flavors: Try adding a teaspoon of vanilla extract or a pinch of cinnamon for an extra flavor boost.
- Storage Tips: Keep the bars in an airtight container in the refrigerator for up to a week, or freeze for longer storage.
- Choose Your Sweetener: Maple syrup provides a unique flavor, but honey can be used for a different taste. Adjust to your preference!
Variations
Ingredient Swaps
You can easily change the nut butter in this recipe. Almond butter or cashew butter works well too. They add unique flavors and textures. If you prefer, try sunflower seed butter for a nut-free option.
For sweeteners, maple syrup and honey are great, but you can use agave syrup or brown rice syrup. These swaps give a different taste. Each sweetener adds its own charm to the bars.
Flavor Additions
Incorporating nuts or seeds can boost the texture and taste. Chopped almonds, walnuts, or sunflower seeds fit perfectly. They add crunch and nutrition. You can also mix in some chia seeds or flaxseeds for extra fiber and omega-3s.
Adding spices or extracts can take your bars to the next level. Try a pinch of cinnamon for warmth. Vanilla or almond extract adds depth. Even a bit of cocoa powder can enhance the chocolate flavor.
Storage Info
Storing the Bars
To keep your no bake peanut butter bars fresh, store them in the fridge. Wrap them tightly in plastic wrap or place them in an airtight container. This helps prevent them from drying out or absorbing other odors. If you need to store them for longer, freezing is a great option. Just wrap the bars individually or place them in a freezer-safe container. They can last up to three months in the freezer.
Shelf Life
These bars last about one week in the fridge. Look for any changes in texture or smell to check for spoilage. If the bars feel sticky or have an off odor, it’s best to toss them. Signs of spoilage include mold or a sour scent. Always inspect before enjoying your delicious treat!
FAQs
Common Questions
Can I make these bars without protein powder?
Yes, you can. If you skip the protein powder, add more oats. This will help bind the bars together. You may also want to add a little more peanut butter or honey for extra moisture.
What can I substitute for maple syrup?
You can use honey instead. It works well and adds sweetness. Agave nectar is another good option. Each of these will still keep your bars tasty and healthy.
Are these bars gluten-free?
Yes, these bars are gluten-free if you use certified gluten-free oats. Always check the label to be sure. This makes them a great choice for those with gluten sensitivities.
Troubleshooting
Why are my bars too crumbly?
If your bars are crumbly, they may need more binding. Add a bit more peanut butter or syrup. Press the mixture down more firmly in the pan to help them stick together.
How do I adjust for missing ingredients?
You can swap ingredients based on what you have. If you lack oats, try crushed nuts or nut flour. Missing cocoa powder? Use carob powder for a different taste. Just keep the ratios in mind.
These bars are easy to make and packed with flavor. We explored the key ingredients, from natural peanut butter to cocoa powder. You learned step-by-step instructions to prepare, set, and store your bars. I shared tips to perfect the texture and creative variations.
In every batch, you can find your favorite taste and texture. Make these delicious bars your own and share them with friends. Enjoy your healthy snack that fits perfectly into your da