
If you love cheesy treats, you’ll adore Mozzarella Stuffed Biscuit Bombs! These delightful bites are simple to make and bursting with melty mozzarella. Imagine buttery biscuits that you can fill with gooey cheese and fresh herbs. Whether you need a snack or a fun appetizer, these bombs are sure to be a hit. Let’s dive into the ingredients and steps so you can whip them up today!
Why I Love This Recipe
- Deliciously Cheesy: The gooey mozzarella center makes every bite a cheesy delight.
- Easy to Make: This recipe is straightforward and perfect for both beginners and experienced cooks.
- Perfect for Sharing: These biscuit bombs are great for parties, game nights, or as a fun appetizer.
- Customizable: Feel free to add your favorite herbs or spices to make them your own!
Ingredients
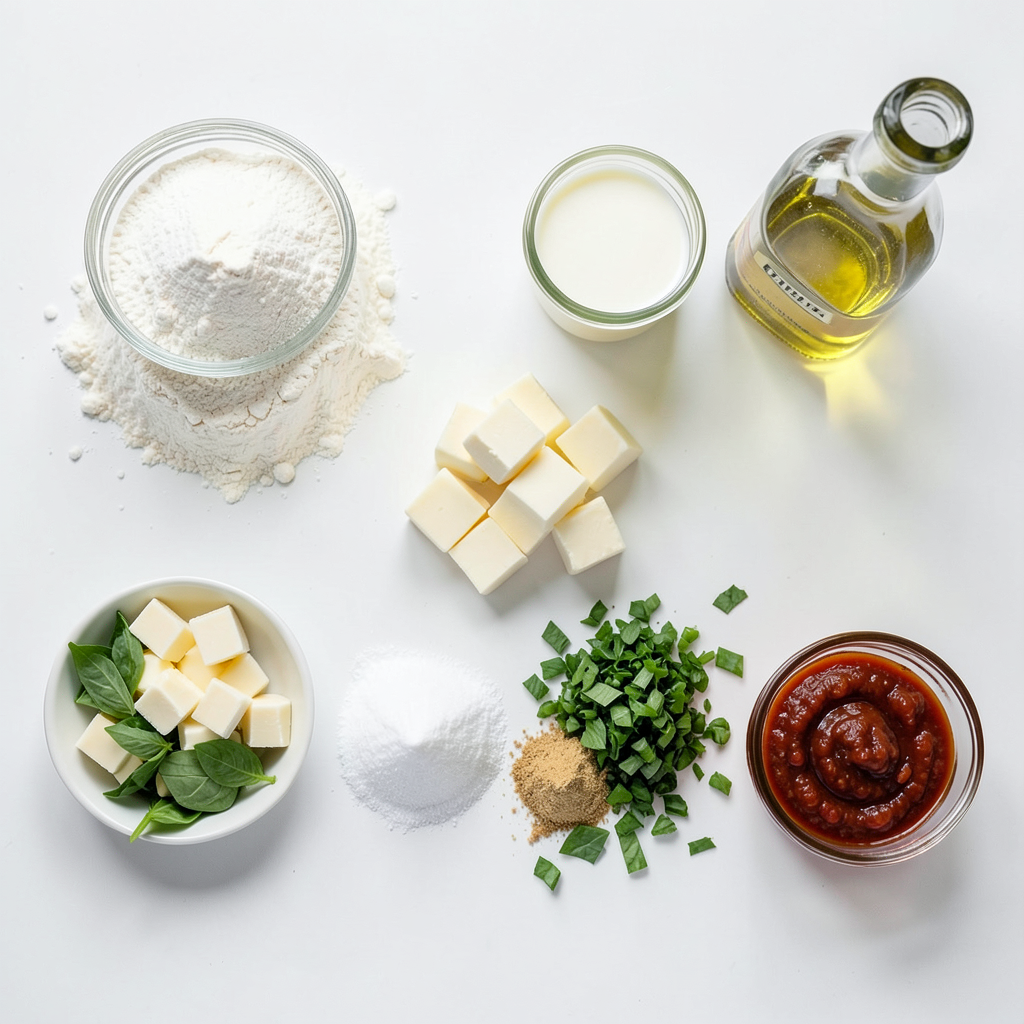
To make mozzarella stuffed biscuit bombs, you will need the following ingredients:
- 2 cups all-purpose flour
- 1 tablespoon baking powder
- 1/2 teaspoon baking soda
- 1/2 teaspoon salt
- 1/4 cup unsalted butter, cold and cubed
- 3/4 cup buttermilk
- 1 cup mozzarella cheese, cut into small cubes
- 1/4 cup fresh basil, chopped (plus extra for garnish)
- 1 teaspoon garlic powder
- 1 tablespoon olive oil
- Marinara sauce, for dipping
Each ingredient plays a key role in creating the perfect biscuit bomb. The flour forms the base, while baking powder and baking soda help them rise. Salt adds flavor, and cold butter ensures a flaky texture. Buttermilk provides moisture and tanginess.
Mozzarella is the star of this dish, delivering that gooey, cheesy center. Fresh basil adds a hint of brightness, and garlic powder gives it that savory kick. The olive oil helps achieve a golden finish when baking, and marinara sauce is a must for dipping.
Gather these ingredients, and you are ready to create a cheesy treat that will wow your family and friends!
Step-by-Step Instructions
Preparation Steps
1. Preheat your oven to 425°F (220°C). Line a baking sheet with parchment paper.
2. In a large bowl, mix together 2 cups of flour, 1 tablespoon of baking powder, 1/2 teaspoon of baking soda, and 1/2 teaspoon of salt.
3. Add 1/4 cup of cold, cubed unsalted butter to the dry mix. Use your fingers to mix until it looks like coarse crumbs.
4. Pour in 3/4 cup of buttermilk. Stir gently, just until it comes together. Add in 1/4 cup of chopped fresh basil and 1 teaspoon of garlic powder.
Dough Handling
1. On a floured surface, turn out the dough. Knead it gently for about 1 minute until it feels smooth.
2. Roll the dough out to about 1/2 inch thick. Cut it into circles, roughly 3 inches in diameter.
Filling and Baking
1. Place a cube of mozzarella cheese in the center of each dough circle.
2. Fold the dough over the cheese. Pinch the edges to seal tightly, forming a ball.
3. Set the sealed biscuit bombs seam side down on the prepared baking sheet.
4. Brush each bomb with 1 tablespoon of olive oil for a nice golden finish.
5. Bake in the oven for 12-15 minutes until they are golden brown and cooked through.
6. Let them cool for a few minutes before serving. They taste great warm, especially with marinara sauce for dipping!
Tips & Tricks
Best Practices for Dough
- Avoid overmixing: This keeps the dough light and fluffy. Mix just until combined.
- Keeping ingredients cold: Cold butter helps create flaky layers. Use very cold buttermilk too.
Enhancing Flavor
- Variations with herbs: Try adding rosemary or thyme for a new taste. Fresh herbs boost flavor.
- Cheese alternatives: Swap mozzarella for cheddar or pepper jack. Each cheese gives a unique twist.
Serving Suggestions
- Presentation tips: Arrange biscuit bombs on a platter. Garnish with chopped basil for color.
- Pairing with marinara: Serve warm with marinara sauce. The sauce adds a tasty dip to each bite.
Pro Tips
- Use Cold Butter: Ensure your butter is cold and cubed to create flaky layers in your biscuit bombs.
- Don't Overmix: Mix the dough until just combined to keep the biscuit bombs tender and fluffy.
- Seal Properly: Make sure to pinch the edges tightly to avoid leakage of the mozzarella during baking.
- Experiment with Cheese: Feel free to mix different types of cheese for varied flavors and textures in your biscuit bombs.
Variations
Different Cheeses
You can change the cheese inside these biscuit bombs to keep things fun. Cheddar adds a sharp taste that many love. Swiss cheese gives a nutty flavor and melts nicely. You can even mix cream cheese with mozzarella for a rich, creamy center. This blend offers both taste and texture, making each bite extra special.
Meat Additions
Adding meat can take these biscuit bombs to a new level. Cut some pepperoni into small bites and tuck them inside with the cheese. Cooked sausage also works great. Its savory flavor pairs well with the gooey cheese. Both options add protein and make these bites heartier.
Healthier Alternatives
If you're looking for a lighter option, try whole wheat flour to make the dough. This swap gives more fiber and nutrients. For those who prefer plant-based meals, use vegan cheese. It melts well and still keeps that cheesy goodness. These adjustments help make the recipe fit your lifestyle while keeping it tasty.
Storage Info
Refrigeration
To store your mozzarella stuffed biscuit bombs, let them cool down. Place them in an airtight container. This keeps them fresh for up to three days. I recommend using glass or plastic containers with tight lids. They help maintain moisture and flavor.
Reheating Tips
When reheating, I suggest using the oven. Preheat it to 350°F (175°C). Place the biscuit bombs on a baking sheet for about 10 minutes. This keeps them crispy. If you use a microwave, they may become soft. If you must use the microwave, heat them for 20-30 seconds. Check them often to avoid overcooking.
Freezing Instructions
You can freeze these biscuit bombs before or after baking. To freeze uncooked, place them on a baking sheet. Cover with plastic wrap and freeze until solid. Then, transfer them to a freezer bag. For cooked ones, let them cool completely. Store them in airtight containers or freezer bags. They last for up to two months. When ready to eat, thaw them overnight in the fridge. Bake them directly from the freezer at 400°F (200°C) for about 15-20 minutes. Enjoy their cheesy goodness straight from the oven!
FAQs
How can I make these ahead of time?
You can make the dough in advance. Prepare the dough, then wrap it tightly in plastic wrap. Keep it in the fridge for up to 24 hours. When you’re ready to bake, simply cut and fill the dough as directed. You can also freeze the formed biscuit bombs. Place them on a baking sheet to freeze, then transfer to a freezer bag. Bake them straight from the freezer, adding a few minutes to the cooking time.
Can I substitute the buttermilk?
Yes, you can. If you don't have buttermilk, mix one cup of milk with a tablespoon of lemon juice or vinegar. Let it sit for five minutes. This will create a similar tangy taste. You can also use plain yogurt, thinned with a bit of water, as a substitute.
What other dips can I serve with biscuit bombs?
Marinara sauce is a classic choice. You can also try ranch dressing for a cool dip. Cheese sauce adds a rich flavor. For a fun twist, serve with pesto or spicy aioli. Each dip brings out the cheesy goodness of the biscuit bombs.
How do I know when they're fully cooked?
Look for a golden brown color on top. You can also insert a toothpick into the center. If it comes out clean, they’re done. The cheese inside should be melted and bubbly, which is a good sign they are ready to enjoy!
Can I use a different type of flour?
Absolutely! While all-purpose flour works best, you can use whole wheat flour for a healthier option. Almond flour or gluten-free flour blends may work too, but they might change the texture. Adjust the liquid as needed for different flours.
Biscuit bombs are simple and fun to make. We covered key ingredients, step-by-step instructions, and tips for perfect results. Don't forget about tasty variations, smart storage, and reheating methods. Experiment with flavors and fillings to make them your own. These bites are great for any occasion. Enjoy them fresh or save for later. Your efforts will impress family and friends!