Mini Apple Hand Pies Flavorful and Simple Delight

If you love the cozy taste of apples, these Mini Apple Hand Pies are for you! They are quick to make and bursting with flavor. In this article, I’ll guide you through choosing the best apples, preparing a simple filling, and mastering the dough. Whether you want desserts for a gathering or a sweet treat for yourself, these little pies will shine. Let’s dive in and create this delightful snack together!

Ingredients

Essential Ingredients for Mini Apple Hand Pies

  • Apples: For these pies, I love using Granny Smith or Honeycrisp apples. Granny Smith gives a nice tart flavor, while Honeycrisp adds sweetness. Both varieties hold up well during baking. You want apples that are firm and flavorful.
  • Sugar and Spices: I recommend using granulated sugar and a good dose of cinnamon. These two together create a warm, comforting taste. You can also add a bit of lemon juice for brightness. Cornstarch helps to thicken the filling so it doesn’t run out when you bite in.
  • Pie Crust: You can use a package of refrigerated pie crusts. They save time and work well. Look for brands that use simple ingredients. If you like, you can even make your own crust, but the store-bought ones are great for quick prep.

These ingredients come together to create a tasty treat. For the full recipe, you can check out the details I provided earlier. Enjoy making your mini apple hand pies!

Step-by-Step Instructions

Prepare the Apple Filling

To start, grab a medium bowl. In this bowl, mix together the diced apples, granulated sugar, cinnamon, lemon juice, cornstarch, and a pinch of salt. Make sure you stir it well. This mixture is key for flavor. Let it sit for about 15 minutes. This resting time helps the flavors blend and taste better.

Preheat the Oven and Prepare Baking Sheet

While your filling rests, it’s time to preheat your oven. Set it to 400°F (200°C). This is important because the right temperature gives the hand pies a nice, golden brown finish. Next, line a baking sheet with parchment paper. This helps the pies bake evenly and prevents sticking.

Dough Preparation and Cutting

Now, let’s roll out the dough. Unroll the refrigerated pie crusts on a lightly floured surface. Use a rolling pin to gently smooth out any creases. This step makes the dough easier to work with. Next, use a round cutter that is about 4-5 inches wide to cut out circles. If you have scraps, gather and re-roll them to make more circles.

Filling, Sealing, and Egg Wash

With your dough circles ready, it’s time to fill them. Place 1-2 tablespoons of the apple filling in the center of each circle. Be careful not to overfill. Then, fold the dough over to make a half-moon shape. Press the edges together gently. Use a fork to crimp the edges. This seals the filling inside.

For a golden finish, make an egg wash. In a small bowl, whisk the beaten egg with a tablespoon of milk. Brush this mixture over the top of each hand pie. This step adds a nice shine and color.

Baking Instructions

Place the filled hand pies on your prepared baking sheet. Bake them in the preheated oven for 20-25 minutes. Watch for a golden brown color. This shows they are done. Once baked, remove them from the oven. Let them cool for a bit before serving. Enjoy your mini apple hand pies! For the complete recipe, check the Full Recipe section.

Tips & Tricks

Making the Perfect Hand Pies

To make your hand pies truly special, focus on the crust. A flaky crust is the key to a great pie. Here are some tips to ensure your crust shines:

  • Use cold ingredients: Keep your butter and water cold. This helps create steam, which makes the crust flaky.
  • Don’t overwork the dough: Mix just until combined. Overworking can make the crust tough.
  • Chill the dough: After mixing, wrap the dough and chill it for at least 30 minutes. This relaxes the gluten.

To avoid a soggy bottom crust, consider these steps:

  • Pre-bake the crust: A quick bake before filling helps set the crust.
  • Use cornstarch: Adding cornstarch to your filling can help absorb excess moisture.
  • Don’t overfill: Stick to the recommended amount of filling. Overfilling can cause leaks.

Serving Suggestions

How you serve your mini apple hand pies can elevate the experience. Here are the best ways to serve them:

  • Serve warm: Freshly baked pies taste best when warm. This enhances the flavors.
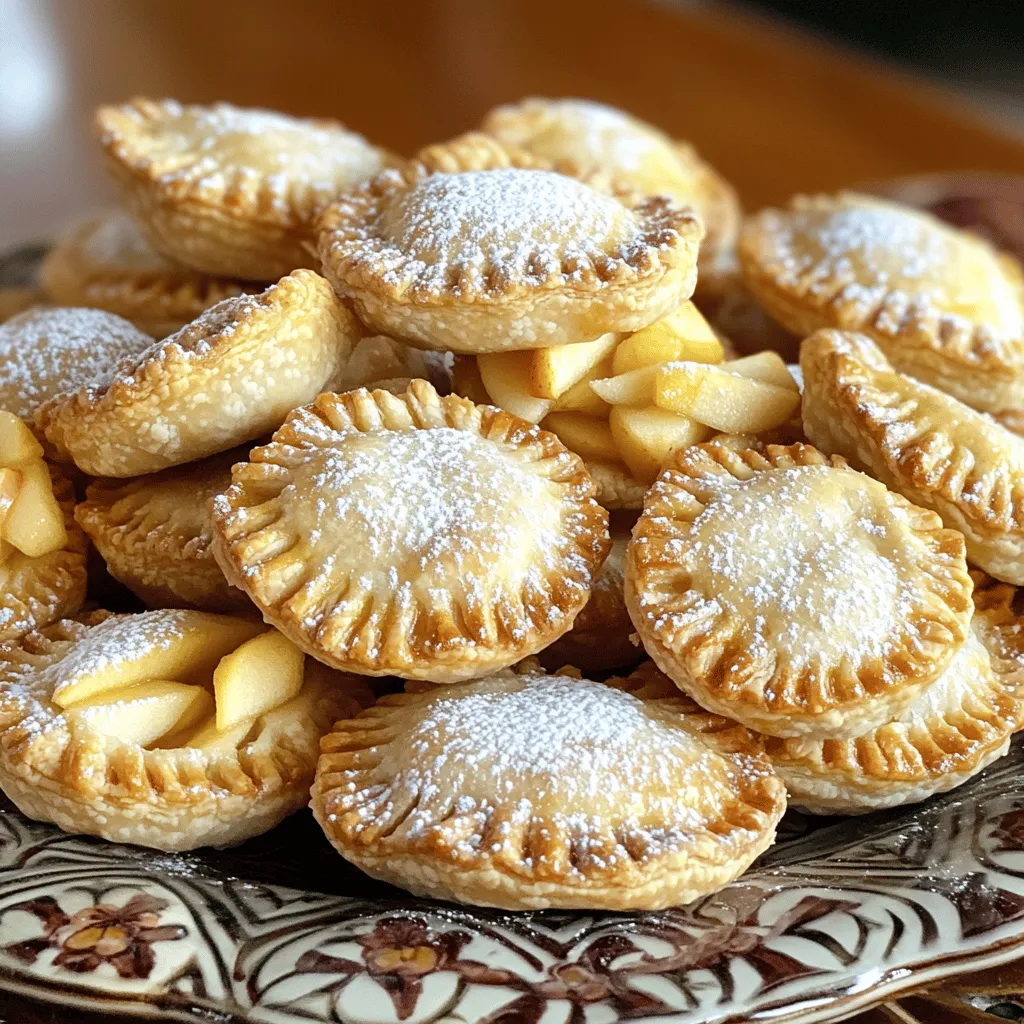
  • Presentation matters: Arrange them on a beautiful platter for a visually appealing display.
  • Dust with powdered sugar: A light sprinkle adds a touch of sweetness and elegance.

For pairing options, consider these ideas:

  • Ice cream: Vanilla ice cream complements the apple flavor perfectly.
  • Caramel sauce: Drizzle warm caramel for an extra treat.
  • Coffee or tea: A warm beverage balances the sweetness of the pies.

These tips will help you make and enjoy your mini apple hand pies even more. For the complete recipe, check the Full Recipe section.
Variations

Alternative Fillings

You can make your mini apple hand pies even more exciting with different fillings. While apples are tasty, why not try pears or berries? Both of these fruits add a sweet twist. Pears give a soft, juicy bite, while berries bring a burst of flavor. You can mix berries like blueberries or raspberries with apples for a fun blend.

Adding nuts or caramel can create a unique flavor, too. Chopped walnuts or pecans add crunch and richness. A drizzle of caramel sauce inside the pie can make each bite a sweet surprise. Just be careful not to overfill; you want to keep that flaky crust intact.

Dietary Adjustments

If you need gluten-free options, don’t worry! You can find gluten-free pie crusts at many stores. They taste great and work well. You can also make a simple crust with almond flour or coconut flour.

For those who follow a vegan diet, swap the egg wash for a mix of plant-based milk and a bit of maple syrup. This will still give your pies a nice shine. Use a vegan butter substitute in the crust for a buttery taste without the dairy. These small changes let everyone enjoy these delightful mini pies!

For the complete recipe, check out the Full Recipe section.

Storage Info

How to Store Mini Apple Hand Pies

Store your mini apple hand pies at room temperature for up to two days. Place them in an airtight container to keep them fresh and tasty. If you want to keep them longer, refrigerate them for up to one week. Just remember, refrigeration can make the crust a bit less crisp.

Reheating Tips

To reheat your hand pies, use the oven. Preheat it to 350°F (175°C). Place the pies on a baking sheet and heat for about 10 minutes. This method helps restore their lovely crunch. If you are in a hurry, you can use a microwave. Heat them for about 20-30 seconds, but know that the crust may not be as crispy. Enjoy them warm for the best taste! For the full recipe, check out the details above.

FAQs

How long do homemade mini apple hand pies last?

Homemade mini apple hand pies last about 2 to 3 days at room temperature. Keep them in an airtight container. For longer freshness, store them in the fridge. They can last up to a week when refrigerated. If you want the best taste, eat them fresh.

Can I freeze mini apple hand pies?

Yes, you can freeze mini apple hand pies! For the best results, freeze them before baking. Place the filled, unbaked pies on a tray and freeze them for about an hour. Once they are firm, transfer them to a freezer bag. You can also freeze baked pies. Just let them cool completely and then store them in a freezer bag. To enjoy, reheat them in the oven.

What type of apples are best for hand pies?

The best apples for hand pies are Granny Smith and Honeycrisp. Granny Smith apples are tart and hold their shape well during baking. Honeycrisp apples are sweet and juicy, adding a lovely flavor. You can mix both for a balanced taste.

Where can I buy mini apple hand pies?

You can find mini apple hand pies at local bakeries and some grocery stores. Check the bakery section for fresh options. Some stores may also have frozen hand pies that you can bake at home. If you want a gourmet option, look for shops with a good reputation for baked goods.

Full Recipe Availability

You can view the complete recipe details for Mini Apple Hand Pies [here](#).

You’ve learned how to make mini apple hand pies from scratch. We covered key ingredients, like the best apples and types of pie crust. You now know step-by-step instructions for mixing, prepping, and baking. We shared tips for perfect pies and delicious serving ideas. Don’t forget about fun filling variations and simple storage tips! With this guide, you can create tasty hand pies that impress every time. Enjoy the process and share them with friends and family for happy moments.

- Apples: For these pies, I love using Granny Smith or Honeycrisp apples. Granny Smith gives a nice tart flavor, while Honeycrisp adds sweetness. Both varieties hold up well during baking. You want apples that are firm and flavorful. - Sugar and Spices: I recommend using granulated sugar and a good dose of cinnamon. These two together create a warm, comforting taste. You can also add a bit of lemon juice for brightness. Cornstarch helps to thicken the filling so it doesn’t run out when you bite in. - Pie Crust: You can use a package of refrigerated pie crusts. They save time and work well. Look for brands that use simple ingredients. If you like, you can even make your own crust, but the store-bought ones are great for quick prep. These ingredients come together to create a tasty treat. For the full recipe, you can check out the details I provided earlier. Enjoy making your mini apple hand pies! To start, grab a medium bowl. In this bowl, mix together the diced apples, granulated sugar, cinnamon, lemon juice, cornstarch, and a pinch of salt. Make sure you stir it well. This mixture is key for flavor. Let it sit for about 15 minutes. This resting time helps the flavors blend and taste better. While your filling rests, it's time to preheat your oven. Set it to 400°F (200°C). This is important because the right temperature gives the hand pies a nice, golden brown finish. Next, line a baking sheet with parchment paper. This helps the pies bake evenly and prevents sticking. Now, let's roll out the dough. Unroll the refrigerated pie crusts on a lightly floured surface. Use a rolling pin to gently smooth out any creases. This step makes the dough easier to work with. Next, use a round cutter that is about 4-5 inches wide to cut out circles. If you have scraps, gather and re-roll them to make more circles. With your dough circles ready, it’s time to fill them. Place 1-2 tablespoons of the apple filling in the center of each circle. Be careful not to overfill. Then, fold the dough over to make a half-moon shape. Press the edges together gently. Use a fork to crimp the edges. This seals the filling inside. For a golden finish, make an egg wash. In a small bowl, whisk the beaten egg with a tablespoon of milk. Brush this mixture over the top of each hand pie. This step adds a nice shine and color. Place the filled hand pies on your prepared baking sheet. Bake them in the preheated oven for 20-25 minutes. Watch for a golden brown color. This shows they are done. Once baked, remove them from the oven. Let them cool for a bit before serving. Enjoy your mini apple hand pies! For the complete recipe, check the Full Recipe section. To make your hand pies truly special, focus on the crust. A flaky crust is the key to a great pie. Here are some tips to ensure your crust shines: - Use cold ingredients: Keep your butter and water cold. This helps create steam, which makes the crust flaky. - Don’t overwork the dough: Mix just until combined. Overworking can make the crust tough. - Chill the dough: After mixing, wrap the dough and chill it for at least 30 minutes. This relaxes the gluten. To avoid a soggy bottom crust, consider these steps: - Pre-bake the crust: A quick bake before filling helps set the crust. - Use cornstarch: Adding cornstarch to your filling can help absorb excess moisture. - Don’t overfill: Stick to the recommended amount of filling. Overfilling can cause leaks. How you serve your mini apple hand pies can elevate the experience. Here are the best ways to serve them: - Serve warm: Freshly baked pies taste best when warm. This enhances the flavors. - Presentation matters: Arrange them on a beautiful platter for a visually appealing display. - Dust with powdered sugar: A light sprinkle adds a touch of sweetness and elegance. For pairing options, consider these ideas: - Ice cream: Vanilla ice cream complements the apple flavor perfectly. - Caramel sauce: Drizzle warm caramel for an extra treat. - Coffee or tea: A warm beverage balances the sweetness of the pies. These tips will help you make and enjoy your mini apple hand pies even more. For the complete recipe, check the Full Recipe section. {{image_2}} You can make your mini apple hand pies even more exciting with different fillings. While apples are tasty, why not try pears or berries? Both of these fruits add a sweet twist. Pears give a soft, juicy bite, while berries bring a burst of flavor. You can mix berries like blueberries or raspberries with apples for a fun blend. Adding nuts or caramel can create a unique flavor, too. Chopped walnuts or pecans add crunch and richness. A drizzle of caramel sauce inside the pie can make each bite a sweet surprise. Just be careful not to overfill; you want to keep that flaky crust intact. If you need gluten-free options, don’t worry! You can find gluten-free pie crusts at many stores. They taste great and work well. You can also make a simple crust with almond flour or coconut flour. For those who follow a vegan diet, swap the egg wash for a mix of plant-based milk and a bit of maple syrup. This will still give your pies a nice shine. Use a vegan butter substitute in the crust for a buttery taste without the dairy. These small changes let everyone enjoy these delightful mini pies! For the complete recipe, check out the Full Recipe section. Store your mini apple hand pies at room temperature for up to two days. Place them in an airtight container to keep them fresh and tasty. If you want to keep them longer, refrigerate them for up to one week. Just remember, refrigeration can make the crust a bit less crisp. To reheat your hand pies, use the oven. Preheat it to 350°F (175°C). Place the pies on a baking sheet and heat for about 10 minutes. This method helps restore their lovely crunch. If you are in a hurry, you can use a microwave. Heat them for about 20-30 seconds, but know that the crust may not be as crispy. Enjoy them warm for the best taste! For the full recipe, check out the details above. Homemade mini apple hand pies last about 2 to 3 days at room temperature. Keep them in an airtight container. For longer freshness, store them in the fridge. They can last up to a week when refrigerated. If you want the best taste, eat them fresh. Yes, you can freeze mini apple hand pies! For the best results, freeze them before baking. Place the filled, unbaked pies on a tray and freeze them for about an hour. Once they are firm, transfer them to a freezer bag. You can also freeze baked pies. Just let them cool completely and then store them in a freezer bag. To enjoy, reheat them in the oven. The best apples for hand pies are Granny Smith and Honeycrisp. Granny Smith apples are tart and hold their shape well during baking. Honeycrisp apples are sweet and juicy, adding a lovely flavor. You can mix both for a balanced taste. You can find mini apple hand pies at local bakeries and some grocery stores. Check the bakery section for fresh options. Some stores may also have frozen hand pies that you can bake at home. If you want a gourmet option, look for shops with a good reputation for baked goods. You can view the complete recipe details for Mini Apple Hand Pies [here](#). You’ve learned how to make mini apple hand pies from scratch. We covered key ingredients, like the best apples and types of pie crust. You now know step-by-step instructions for mixing, prepping, and baking. We shared tips for perfect pies and delicious serving ideas. Don’t forget about fun filling variations and simple storage tips! With this guide, you can create tasty hand pies that impress every time. Enjoy the process and share them with friends and family for happy moments.

Mini Apple Hand Pies

Indulge in the deliciousness of Mini Apple Hand Pies with this easy recipe! Bursting with flavors from fresh apples, cinnamon, and a golden crust, these delightful treats are perfect for any occasion. Learn how to make these scrumptious handheld desserts in just 50 minutes. Click through to explore the full recipe and impress your family and friends with your baking skills! Your taste buds will thank you!

Ingredients
  

2 large apples (Granny Smith or Honeycrisp), peeled and diced

1/4 cup granulated sugar

1 teaspoon cinnamon

1 tablespoon lemon juice

1 tablespoon cornstarch

1 package of refrigerated pie crusts (2 crusts)

1 egg, beaten (for egg wash)

1 tablespoon milk (for egg wash)

Pinch of salt

Optional: powdered sugar for dusting

Instructions
 

Prepare the Apple Filling: In a medium bowl, combine the diced apples, granulated sugar, cinnamon, lemon juice, cornstarch, and a pinch of salt. Mix well and set aside to allow the flavors to meld for about 15 minutes.

    Preheat the Oven: While the filling rests, preheat your oven to 400°F (200°C) and line a baking sheet with parchment paper.

      Roll Out the Dough: Unroll the refrigerated pie crusts on a lightly floured surface. Using a rolling pin, gently roll each crust to smooth out any creases.

        Cut Out the Dough: Use a round cutter (about 4-5 inches in diameter) to cut out circles from the dough. Gather and re-roll any scraps to cut more circles.

          Fill the Hand Pies: Place about 1-2 tablespoons of the apple filling in the center of each dough circle, making sure not to overfill.

            Seal the Pies: Fold the dough over to create a half-moon shape. Press the edges together gently and use a fork to crimp the edges, sealing the filling inside.

              Prepare the Egg Wash: In a small bowl, whisk the beaten egg with the milk. Brush this mixture over the top of each hand pie to give them a beautiful golden color when baked.

                Bake the Pies: Place the filled hand pies on the prepared baking sheet. Bake in the preheated oven for 20-25 minutes, or until they are golden brown.

                  Cool and Serve: Remove from the oven and let cool slightly. If desired, dust with powdered sugar before serving.

                    Prep Time, Total Time, Servings: 30 min | 50 min | Makes about 12 mini pies.

                      - Presentation Tips: Serve on a decorative platter, ideally warm, and pair with a scoop of vanilla ice cream for an added treat!

                        Leave a Comment

                        Recipe Rating