
Are you ready to elevate your dessert game? The King’s Hawaiian Cheesecake Danish is a sweet twist that brings joy to any table. This easy recipe combines soft, fluffy King’s Hawaiian rolls with a rich cream cheese filling. Don’t worry if you’re new to baking—I’ll guide you every step of the way. Grab your ingredients, and let’s make something delightful!
Ingredients
Main Ingredients for King’s Hawaiian Cheesecake Danish
– 1 package of King’s Hawaiian Sweet Rolls (12 rolls)
– 8 oz cream cheese, softened
– 1/2 cup powdered sugar
– 1 teaspoon vanilla extract
– 1/4 cup sour cream
– 1 tablespoon lemon juice
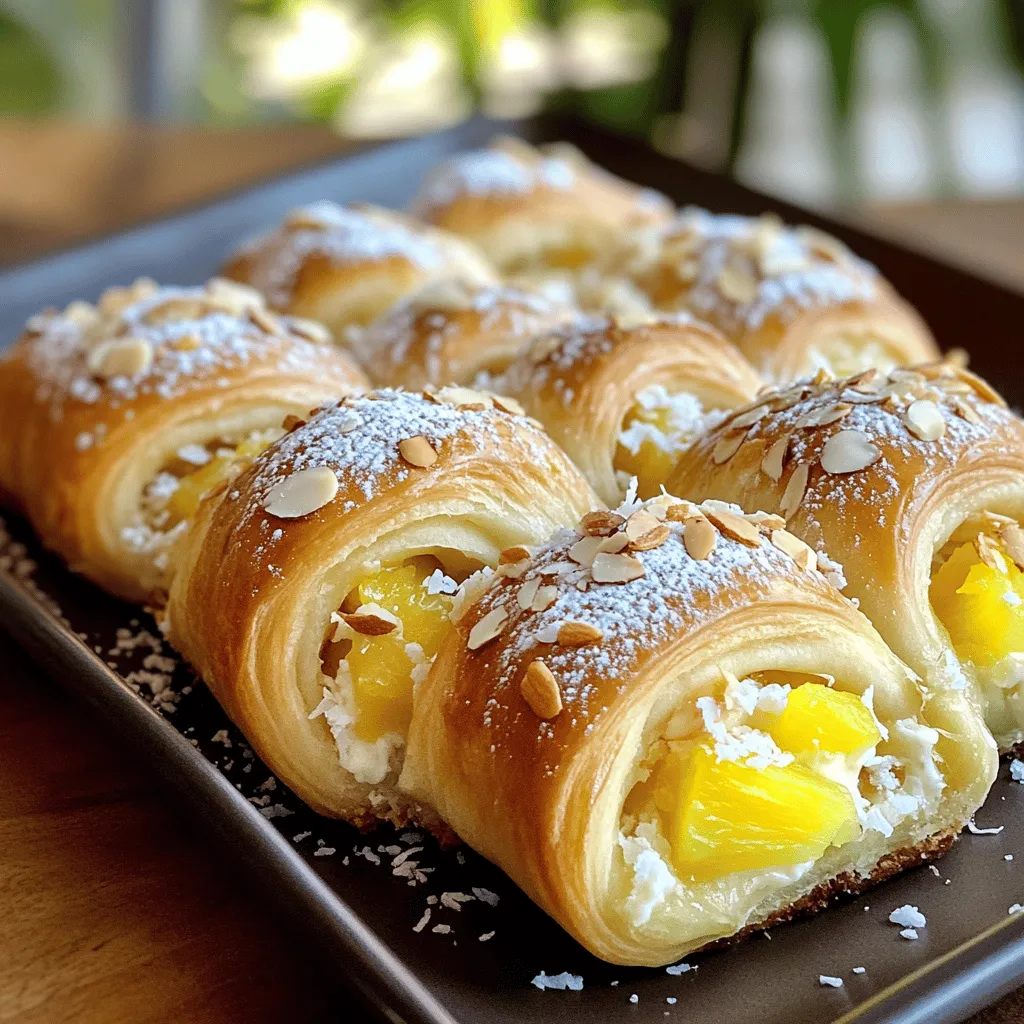
– 1/4 cup crushed pineapple, drained
– 1 egg (for egg wash)
– Optional: Sliced almonds or shredded coconut for topping
The main star of our dessert is the King’s Hawaiian Sweet Rolls. These rolls are soft and sweet. They give a lovely base for the cheesecake filling. The cream cheese mixture is rich and smooth. You mix cream cheese, powdered sugar, and vanilla for a sweet touch. Adding sour cream and lemon juice helps balance the flavors. Crushed pineapple adds a tropical twist, making each bite bright and fresh.
Required Kitchen Tools
– Mixing Bowls
– Baking Sheet
– Whisk
You will need a few tools to make this Danish. Mixing bowls are essential for combining ingredients. A baking sheet is needed to hold the Danish while they bake. Lastly, a whisk helps blend the cream cheese mixture smoothly. These tools make the process simple and fun. You can easily find all of them in your kitchen.Enjoy creating this tasty treat!
Step-by-Step Instructions
Preparation
– Preheat Oven
First, set your oven to 350°F (175°C). This warm-up step is key for even baking.
– Prepare Cream Cheese Mixture
In a mixing bowl, beat the softened cream cheese until it’s smooth. Then, add the powdered sugar, vanilla extract, sour cream, lemon juice, and crushed pineapple. Mix it well until you have a fluffy and creamy texture. This mixture gives the Danish its sweet, tangy flavor.
Assembling the Danish
– Flattening the Rolls
Take your King’s Hawaiian Sweet Rolls and gently separate them. Flatten each roll slightly with your fingers. This will create a nice base for the filling.
– Filling the Rolls
Spoon a generous amount of the cream cheese mixture into the center of each flattened roll. Fold the edges over to form a pouch. Pinch the seams to seal them well. This keeps the filling from spilling out while baking.
Baking Process
– Egg Wash Application
In a small bowl, whisk the egg to create the egg wash. Brush this mixture on top of each Danish. This step gives them a lovely golden color.
– Baking Time and Temperature
Place the filled rolls seam side down on a parchment-lined baking sheet. Bake in the preheated oven for 18-20 minutes. Keep an eye on them. They should turn golden brown and smell amazing when done.
Tips & Tricks
Perfecting the Cream Cheese Mixture
To make the cream cheese mixture just right, start with sweetness. You can adjust it to your taste. If you want it sweeter, add a bit more powdered sugar. Taste it as you mix to find your perfect level.
Next, focus on cream cheese consistency. Make sure it’s very soft. Let it sit out for a bit, or microwave it for a few seconds. This will help it blend smoothly. A smooth mixture spreads better and tastes great.
Ensuring Even Baking
Place your baking sheet in the center of the oven. This helps the heat spread evenly. If the rolls are too close to the top or bottom, they might bake unevenly.
Keep an eye on baking times. Start checking at 18 minutes. The rolls should be golden brown. If they need more time, check them every two minutes. This helps you avoid overbaking.
Serving Suggestions
These rolls taste best warm. Serve them right out of the oven for maximum flavor.
For pairings, think about fresh fruit or a scoop of vanilla ice cream. The sweet rolls go well with sweet toppings. You can also drizzle some honey for an extra touch. Enjoy them with friends for a delightful treat.
Variations
Flavor Variations
Add-ins for Cream Cheese Mixture
You can make the cream cheese mixture even more fun. Try adding:
– Fresh berries like blueberries or strawberries
– Chocolate chips for a sweet kick
– Lemon zest for a bright flavor
– A dash of cinnamon for warmth
These additions can bring new tastes to your Danish. Mix in your chosen add-ins before filling the rolls.
Alternative Toppings
Toppings can change the look and taste of your Danish. Consider these options:
– Drizzled chocolate for a sweet touch
– Fresh fruit like kiwi or mango for color
– Caramel sauce for a rich finish
These toppings not only enhance flavor but also make your Danish more appealing to the eye.
Dietary Modifications
Gluten-Free Options
If you need a gluten-free treat, use gluten-free sweet rolls. Many brands offer good options that taste great. Just ensure your cream cheese and other ingredients are gluten-free too.
Vegan Substitutes
For a vegan version, swap the cream cheese with a plant-based cream cheese. Instead of an egg wash, use almond milk or a flax egg to achieve a nice golden color. These changes make it easy for everyone to enjoy this dessert.
Mini Versions
Creating Mini Danish
To make mini Danish, cut each roll into smaller pieces. Fill with the cream cheese mixture like before. These bite-sized treats are perfect for parties or snacks.
Baking Times for Smaller Portions
Mini Danish will bake faster than full-sized ones. Check them around 12-15 minutes to avoid overbaking. Keep an eye on them until they turn golden brown.
Feel free to explore these variations! You can adjust the recipe to fit your taste and needs.
Storage Info
Storing Leftovers
To keep your King’s Hawaiian Cheesecake Danish fresh, store it in the fridge. Place the cooled Danish in an airtight container. This helps prevent them from drying out. They can stay fresh for about three days in the fridge. If you want to keep them longer, freezing is a great choice.
To freeze, wrap each Danish tightly in plastic wrap. Then, place them in a freezer-safe bag. This keeps them tasty for up to three months. When you’re ready to enjoy them, simply thaw them in the fridge overnight.
Reheating Instructions
When reheating, you have two options: the oven or the microwave. For the best results, use the oven. Preheat it to 350°F (175°C). Place the Danish on a baking sheet and heat for about 10 minutes. This method keeps them warm and crispy.
If you’re short on time, the microwave works too. Heat each Danish for about 20-30 seconds. Be careful not to overheat them, as this can make them chewy. Enjoy the warm, gooey goodness!
FAQs
What is a King’s Hawaiian Cheesecake Danish?
A King’s Hawaiian Cheesecake Danish is a sweet pastry made from King’s Hawaiian Sweet Rolls. These rolls are soft, fluffy, and slightly sweet. Inside, you find a rich cream cheese filling mixed with pineapple, sugar, and vanilla. The combination of flavors creates a delightful treat. When baked, they turn golden brown, making them look as good as they taste.
Where can I buy King’s Hawaiian Cheesecake Danish?
You can find King’s Hawaiian Cheesecake Danish at many grocery stores. Look in the bakery section for King’s Hawaiian Sweet Rolls. Stores like Walmart, Kroger, or Target often carry them. If they are not available, you can also check online. Many stores offer delivery options or curbside pickup.
Can I make this recipe ahead of time?
Yes, you can prepare this recipe ahead of time. You can make the cream cheese filling and store it in the fridge. Keep it in an airtight container. You can also assemble the Danish and keep them in the fridge before baking. Just cover them with plastic wrap. Bake them when you are ready to enjoy.
How do I know when the Danish is done?
You can tell the Danish is done by its color. They should be golden brown on top. If you tap the bottom, it should sound hollow. Another tip is to check the filling. It should be warm and bubbly. These signs mean your rolls are perfectly baked and ready to eat.
This blog post covered how to make a King’s Hawaiian Cheesecake Danish. We explored key ingredients, the right tools, and step-by-step instructions for assembly and baking. I shared tips for getting the cream cheese just right and recommended flavor and dietary variations. We also discussed how to store and reheat leftovers, plus answered frequently asked questions.
Enjoy your delicious creation! This treat is sure to impress.