If you love the rich taste of chocolate and the cool bite of peppermint, you’ll adore these Double Chocolate Peppermint Cookies. They are the perfect festive treat for any holiday gathering. With simple ingredients and easy steps, you can impress friends and family with these sweet delights. Let’s dive into the recipe and create some magical cookies that will warm your home and your heart!
Ingredients
Complete List of Ingredients
– 1 cup all-purpose flour
– 1/2 cup unsweetened cocoa powder
– 1/2 teaspoon baking soda
– 1/4 teaspoon salt
– 1/2 cup unsalted butter, softened
– 1 cup granulated sugar
– 1/2 cup brown sugar, packed
– 1 large egg
– 1 teaspoon vanilla extract
– 1/2 teaspoon peppermint extract
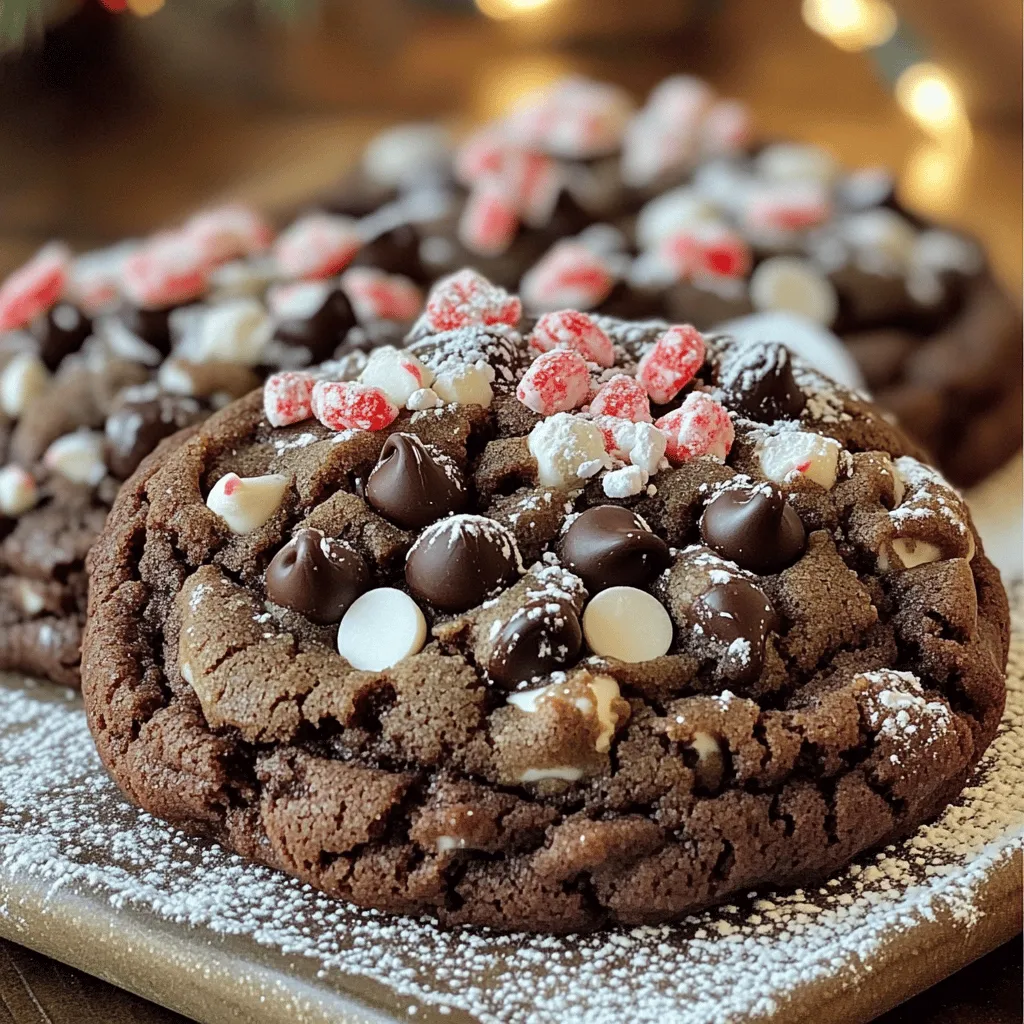
– 1 cup semi-sweet chocolate chips
– 1/2 cup crushed peppermint candies (plus extra for topping)
Notes on Ingredient Quality
When you bake, the quality of your ingredients matters. Use fresh cocoa powder for a rich taste. Select good chocolate chips; they make a big difference. I prefer semi-sweet chocolate, but you can use dark or milk chocolate too. For peppermint, use pure peppermint extract for the best flavor. It is stronger and more natural than imitation extracts. Choose unsalted butter to control the salt in your cookies.
Possible Substitutions
If you’re out of an ingredient, don’t worry! You can swap all-purpose flour with gluten-free flour for a gluten-free option. Instead of brown sugar, you can use coconut sugar. For a dairy-free version, try vegan butter and dairy-free chocolate chips. If you can’t find peppermint extract, use almond extract for a different twist. Just remember, the taste will change a bit, but it can still be tasty!
Step-by-Step Instructions
Preparation Steps
1. First, preheat your oven to 350°F (175°C). This ensures even baking.
2. Next, line your baking sheets with parchment paper. This helps prevent sticking.
3. In a medium bowl, whisk together the flour, cocoa powder, baking soda, and salt. This mixes the dry ingredients well.
Mixing Wet and Dry Ingredients
1. In a large bowl, cream together the softened butter, granulated sugar, and brown sugar. Mix until light and fluffy. This step adds air to the dough.
2. Then, beat in one large egg, vanilla extract, and peppermint extract. Mix until everything is well combined. This adds flavor and moisture to your cookies.
Final Dough Preparation
1. Gradually add the dry ingredients to the wet mixture. Mix until just combined. Be careful not to over-mix; this keeps your cookies soft.
2. Fold in the semi-sweet chocolate chips and crushed peppermint candies gently. This adds a fun crunch in every bite.
3. Now, drop tablespoon-sized balls of dough onto your prepared sheets. Space them about 2 inches apart. This gives them room to spread.
4. Sprinkle extra crushed peppermint candies on top of each cookie. This adds a festive touch.
Tips & Tricks
Baking Advice
– Ideal oven settings: Preheat your oven to 350°F (175°C). This heat level ensures the cookies bake evenly. If your oven has hot spots, rotate the trays halfway through baking for even results.
– How to check cookie doneness: Look for edges that are set while the centers remain soft. You can gently press a cookie with a finger; if it springs back, it’s done.
Presentation Tips
– Serving options: Arrange the cookies on a festive platter. This adds a cheerful touch to your dessert table. You can also stack them in a clear jar for a fun display.
– Garnishing ideas: Finish your cookies with a sprinkle of powdered sugar or extra crushed peppermint. Whole peppermint sticks or chocolate shavings make lovely garnishes too.
Enhancement Techniques
– Adding toppings or drizzles: Drizzle melted chocolate over the cooled cookies for extra richness. You can also sprinkle sea salt for a sweet and salty twist.
– Experimenting with different melts: Try using white chocolate or dark chocolate melts instead of semi-sweet. This adds new flavors and fun colors to your cookies.

Variations
Alternating Ingredients
You can have fun with different types of chocolate chips. Try using dark chocolate or white chocolate chips instead of semi-sweet. This small change can give your cookies a new taste. You can also mix in some mint chocolate chips for an extra kick.
Flavored extracts can change the vibe of your cookies. Instead of peppermint extract, use orange or almond extract. This twist can create a unique flavor for special occasions. Don’t be afraid to experiment!
Dietary Modifications
If you need gluten-free options, you can swap all-purpose flour for gluten-free flour. Many brands offer a great gluten-free blend. This will keep the cookie’s texture while making it safe for gluten-free diets.
For dairy-free substitutions, use coconut oil or vegan butter in place of regular butter. It works well and keeps the cookies soft and tasty. You can also pick dairy-free chocolate chips for a treat everyone can enjoy.
Seasonal Variations
These cookies can fit any holiday with a few changes. For Valentine’s Day, add pink sprinkles or heart shapes. For Halloween, use orange and black toppings.
For theme-based decorations, consider using different colors of frosting or icing. You can even press in seasonal candies to make them pop. Adapting the look can make these cookies perfect for any festive occasion.
Storage Info
Short-term Storage
To keep your double chocolate peppermint cookies fresh, store them in an airtight container. This helps maintain their chewy texture. You can also layer them with parchment paper to prevent sticking. Keep the container at room temperature for up to a week. If you want a special touch, add a slice of bread to the container. This keeps the cookies soft and moist.
Long-term Storage
Freezing cookies is a great way to enjoy them later. To freeze, let the cookies cool completely first. Then, place them in a single layer on a baking sheet. Freeze for about two hours until solid. After that, transfer them to a freezer-safe bag or container. Label the bag with the date. You can store them for up to three months. When you want a cookie, just take out the amount you need.
Reheating Tips
To revive stored cookies, preheat your oven to 350°F (175°C). Place the cookies on a baking sheet. Heat them for about 5 to 7 minutes. This warms them up and restores their soft texture. You can also use the microwave if you’re in a hurry. Heat each cookie for about 10 to 15 seconds. Enjoy your warm, delicious cookies again!
FAQs
Common Questions
How to make cookies chewy?
To make cookies chewy, use brown sugar. It adds moisture. Also, don’t overmix the dough. This keeps the cookies soft. Bake them just until the edges are set. This way, the centers stay gooey.
Can I make the dough ahead of time?
Yes, you can make the dough ahead. Wrap it tightly in plastic wrap. Store it in the fridge for up to three days. You can also freeze it for up to three months. Just thaw it in the fridge before baking.
Ingredient Queries
What if I don’t have peppermint extract?
If you don’t have peppermint extract, use vanilla instead. The cookies will still taste great. You can also try almond extract for a different twist. Just adjust the amount to match your taste.
Can I substitute brown sugar for white sugar?
Yes, you can substitute brown sugar for white sugar. Brown sugar adds moisture and a deeper flavor. This will change the texture slightly, making it chewier. Use the same amount in your recipe for the best results.
Baking Troubleshooting
Why are my cookies flat?
Cookies can turn flat for several reasons. Too much butter or not enough flour can cause this. Also, check that the baking soda is fresh. Finally, chilling the dough can help prevent flat cookies.
How to ensure even baking?
To ensure even baking, use the same size cookie scoop for each dough ball. Space them evenly on the baking sheet. Rotate the baking sheets halfway through the baking time. This helps cookies bake evenly.
This blog post covered all you need for great cookies. We listed each ingredient and why quality matters. You learned step-by-step how to mix and bake perfectly. Plus, you got tips for presentation and ways to change the recipe for fun. Storage tips help you keep cookies fresh longer. Remember, baking is about trying new things and enjoying the process. Get creative and share these treats with friends!