Caramel Apple Cheesecake Jars Delightful Dessert Treat

WANT TO SAVE THIS RECIPE?

Are you ready to indulge in a dessert that combines creamy cheesecake with sweet caramel apples? In my blog post, Caramel Apple Cheesecake Jars: Delightful Dessert Treat, I’ll guide you through every step. From gathering the ingredients to assembling your jars, it’s all simple and fun! Get ready to impress your family and friends with this delicious treat that’s perfect for any occasion. Let’s dive into this easy recipe together!

Ingredients

List of Required Ingredients

To make your caramel apple cheesecake jars, you will need:

  • 2 large apples, peeled and chopped
  • 2 tablespoons unsalted butter
  • 1/4 cup brown sugar
  • 1 teaspoon cinnamon
  • 1 cup cream cheese, softened
  • 1/2 cup powdered sugar
  • 1 cup heavy cream
  • 1 teaspoon vanilla extract
  • 1 cup graham cracker crumbs
  • 1/4 cup caramel sauce (plus extra for drizzling)

Ingredient Notes and Substitutions

  • Apples: I love using sweet apples like Fuji or Honeycrisp for a tasty treat. You can swap them with tart apples, too.
  • Unsalted Butter: If you use salted butter, reduce the added salt or skip it.
  • Brown Sugar: Light or dark brown sugar works well. Dark adds a richer flavor, while light is milder.
  • Cream Cheese: For a lighter version, use low-fat cream cheese.
  • Heavy Cream: You can substitute with whipped topping for a quicker option.

Optional Toppings and Garnishes

For extra fun, consider these toppings:

  • Whipped cream for a fluffy touch
  • Chopped nuts, like pecans or walnuts, for crunch
  • A sprinkle of cinnamon or nutmeg for spice
  • Extra caramel sauce drizzled on top for sweetness

Step-by-Step Instructions

Preparing the Caramelized Apples

Start by melting the unsalted butter in a skillet over medium heat. Once the butter melts, add the chopped apples. Sprinkle the brown sugar and cinnamon over the apples. Cook for about 5 to 7 minutes. Stir often while cooking. You want the apples to soften and turn golden brown. After they are done, remove the skillet from the heat and let the apples cool.

Making the Cheesecake Filling

In a mixing bowl, add the softened cream cheese. Use a hand mixer to beat it with the powdered sugar and vanilla extract. Mix until the filling is smooth and creamy. In another bowl, whip the heavy cream until it forms stiff peaks. Gently fold the whipped cream into the cream cheese mixture. This step makes your filling light and airy.

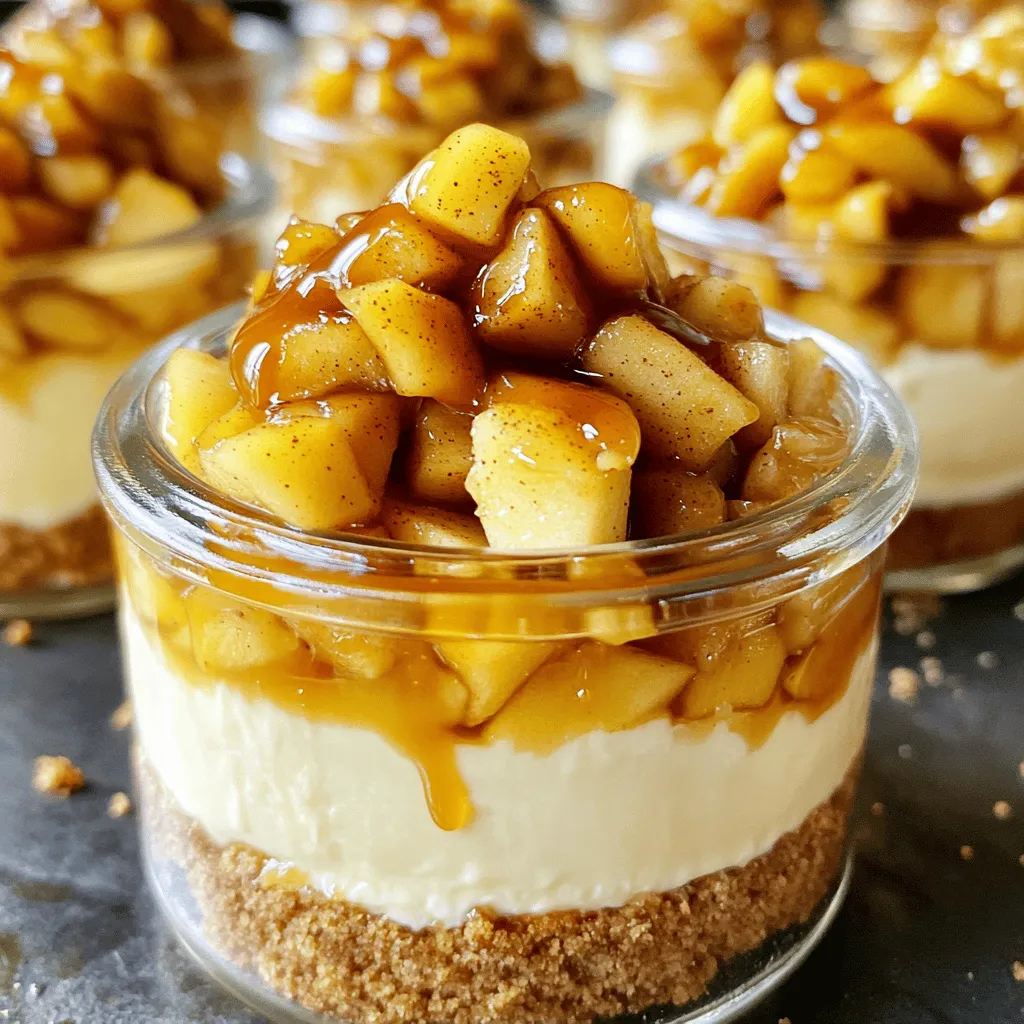
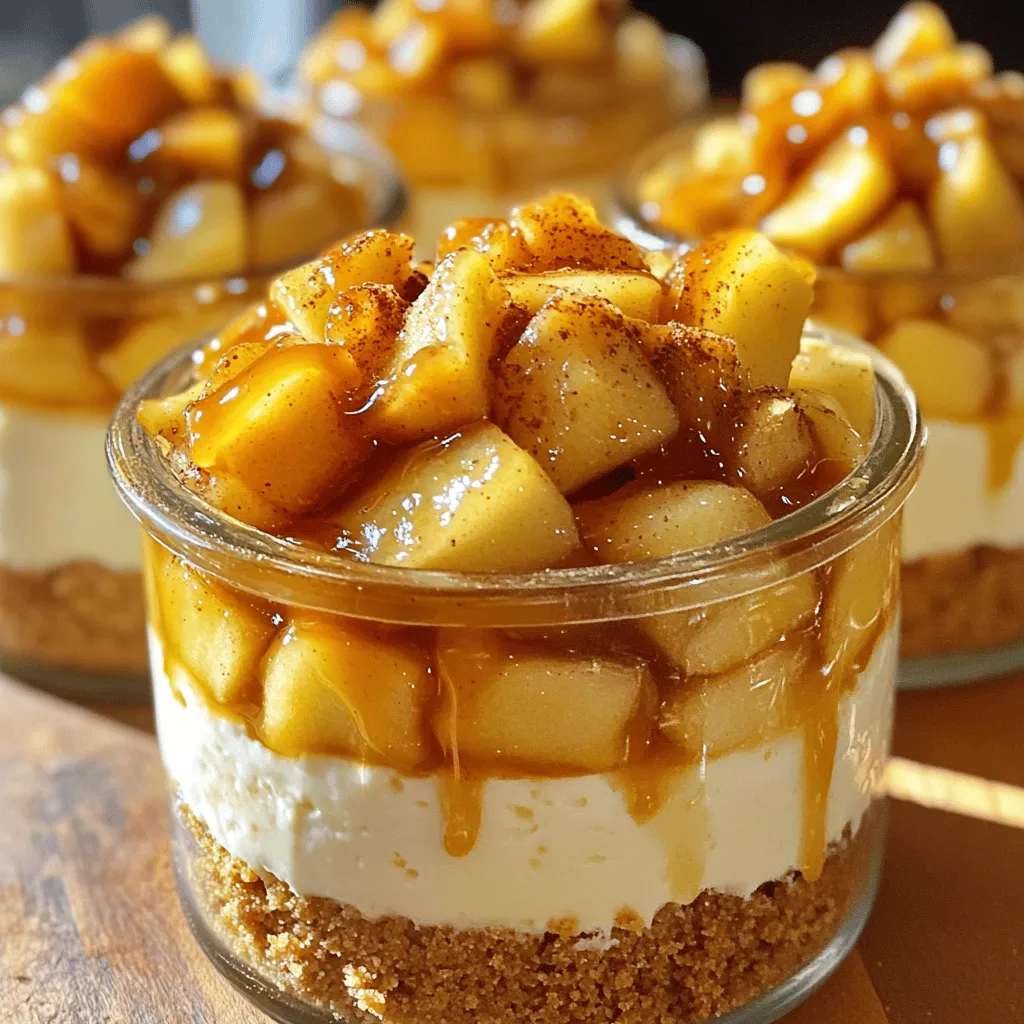
Assembling the Cheesecake Jars

Grab small jars or dessert cups for this step. Start by adding a layer of graham cracker crumbs at the bottom of each jar. Next, add a layer of the cheesecake filling. Follow that with a layer of the caramelized apples. Repeat these layers until the jars are full. Finish with a dollop of cheesecake filling on top for a nice look.

Chilling and Final Touches

Cover the jars with lids or plastic wrap. Refrigerate them for at least 2 hours. This chilling time helps the flavors blend and sets the cheesecake. Just before serving, drizzle some extra caramel sauce over the top of each jar. This adds sweetness and makes them look even more tempting.

Tips & Tricks

Common Mistakes to Avoid

One mistake is overcooking the apples. Cook them just until soft. This keeps them juicy and tasty. Another mistake is not chilling the jars long enough. They need at least two hours to set. If you skip this, the layers may mix, and your jars won’t look pretty. Lastly, don’t be shy with the caramel. A good drizzle on top makes it better!

Serving Suggestions

These jars are great for parties or family dinners. You can serve them in small jars or cups. They look cute and are easy to grab. Add a sprinkle of cinnamon or some nuts on top for crunch. You can even serve them with whipped cream on the side. Everyone loves a little extra cream!

Enhancing Flavor and Texture

To boost the flavor, try adding a pinch of nutmeg or allspice to the apples. This gives them a warm, cozy taste. For texture, mix in some chopped nuts or toffee bits in the layers. This adds a nice crunch that contrasts with the creamy cheesecake. You could also use flavored whipped cream for a fun twist.

Variations

Chocolate Caramel Apple Cheesecake Jars

You can add chocolate to your caramel apple cheesecake jars for a fun twist. Start by mixing in cocoa powder into the cream cheese filling. This will give it a rich chocolate flavor. You can also use chocolate graham crackers instead of regular ones for the crust. Drizzle chocolate sauce on top with caramel for an extra treat.

Gluten-Free or Dairy-Free Options

To make these jars gluten-free, use gluten-free graham crackers. For a dairy-free option, swap out the cream cheese with a dairy-free cream cheese alternative. You can also use coconut cream instead of heavy cream for a lighter texture. These changes still keep the flavor rich and tasty, letting everyone enjoy this dessert.

Seasonal Flavor Additions

You can change the flavors based on the seasons. In fall, add pumpkin spice to the filling for a cozy vibe. For summer, try mixing in fresh berries with the apples. In winter, add a hint of peppermint to the cream for a festive touch. These small changes can make your cheesecake jars fit any time of year!

Storage Info

How to Store Cheesecake Jars

To keep your caramel apple cheesecake jars fresh, store them in the fridge. Use airtight containers or keep the jars covered with lids or plastic wrap. This way, the cheesecake stays creamy and the flavors stay bright. It’s best to avoid letting them sit out too long to prevent spoilage.

Freezing Instructions

You can freeze these cheesecake jars for later. First, make sure they are tightly sealed. Use freezer-safe containers or wrap the jars well. They can last in the freezer for up to three months. When ready to enjoy, thaw them in the fridge overnight. Do not refreeze after thawing.

Shelf Life and Best Practices

These cheesecake jars will last about 3-5 days in the fridge. To enjoy the best taste, eat them within this time frame. Always check for any signs of spoilage, like unusual smells or changes in texture. If you notice anything off, it’s best to toss them. Enjoy them fresh for the best flavor and texture!

FAQs

Can I use different fruits in the recipe?

Yes, you can swap apples for other fruits. Pears, peaches, or berries work well too. Each fruit adds a unique flavor. Just adjust the sugar and spices to match the fruit you choose. For example, use nutmeg with pears for a warm taste.

How long can I keep the cheesecake jars in the fridge?

You can store the cheesecake jars in the fridge for up to five days. Make sure to cover them well. This keeps the cheesecake fresh and tasty. If you notice any change in smell or texture, it’s best to toss them.

Can I prepare these jars in advance?

Absolutely! You can make the jars a day or two before serving. Just follow the steps and chill them. This gives the flavors time to mix. Plus, it saves you time on the day of your event.

What is the best way to serve these cheesecake jars?

Serve the jars chilled straight from the fridge. Drizzle extra caramel sauce on top for a sweet touch. You can also add a sprinkle of cinnamon for extra flavor. These jars look great on a dessert table or as a treat after dinner.

Is it possible to make the cheesecake without heavy cream?

Yes, you can skip the heavy cream if you want a lighter version. Use Greek yogurt or whipped coconut cream instead. This will change the texture a bit but still taste great. Just make sure to whip it well for a creamy mix.

This blog post covered everything you need for delicious cheesecake jars. We explored key ingredients, step-by-step instructions, and vital tips. You learned about fun variations and smart storage methods. Remember to avoid common mistakes for the best results.

Try mixing your favorite fruits or flavors to make it special. Enjoy the process and share with friends or family. These cheesecake jars can be a hit at any gathering! Your journey to perfect cheesecake begins now.

To make your caramel apple cheesecake jars, you will need: - 2 large apples, peeled and chopped - 2 tablespoons unsalted butter - 1/4 cup brown sugar - 1 teaspoon cinnamon - 1 cup cream cheese, softened - 1/2 cup powdered sugar - 1 cup heavy cream - 1 teaspoon vanilla extract - 1 cup graham cracker crumbs - 1/4 cup caramel sauce (plus extra for drizzling) - Apples: I love using sweet apples like Fuji or Honeycrisp for a tasty treat. You can swap them with tart apples, too. - Unsalted Butter: If you use salted butter, reduce the added salt or skip it. - Brown Sugar: Light or dark brown sugar works well. Dark adds a richer flavor, while light is milder. - Cream Cheese: For a lighter version, use low-fat cream cheese. - Heavy Cream: You can substitute with whipped topping for a quicker option. For extra fun, consider these toppings: - Whipped cream for a fluffy touch - Chopped nuts, like pecans or walnuts, for crunch - A sprinkle of cinnamon or nutmeg for spice - Extra caramel sauce drizzled on top for sweetness Start by melting the unsalted butter in a skillet over medium heat. Once the butter melts, add the chopped apples. Sprinkle the brown sugar and cinnamon over the apples. Cook for about 5 to 7 minutes. Stir often while cooking. You want the apples to soften and turn golden brown. After they are done, remove the skillet from the heat and let the apples cool. In a mixing bowl, add the softened cream cheese. Use a hand mixer to beat it with the powdered sugar and vanilla extract. Mix until the filling is smooth and creamy. In another bowl, whip the heavy cream until it forms stiff peaks. Gently fold the whipped cream into the cream cheese mixture. This step makes your filling light and airy. Grab small jars or dessert cups for this step. Start by adding a layer of graham cracker crumbs at the bottom of each jar. Next, add a layer of the cheesecake filling. Follow that with a layer of the caramelized apples. Repeat these layers until the jars are full. Finish with a dollop of cheesecake filling on top for a nice look. Cover the jars with lids or plastic wrap. Refrigerate them for at least 2 hours. This chilling time helps the flavors blend and sets the cheesecake. Just before serving, drizzle some extra caramel sauce over the top of each jar. This adds sweetness and makes them look even more tempting. One mistake is overcooking the apples. Cook them just until soft. This keeps them juicy and tasty. Another mistake is not chilling the jars long enough. They need at least two hours to set. If you skip this, the layers may mix, and your jars won’t look pretty. Lastly, don’t be shy with the caramel. A good drizzle on top makes it better! These jars are great for parties or family dinners. You can serve them in small jars or cups. They look cute and are easy to grab. Add a sprinkle of cinnamon or some nuts on top for crunch. You can even serve them with whipped cream on the side. Everyone loves a little extra cream! To boost the flavor, try adding a pinch of nutmeg or allspice to the apples. This gives them a warm, cozy taste. For texture, mix in some chopped nuts or toffee bits in the layers. This adds a nice crunch that contrasts with the creamy cheesecake. You could also use flavored whipped cream for a fun twist. {{image_2}} You can add chocolate to your caramel apple cheesecake jars for a fun twist. Start by mixing in cocoa powder into the cream cheese filling. This will give it a rich chocolate flavor. You can also use chocolate graham crackers instead of regular ones for the crust. Drizzle chocolate sauce on top with caramel for an extra treat. To make these jars gluten-free, use gluten-free graham crackers. For a dairy-free option, swap out the cream cheese with a dairy-free cream cheese alternative. You can also use coconut cream instead of heavy cream for a lighter texture. These changes still keep the flavor rich and tasty, letting everyone enjoy this dessert. You can change the flavors based on the seasons. In fall, add pumpkin spice to the filling for a cozy vibe. For summer, try mixing in fresh berries with the apples. In winter, add a hint of peppermint to the cream for a festive touch. These small changes can make your cheesecake jars fit any time of year! To keep your caramel apple cheesecake jars fresh, store them in the fridge. Use airtight containers or keep the jars covered with lids or plastic wrap. This way, the cheesecake stays creamy and the flavors stay bright. It’s best to avoid letting them sit out too long to prevent spoilage. You can freeze these cheesecake jars for later. First, make sure they are tightly sealed. Use freezer-safe containers or wrap the jars well. They can last in the freezer for up to three months. When ready to enjoy, thaw them in the fridge overnight. Do not refreeze after thawing. These cheesecake jars will last about 3-5 days in the fridge. To enjoy the best taste, eat them within this time frame. Always check for any signs of spoilage, like unusual smells or changes in texture. If you notice anything off, it’s best to toss them. Enjoy them fresh for the best flavor and texture! Yes, you can swap apples for other fruits. Pears, peaches, or berries work well too. Each fruit adds a unique flavor. Just adjust the sugar and spices to match the fruit you choose. For example, use nutmeg with pears for a warm taste. You can store the cheesecake jars in the fridge for up to five days. Make sure to cover them well. This keeps the cheesecake fresh and tasty. If you notice any change in smell or texture, it’s best to toss them. Absolutely! You can make the jars a day or two before serving. Just follow the steps and chill them. This gives the flavors time to mix. Plus, it saves you time on the day of your event. Serve the jars chilled straight from the fridge. Drizzle extra caramel sauce on top for a sweet touch. You can also add a sprinkle of cinnamon for extra flavor. These jars look great on a dessert table or as a treat after dinner. Yes, you can skip the heavy cream if you want a lighter version. Use Greek yogurt or whipped coconut cream instead. This will change the texture a bit but still taste great. Just make sure to whip it well for a creamy mix. This blog post covered everything you need for delicious cheesecake jars. We explored key ingredients, step-by-step instructions, and vital tips. You learned about fun variations and smart storage methods. Remember to avoid common mistakes for the best results. Try mixing your favorite fruits or flavors to make it special. Enjoy the process and share with friends or family. These cheesecake jars can be a hit at any gathering! Your journey to perfect cheesecake begins now.

Caramel Apple Cheesecake Jars

Indulge in the deliciousness of Caramel Apple Cheesecake Jars with this easy recipe! Layer creamy cheesecake filling with caramelized apples and crunchy graham crackers for a perfect no-bake dessert. Ideal for any occasion, these charming jars are sure to impress. Follow the simple steps to create a delightful treat that brings fall flavors to your dessert table. Click through to explore the full recipe and make these sweet delights today!

Ingredients
  

2 large apples, peeled and chopped

2 tablespoons unsalted butter

1/4 cup brown sugar

1 teaspoon cinnamon

1 cup cream cheese, softened

1/2 cup powdered sugar

1 cup heavy cream

1 teaspoon vanilla extract

1 cup graham cracker crumbs

1/4 cup caramel sauce (plus extra for drizzling)

Instructions
 

Caramelized Apples: In a skillet, melt the butter over medium heat. Add the chopped apples, brown sugar, and cinnamon. Cook for about 5-7 minutes, stirring often, until the apples are softened and caramelized. Remove from heat and let cool.

    Cheesecake Filling: In a mixing bowl, beat the softened cream cheese with powdered sugar and vanilla extract until smooth and creamy. In a separate bowl, whip the heavy cream until stiff peaks form. Gently fold the whipped cream into the cream cheese mixture until well combined and airy.

      Layering: In small jars or dessert cups, start by adding a layer of graham cracker crumbs at the bottom. Next, add a layer of the cheesecake filling, followed by a layer of the caramelized apples. Repeat the layers until the jars are filled, finishing with a dollop of cheesecake filling on top.

        Chill: Cover the jars with lids or plastic wrap and refrigerate for at least 2 hours to allow the flavors to meld and the cheesecake to set.

          Serve: Before serving, drizzle extra caramel sauce over the top of each jar for added sweetness and visual appeal.

            Prep Time: 30 minutes | Total Time: 2 hours 30 minutes | Servings: 4

              WANT TO SAVE THIS RECIPE?

              Leave a Comment

              Recipe Rating