Get ready to indulge in a classic treat that combines rich chocolate and creamy peanut butter! In this article, I’ll guide you through an easy recipe for Buckeye Brownies. With simple ingredients and straightforward steps, you’ll create a dessert everyone will love. Whether you’re a beginner or a pro in the kitchen, this delightful recipe is perfect for all. Let’s dive into making these mouthwatering treats together!
Why I Love This Recipe
- Decadent Flavor: The combination of rich chocolate brownies and creamy peanut butter creates a delightful contrast that is simply irresistible.
- Easy to Make: This recipe is straightforward, making it perfect for bakers of all skill levels. Just mix, pour, and bake!
- Perfect for Sharing: With 24 squares, these brownies are ideal for parties, potlucks, or just sharing with family and friends.
- Customizable: You can easily modify this recipe by adding nuts, using different types of chocolate, or even adding a sprinkle of sea salt on top for an extra touch.
Ingredients
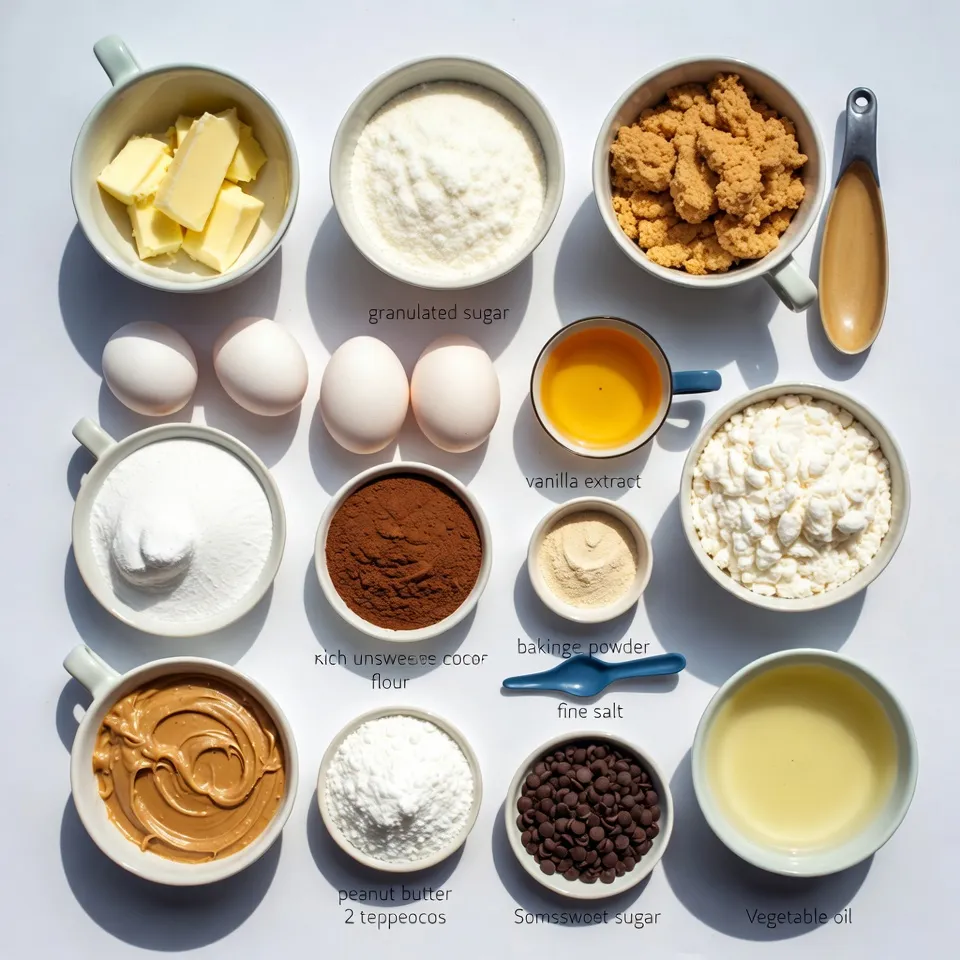
To make tasty Buckeye Brownies, gather these simple ingredients:
– 1 cup unsalted butter, melted
– 1 cup granulated sugar
– 1 cup brown sugar, packed
– 4 large eggs
– 1 tablespoon vanilla extract
– 1 cup all-purpose flour
– 1 cup unsweetened cocoa powder
– 1/2 teaspoon baking powder
– 1/2 teaspoon salt
– 1 cup creamy peanut butter
– 1 cup powdered sugar
– 1 cup semi-sweet chocolate chips
– 2 tablespoons vegetable oil
Each ingredient plays a key role. The unsalted butter adds rich flavor and moisture. The sugars give sweetness and depth. Eggs help bind the mix and add fluffiness. Vanilla extract brings warmth and aroma.
Flour and cocoa powder create the brownie base, while baking powder makes them rise. Salt balances the sweetness and enhances flavors. The creamy peanut butter layer adds a delicious nutty taste. Powdered sugar sweetens the peanut butter mixture, making it smooth.
Finally, the semi-sweet chocolate chips bring a nice chocolate touch. Vegetable oil helps the chocolate topping melt smoothly. By using these ingredients, you will create a dessert that everyone will love!
Step-by-Step Instructions
Preparation Steps
1. Preheat the oven: Set your oven to 350°F (175°C). This step is key for baking. Grease a 9×13 inch pan or line it with parchment paper.
2. Make the brownie base: In a large bowl, mix melted butter, granulated sugar, and brown sugar. Whisk until smooth. Add in the eggs, one at a time, and mix well. Stir in the vanilla extract for added flavor.
3. Prepare the dry ingredients: In another bowl, sift together the flour, cocoa powder, baking powder, and salt. Gradually mix this dry blend into the wet mix. Take care to not overmix; you want a fudgy texture.
4. Bake the brownies: Pour the brownie batter into the greased pan. Spread it evenly. Bake for 25 to 30 minutes. Use a toothpick to check; it should come out with a few moist crumbs.
5. Prepare the peanut butter layer: In a medium bowl, mix creamy peanut butter and powdered sugar until smooth. Spread this layer over the cooled brownies evenly.
6. Make the chocolate topping: In a microwave-safe bowl, combine chocolate chips and vegetable oil. Microwave in 30-second bursts, stirring in between, until smooth. Pour this melted chocolate over the peanut butter layer.
7. Set the brownies: Place the complete brownies in the fridge for about 30 minutes. This helps the chocolate topping to firm up.
8. Cut and serve: Once set, lift the brownies out using the parchment paper. Cut them into squares for serving. Enjoy your tasty Buckeye Brownies!
Tips & Tricks
Achieving the Perfect Brownie Texture
– Don’t overmix the batter: Overmixing can make your brownies tough. Mix until just combined.
– Check baking time carefully: Timing is key! Bake for 25-30 minutes. Use a toothpick to check for doneness. It should come out with a few moist crumbs.
– Use room temperature ingredients: Room temperature eggs and butter mix better. This helps create a smooth batter.
Enhancing Flavor and Presentation
– Sprinkle with sea salt: A small sprinkle of sea salt adds a nice contrast to the sweet brownies. It enhances the flavor too.
– Use crushed peanuts for garnish: Crushed peanuts on top give a nice crunch. They also make your brownies look fancy and fun!
Pro Tips
- Use Room Temperature Ingredients: Ensure your eggs and peanut butter are at room temperature for better mixing and a smoother batter.
- Don’t Overbake: To achieve fudgy brownies, keep an eye on the baking time and remove them from the oven when a toothpick comes out with a few moist crumbs.
- Chill for Better Slicing: After the brownies are set, chilling them in the refrigerator makes it easier to cut them into neat squares.
- Enhance Flavor with Sea Salt: A sprinkle of flaky sea salt on top of the chocolate layer before it sets can enhance the flavors and add a delightful contrast.
Variations
Popular Additions
You can make Buckeye Brownies even more fun by adding different ingredients. Here are some ideas:
– Adding nuts: Chopped walnuts or pecans give a nice crunch. They pair well with the soft brownie texture.
– Swapping chocolate types: Use dark chocolate for a rich taste or white chocolate for a sweeter touch. Both options will make the brownies unique.
Dietary Alternatives
If you have special diets, you can still enjoy these brownies. Try these options:
– Gluten-free flour option: Replace regular flour with gluten-free flour. This swap keeps the brownies tasty and safe for those gluten-sensitive.
– Vegan substitutes: Use coconut oil instead of butter and flax eggs instead of regular eggs. This way, everyone can enjoy these treats!
Experiment with these variations to find your favorite version of Buckeye Brownies. Each choice adds its own special twist!
Storage Info
Best Practices for Storing Brownies
To keep your Buckeye Brownies fresh, store them at room temperature. Place them in an airtight container. This will help keep them soft and tasty. If you plan to eat them within a few days, this method works well.
For a longer shelf life, refrigerate the brownies. Wrap them tightly in plastic wrap or foil. This helps prevent them from drying out. In the fridge, they can last up to a week.
Freezing Instructions
To freeze your brownies, first cut them into squares. Place them in a single layer on a baking sheet. Freeze them for about an hour. Once firm, transfer the squares to a freezer bag. Seal it tightly and label it with the date. They can stay frozen for up to three months.
When you’re ready to enjoy them, just take out what you need. Thaw them in the fridge overnight or at room temperature for a few hours. If you want to warm them, pop them in the microwave for about 10-15 seconds. This will bring back their gooey goodness.
FAQs
Common Questions About Buckeye Brownies
Can I use crunchy peanut butter instead of creamy?
Yes, you can use crunchy peanut butter. This will add a nice texture to your brownies. Some people love the extra crunch. Just remember, it may change the smoothness of the peanut butter layer.
How long do Buckeye Brownies last?
Buckeye brownies stay fresh for about 4 to 5 days. Keep them in an airtight container. If you want them to last longer, store them in the fridge. They can last up to a week that way.
What are the best ways to cut brownies neatly?
To cut brownies neatly, let them cool completely first. Use a sharp knife for clean cuts. You can also warm the knife in hot water before cutting. This helps to make perfect squares without tearing.
Can I double the recipe for a larger batch?
Yes, you can double the recipe. Just use a larger baking pan. A 12×18 inch pan works great for double batches. Keep an eye on the baking time, as it may need a few extra minutes.
These Buckeye brownies blend rich chocolate with creamy peanut butter, making them a treat. We discussed the key ingredients and precise steps for perfecting them. Remember to mix carefully and check your baking time. You can also try nuts or different chocolates for variety.
Keep these brownies fresh by storing them properly or freezing them. With these tips, you’re set to enjoy delicious treats any time. Happy bakin