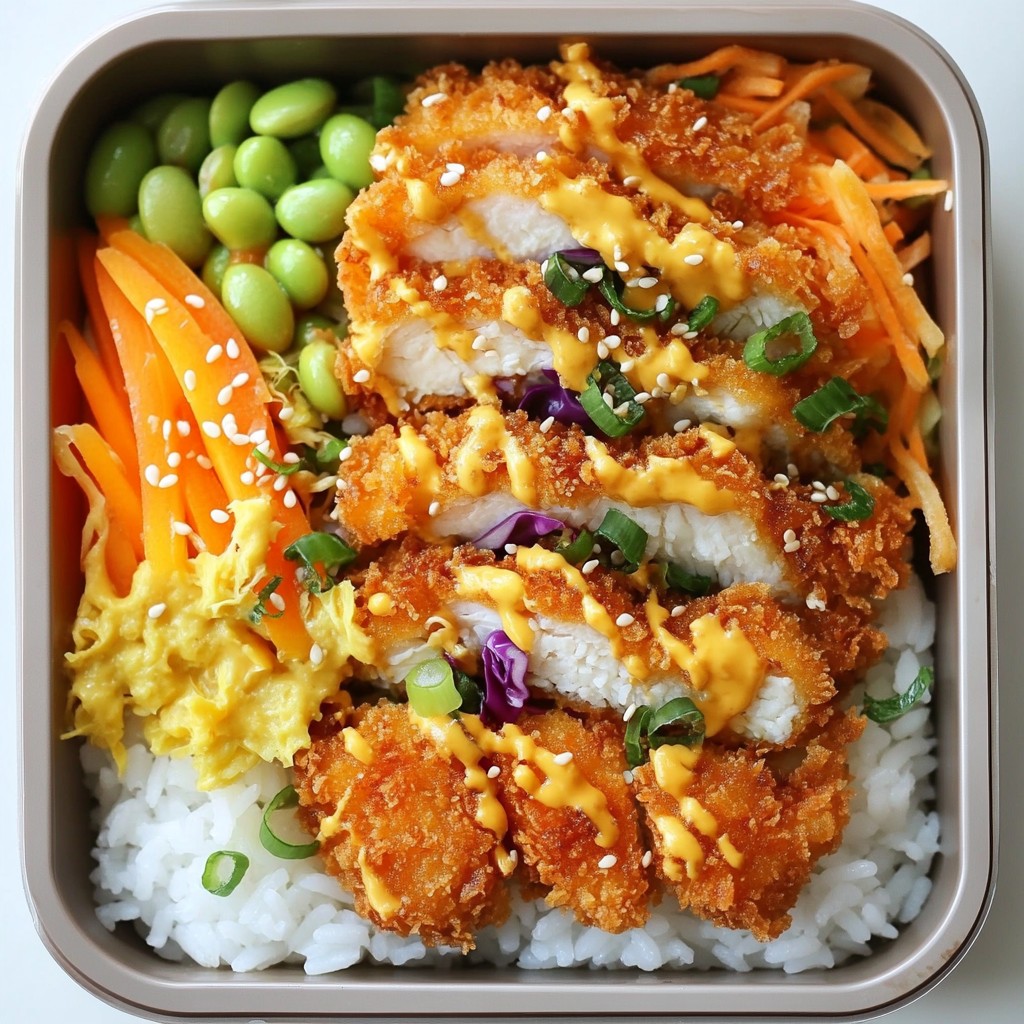
Ready to wow your taste buds with a flavorful lunch? This Crispy Chicken Katsu Bento is the perfect meal! Featuring juicy chicken, tasty rice, and fresh veggies, it’s a delight for everyone. You'll love the crunch of the coating and the zing of tonkatsu sauce. In this post, I'll guide you through each step to make this delicious bento meal at home. Let's dive in and get cooking!
Why I Love This Recipe
- Crispy Texture: The panko breadcrumbs create a delightful crunch that contrasts beautifully with the tender chicken inside.
- Flavorful Sauce: The tonkatsu sauce adds a rich, tangy sweetness that elevates the entire dish.
- Colorful Presentation: The vibrant vegetables and garnishes make this bento visually appealing and appetizing.
- Versatile Meal: This recipe is perfect for lunch boxes, dinner plates, or even a picnic, making it a great go-to option.
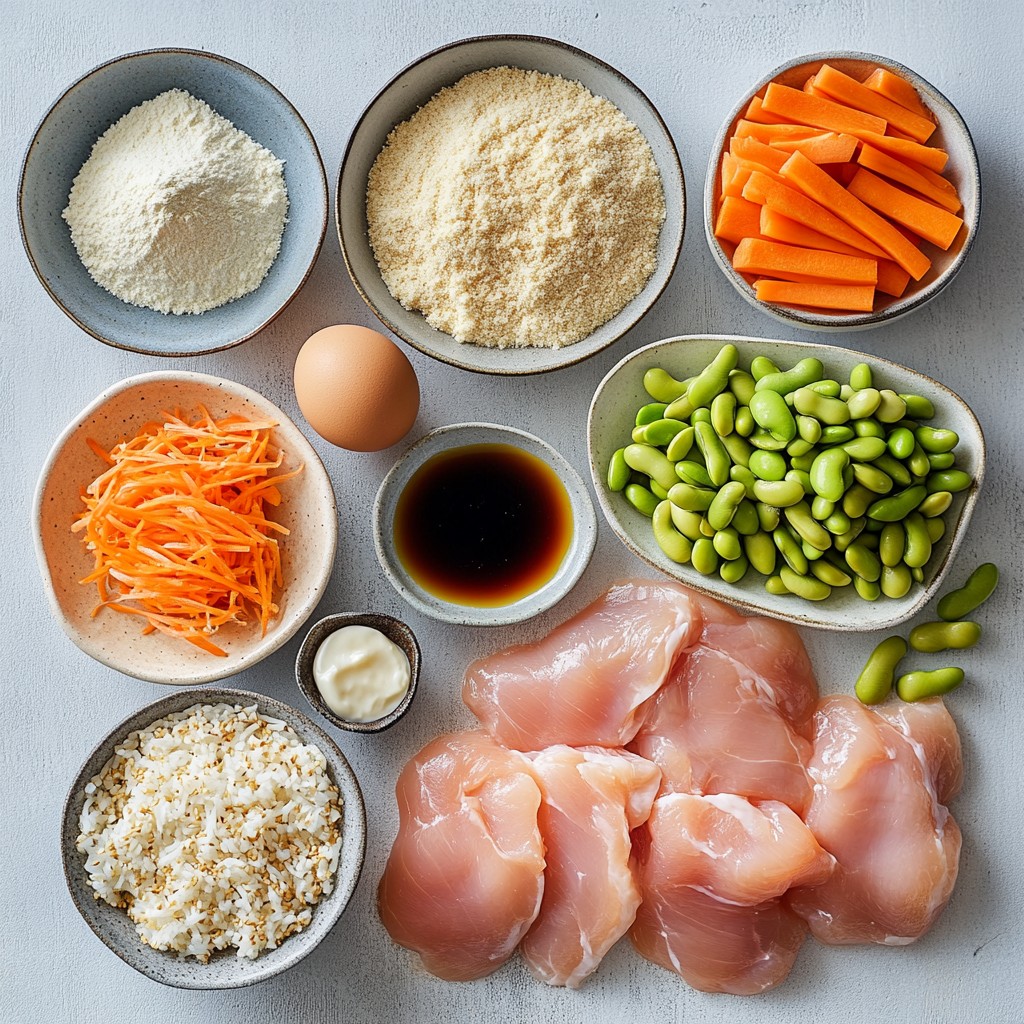
Ingredients
Main Ingredients
- 2 boneless, skinless chicken breasts
- 1/2 cup all-purpose flour
- 2 large eggs, beaten
- 1 cup panko breadcrumbs
- Vegetable oil, for frying
- 2 cups cooked white rice
- 1 cup shredded cabbage
- 1 small carrot, julienned
- 1/2 cup shelled edamame
The main ingredients bring the heart of the dish to life. Chicken breasts are the star, providing a tender and juicy base. The panko breadcrumbs create the signature crunch. Cooked white rice serves as a fluffy base and pairs perfectly with the chicken. Fresh vegetables like cabbage and carrots add color and nutrients. Edamame gives a nice pop of protein and texture.
Seasoning and Garnishes
- Salt and pepper to taste
- 1/4 cup tonkatsu sauce
- 1 tablespoon sesame seeds
- Pickled ginger for garnish (optional)
Seasoning is key for flavor. A simple sprinkle of salt and pepper enhances the chicken’s taste. Tonkatsu sauce adds a rich, tangy note that elevates the dish. Sesame seeds provide a nutty crunch and visual appeal. If you like, add pickled ginger for a refreshing bite. This garnish not only looks good but also balances the flavors.
Step-by-Step Instructions
Prepare the Chicken
First, we need to prepare the chicken. Take the boneless, skinless chicken breasts and place them between two sheets of plastic wrap. Use a mallet or rolling pin to pound them down to about 1/2 inch thick. This helps the chicken cook evenly. Season both sides of the chicken with salt and pepper.
Next, set up your dredging station. You need three shallow bowls: one for flour, another for beaten eggs, and the last for panko breadcrumbs. This setup makes it easy to coat the chicken.
Coat and Fry Chicken
Now, it’s time to coat the chicken. Start by dipping each chicken breast into the flour. Shake off any extra flour. Next, dip it into the beaten eggs, allowing the excess to drip off. Finally, coat the chicken in panko breadcrumbs. Press down firmly to help the breadcrumbs stick well.
For frying, heat about 1/4 inch of vegetable oil in a large skillet over medium-high heat. Wait until the oil is hot, but not smoking. Carefully add the breaded chicken breasts. Fry for about 3-4 minutes on each side. You want them golden brown and cooked through. Once done, remove the chicken and let it drain on paper towels.
Prepare the Rice and Assemble the Bento
If you’re not using pre-cooked rice, cook the rice according to the package instructions. Once cooked, fluff it with a fork. Divide the rice among your bento containers.
Now, let’s assemble the bento. Slice the cooked chicken katsu into strips and place them on top of the rice. Add a handful of shredded cabbage next to the chicken. Then, add a few pieces of julienned carrot and a small portion of shelled edamame.
To finish, drizzle tonkatsu sauce over the chicken katsu strips. Sprinkle with sesame seeds for a nice touch. If you like, add a few pieces of pickled ginger on top for extra flavor and color. Enjoy your colorful and tasty Chicken Katsu Bento!
Tips & Tricks
Perfecting the Cooking Process
To make the best chicken katsu, pay close attention to frying temperature. Heat your oil to about 350°F (175°C). This temperature helps the chicken cook evenly and become crispy. Use a thermometer to check the oil if you have one.
For a crispy coating, follow the dredging steps carefully. First, coat the chicken in flour, then in beaten eggs, and finally in panko breadcrumbs. Press the breadcrumbs firmly to make sure they stick well. This technique creates a crunchy layer that you will love.
Presentation Ideas
When arranging your bento box, think about balance and color. Place the rice on one side and the chicken on the other. Add vegetables like shredded cabbage and julienned carrots next to the chicken. The bright colors make the meal look yummy.
To add more texture, sprinkle sesame seeds on the chicken. If you like, add a few pieces of pickled ginger on top. It not only adds color but also gives a nice flavor contrast.
Serving Suggestions
For side dishes, serve your chicken katsu with a simple salad or miso soup. These dishes complement the chicken and add variety.
When it comes to drinks, green tea is a great choice. It cleanses the palate and pairs well with the savory flavors of the katsu. You can also try a light soda or lemonade for a refreshing touch.
Pro Tips
- Perfect Pounding: Ensure the chicken is evenly pounded to guarantee uniform cooking and tenderness.
- Oil Temperature: Test the oil temperature by dropping a small piece of bread; it should sizzle upon contact. This ensures a crispy exterior.
- Panko Preference: For extra crunch, consider using a mix of regular breadcrumbs and panko, or try flavored panko for added taste.
- Resting Time: Allow the fried chicken to rest on paper towels for a few minutes before slicing; this helps retain juiciness.
Variations
Alternative Proteins
You can switch chicken for pork or tofu. Pork katsu offers a rich flavor. Tofu provides a great vegetarian option. If you use tofu, press it first to remove extra water. This helps it absorb flavors better. For marinating, try adding soy sauce, ginger, or garlic. These ingredients deepen the taste and add excitement.
Vegetable Swaps
Feel free to mix in different vegetables. Broccoli, bell peppers, or snap peas can brighten your bento. Seasonal veggies like zucchini or asparagus add freshness. You can also use pickled vegetables for a tangy touch. They pair well with the crispy chicken and add crunch.
Sauces and Toppings
Tonkatsu sauce is a favorite, but don't stop there! Try sweet chili sauce for a spicy kick. You can also mix mayonnaise with sriracha for a creamy kick. For garnishes, consider green onions or nori strips. They add flavor and make your bento beautiful.
Storage Info
Storing Leftovers
After enjoying your crispy chicken katsu bento, you might have some leftovers. To store them, let the meal cool to room temperature. Place the chicken katsu and rice in an airtight container. Keep the vegetables separate to retain their crunch. Refrigerate your leftovers within two hours. When you're ready to eat, reheat the chicken in a skillet over medium heat. This keeps it crispy. For the rice, add a splash of water and microwave it until warm.
Freezing Tips
Freezing your chicken katsu bento is a great way to save it for later. First, let everything cool completely. Wrap each chicken piece in plastic wrap. Then, place them in a freezer-safe bag. For rice and veggies, use separate containers. Label each with the date. To reheat, thaw overnight in the fridge. Cook your chicken in the oven at 375°F until hot and crispy again.
Shelf Life
In the fridge, your chicken katsu will last about three days. The rice and veggies should be eaten within the same time. If you freeze them, the chicken katsu can last up to three months. Cooked rice is best used within one month of freezing. Always check for any signs of spoilage before eating.
FAQs
What is Chicken Katsu?
Chicken katsu is a Japanese dish. It features breaded and fried chicken. The chicken is usually a boneless breast. You pound it thin for a crispy texture. This dish comes from the word "katsu," meaning cutlet. It has roots in Western cooking but became popular in Japan. You serve it with tonkatsu sauce, a savory and sweet sauce. Often, it’s paired with rice and vegetables. This makes it a complete meal.
Can I make Chicken Katsu in advance?
Yes, you can prep chicken katsu ahead of time. First, you can pound and season the chicken breasts. Next, coat them in flour, egg, and panko. You can keep the coated chicken in the fridge for a day. Just fry it when you're ready to eat. For storage, wrap the cooked katsu in foil. It lasts well in the fridge for three days. If you want to freeze it, do so after cooking. Reheat in the oven for the best crunch.
Is Chicken Katsu healthy?
Chicken katsu can be part of a healthy meal. It’s high in protein from the chicken. To make it healthier, you can bake instead of fry. You can also use whole wheat panko for extra fiber. Pair it with lots of veggies, like cabbage and carrots. This adds nutrients and color. Be mindful of the tonkatsu sauce; it has sugar. Using less sauce or a homemade version can help. Overall, enjoy chicken katsu as a fun treat in a balanced diet.
In this post, we explored how to make Chicken Katsu Bento. We covered the main ingredients, seasoning, and garnishes. I shared step-by-step instructions for cooking and assembling your meal. You learned tips for perfect frying and presentation. We even discussed variations and storage methods.
Chicken Katsu Bento is a delicious and versatile dish. With simple steps, you can create a meal that impresses. Enjoy your cooking and make it your own!