Get ready for a holiday treat that’s both fun and tasty! Chocolate Pocky Christmas Trees are the perfect festive snack to make with kids or share at parties. They’re easy to create, and you can add your own twist to them. In this article, I’ll guide you through simple steps, from melting chocolate to adding sprinkles. Let’s dive into making these delightful treats together!
Ingredients
List of Ingredients
– 1 box of plain Pocky sticks (about 30 sticks)
– 1 cup of dark chocolate chips
– 1 cup of colorful sprinkles
– 1 cup of pretzel sticks (for tree trunks)
– 1/2 cup of mini marshmallows (for decorations)
– Green food coloring (optional)
– Edible glitter (optional, for a festive touch)
Gather these ingredients to make your Chocolate Pocky Christmas Trees. Each item plays a key role in creating these fun treats. The Pocky sticks serve as the tree’s branches. The dark chocolate adds a rich flavor. Colorful sprinkles make the trees bright and merry. Pretzel sticks act as sturdy trunks. Mini marshmallows add fluffy snow-like decorations.
You can use green food coloring if you want festive trees. Edible glitter adds a magical touch to your creations. Make sure to have everything ready before you start. This will help you enjoy the process. Each ingredient contributes to the festive look and taste of your treats.Enjoy making these delightful snacks!
Step-by-Step Instructions
Melting the Chocolate
To start, we need to melt the dark chocolate chips safely. Place one cup of dark chocolate chips in a microwave-safe bowl. Heat them in the microwave for 30 seconds. After each round, stir the chocolate until it is smooth. This step helps prevent burning. If you want a festive look, add a few drops of green food coloring to the melted chocolate. Stir well to mix the color evenly.
Coating the Pocky
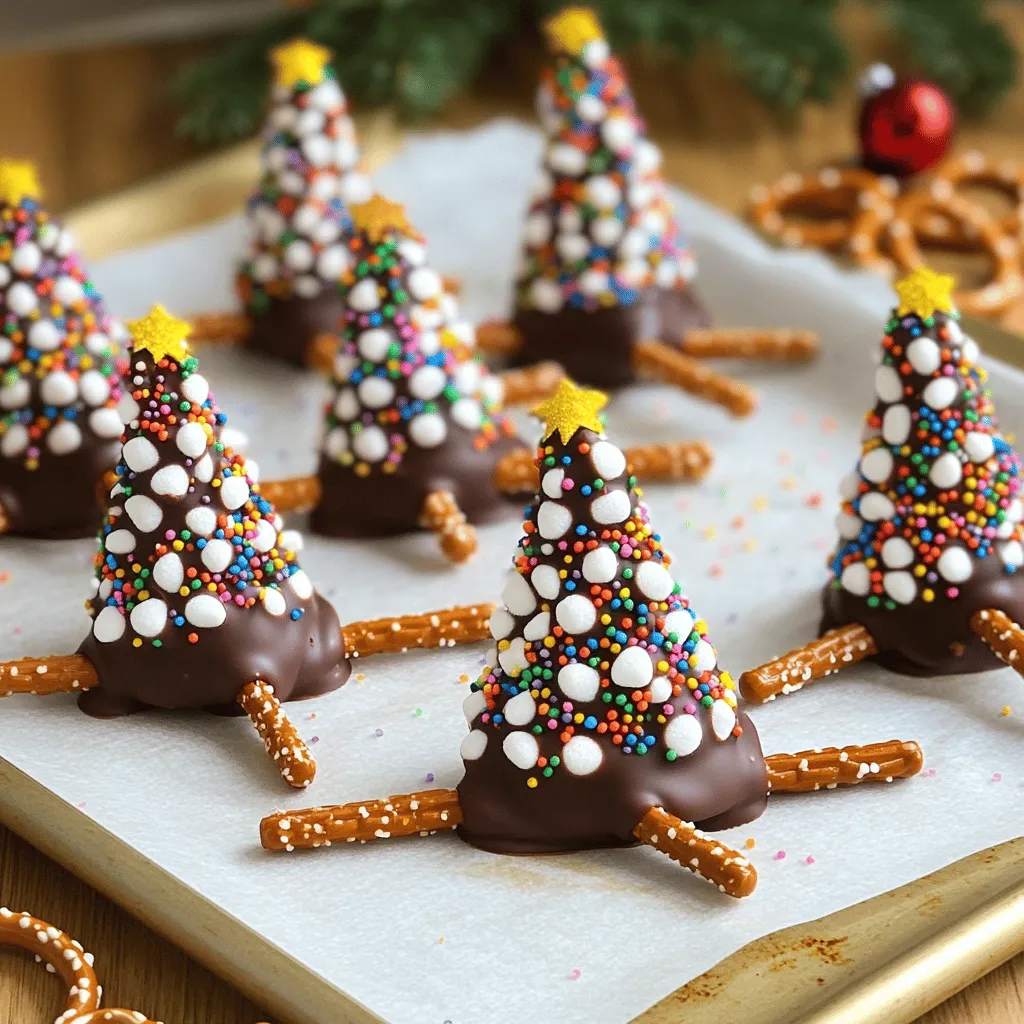
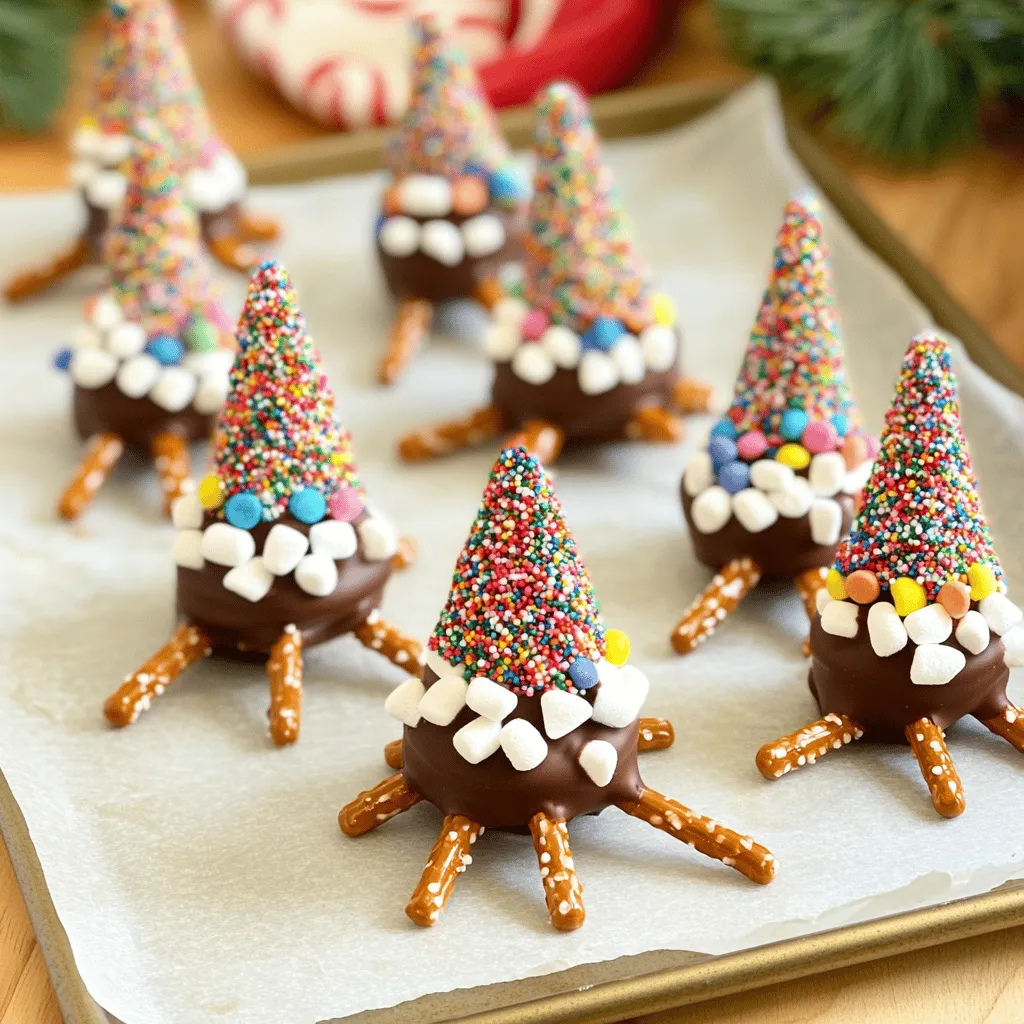
Next, we will coat the Pocky sticks. Take one plain Pocky stick and dip one end into the melted chocolate. Ensure that you coat it well but don’t overdo it. You want a nice, even layer. After dipping, roll the chocolate-coated end in colorful sprinkles. This makes it look like the leafy part of a Christmas tree. Make sure to cover it fully for the best effect.
Assembling the Trees
Now, it’s time to create the tree shape. Grab the pretzel sticks and cut them in half. These will be the trunks of your trees. Once the chocolate on the Pocky sticks has set, take your pretzel trunks and insert them into the bottom of each Pocky stick. This gives your trees a strong base. Make sure they stand upright.
Final Touches
To finish, let’s add some decorations. Use mini marshmallows to make cute ornaments on your trees. You can stick them on the chocolate part. For an extra festive touch, sprinkle some edible glitter on top. This adds sparkle and fun to your trees. Allow everything to set completely before serving. Enjoy these fun treats with family and friends!
Tips & Tricks
Tips for Perfect Chocolate Coating
– Preventing chocolate from hardening too quickly: To keep your chocolate smooth, work quickly after melting it. If it starts to thicken, microwave it for a few seconds to soften. Keep the melted chocolate warm, but not hot. This will help with even coating.
– Best way to handle sprinkles: After dipping the Pocky, roll it in sprinkles right away. Don’t wait! The chocolate needs to be wet for the sprinkles to stick. Use a plate or shallow bowl for easy rolling. This method ensures an even sprinkle coverage.
Creative Decoration Ideas
– Using different candies for unique designs: Get creative! Use mini candies, chocolate chips, or nuts for added flair. You can mix colors and shapes for fun designs. Try red and white candies for a festive touch.
– Incorporating other festive elements: Add small ornaments or tiny stars on top of your trees. You can even use cookie cutters to shape your Pocky into stars or other holiday symbols. This adds more joy to your Christmas treats.
Variations
Flavor Variations
You can change up the flavor of your Chocolate Pocky Christmas Trees. Using white chocolate or milk chocolate instead of dark chocolate can make a sweet twist. Simply melt your chosen chocolate the same way as before. Each type of chocolate brings a different taste. White chocolate is creamy and sweet, while milk chocolate is rich and smooth.
Another fun idea is to try flavored Pocky sticks. You can find Pocky in many flavors, like strawberry or matcha. These unique flavors can add a fun twist to your trees. Imagine a strawberry Pocky tree with white chocolate! It’s a fun way to surprise your guests.
Alternative Decorations
Get creative with your decorations! You can use seasonal toppings to make your trees pop. Consider using crushed candy canes for a minty touch or mini chocolate chips for a classic look. The holiday season is all about fun and color, so let your imagination run wild.
You can also garnish your trees with fresh fruit or nuts. Sliced strawberries or blueberries can give a fresh taste. Chopped nuts like pecans or almonds add a nice crunch. These additions not only look great, but they also add different flavors. You can mix and match to find your favorite combinations.
Storage Info
How to Store Chocolate Pocky Christmas Trees
Store your Chocolate Pocky Christmas Trees in a cool, dry place. Use an airtight container to keep them fresh. I recommend a plastic or glass container with a tight lid. This will help prevent the chocolate from melting or the sprinkles from getting soggy.
For best flavor and texture, enjoy them within five days. After this time, they may lose their crunch and taste. If you keep them in the fridge, they can last a bit longer, but the sprinkles might lose some of their color.
Freezing Instructions
Can you freeze Chocolate Pocky Christmas Trees? Yes, you can freeze them! Just place the trees in a single layer on a baking sheet. Freeze for about an hour, then transfer them to a freezer-safe bag.
When you’re ready to serve, take them out and let them thaw in the fridge. This helps keep the chocolate and sprinkles intact. Avoid thawing at room temperature to prevent melting. Enjoy your festive treats after they have thawed!
FAQs
What is the best way to melt chocolate for this recipe?
To melt chocolate, you can use a microwave or a double boiler. For the microwave, place chocolate chips in a bowl. Heat in 30-second bursts. Stir after each round until smooth. This method is quick and easy.
Using a double boiler is another option. Fill a pot with water and bring it to a simmer. Set a heat-safe bowl on top without touching the water. Stir the chocolate until it melts. This method helps prevent burning.
Both ways work well. Just choose what you feel comfortable with.
Can I make these trees ahead of time?
Yes, you can make these trees ahead of time. After decorating, store them in an airtight container. They can stay fresh for up to a week at room temperature.
If you need to store them longer, you can freeze them. Just place them in a freezer-safe container. They can last up to three months in the freezer. Thaw them before serving for the best taste.
How many servings does this recipe yield?
This recipe yields about 15 servings. Each Pocky stick forms one tree. If you need more trees, simply double the ingredients. They are great for sharing at parties.
Is this recipe suitable for kids?
This recipe is perfect for kids! They can help dip the Pocky in chocolate and sprinkle the decorations. Just watch them with the melted chocolate to keep them safe.
Set up a fun decorating station. Let them express their creativity with colors and toppings. It’s a great way to bond and make holiday memories together.
These fun Chocolate Pocky Christmas Trees are simple to make. We covered all the steps, from melting chocolate to decorating with sprinkles. You can create unique twists by mixing flavors and toppings. Store your treats correctly, so they stay fresh. This recipe is perfect for kids to join in the fun. You can enjoy these festive treats at any holiday event or celebration. Get ready to make sweet memories with your loved ones, and have fun creating!