Skip to content
DisclaimerTerms Of UseGDPR PolicyCookie Policy

savorystride

  • Home
  • Drinks
  • Appetizers
  • Dinner
  • Dessert
  • About
  • Contact
  • Privacy Policy
DisclaimerTerms Of UseGDPR PolicyCookie Policy

Hazel

To make the Sheet Pan Seafood Feast, gather these ingredients: - 1 lb shrimp, peeled and deveined - 1 lb scallops, patted dry - 1 lb salmon fillet, cut into portions - 2 cups cherry tomatoes, halved - 1 cup asparagus, trimmed - 1 lemon, sliced into rounds - 4 cloves garlic, minced - 3 tablespoons olive oil - 2 teaspoons smoked paprika - 1 teaspoon dried oregano - Salt and pepper to taste - Fresh parsley, chopped for garnish When buying seafood, look for these signs of freshness: - Smell: Fresh seafood should smell like the ocean, not fishy. - Appearance: Look for bright colors and clear eyes. - Texture: Fresh shrimp should be firm and bounce back when pressed. - Scallops: They should feel moist and not slimy. - Salmon: Choose bright, vibrant flesh with no discoloration. Ask your fishmonger for help if you're unsure. They can guide you to the best options. Seafood is packed with nutrients. Here’s what you get: - Shrimp: Low in calories, high in protein, and rich in vitamin B12. - Scallops: Great source of protein and omega-3 fatty acids. - Salmon: Packed with healthy fats, protein, and vitamin D. - Cherry Tomatoes: High in vitamins A and C, plus antioxidants. - Asparagus: Full of vitamins K and E, fiber, and folate. Eating this dish gives you a good balance of protein, healthy fats, and vitamins. It's a tasty way to enjoy healthy food. First, gather all your ingredients. You need: - 1 lb shrimp, peeled and deveined - 1 lb scallops, patted dry - 1 lb salmon fillet, cut into portions - 2 cups cherry tomatoes, halved - 1 cup asparagus, trimmed - 1 lemon, sliced into rounds - 4 cloves garlic, minced - 3 tablespoons olive oil - 2 teaspoons smoked paprika - 1 teaspoon dried oregano - Salt and pepper to taste - Fresh parsley, chopped for garnish Next, wash the cherry tomatoes and asparagus. Make sure they are clean. This helps keep the dish fresh. Also, pat the scallops dry so they cook well. This step is key for searing. Now, preheat your oven to 425°F (220°C). Take a large sheet pan and arrange the shrimp, scallops, and salmon on it. Leave space between each piece. This helps them cook evenly. In a bowl, mix the halved cherry tomatoes and trimmed asparagus. Drizzle with 1 tablespoon of olive oil. Add salt and pepper to taste. Toss them well, then spread them around the seafood on the pan. Next, make a quick marinade. In a small bowl, combine minced garlic, the remaining olive oil, smoked paprika, dried oregano, salt, and pepper. Brush this mix over the seafood. Make sure you cover it well. Now, place the lemon slices on top of the seafood and veggies. This adds a nice flavor as they cook. Put the sheet pan in the oven and roast for 15-20 minutes. Check if the seafood is cooked and the veggies are tender. Once done, remove the pan from the oven. Let it cool for a few minutes. This will help with serving. Garnish with fresh parsley on top. For a great presentation, you can serve the feast right from the sheet pan. It looks rustic and inviting. You can also plate individual portions with extra lemon wedges. Enjoy your meal! Cooking times can vary based on the type of seafood. Here’s a quick guide: - Shrimp: Cook for about 15-20 minutes. Look for pink color. - Scallops: They take around 10-15 minutes. They should be opaque. - Salmon: This fish usually takes 15-20 minutes. It’s done when it flakes easily. Thicker pieces of fish may need a bit longer. Always check a few minutes before the time is up. You want your seafood perfectly cooked, not overdone. To achieve even cooking, follow these steps: - Space out seafood: Place shrimp, scallops, and salmon apart. This allows hot air to circulate. - Cut veggies evenly: Halve cherry tomatoes and trim asparagus to similar sizes. This helps them cook at the same rate. - Use parchment paper: Line your sheet pan for easy cleanup and to help with even cooking. Keeping everything spaced out and uniform helps all ingredients cook perfectly together. Enhancing flavor is key to a great seafood feast. Here are some tips: - Marinades: Use garlic, olive oil, smoked paprika, and oregano. Mix well and brush it on generously. - Add acid: Lemon slices add brightness. Place them on top of the seafood before baking. - Fresh herbs: Garnish with chopped parsley after cooking. This adds color and fresh flavor. Experiment with your favorite spices and herbs to find new combinations. Your seafood feast will shine with these simple enhancements! {{image_2}} If you want to mix things up, try different seafood. You can use firm fish like cod or halibut. These fish hold their shape well during cooking. For a change, try crustaceans like crab or lobster. They add a rich flavor. You can also use canned seafood like tuna or clams in a pinch. Just be sure to adjust cooking times, as they may cook faster. Feel free to add your favorite veggies to the mix. Bell peppers, zucchini, or even broccoli work great. They will soak up the flavors of the dish. You can also use seasonal veggies like squash in the fall or snap peas in the spring. Just make sure to cut them into even pieces. This way, they cook evenly and look nice on the plate. You can cook this dish in an air fryer or an oven. The oven gives you a nice roasted flavor, while the air fryer will crisp things up faster. If using an air fryer, set it to 400°F (200°C) and cook for about 10-15 minutes. Keep an eye on it to avoid overcooking. Both methods will yield tasty results. Just choose what works best for you! To store your leftover sheet pan seafood feast, first let it cool. Place the seafood and veggies in an airtight container. Make sure to cover it tightly to keep out air. Store it in the fridge. It stays fresh for up to three days. If you plan to eat it later, consider freezing it. When you want to reheat your seafood dish, the oven is best. Preheat your oven to 350°F (175°C). Place the seafood on a baking sheet. Cover it with foil to keep moisture in. Heat for about 10-15 minutes. Check that it is warm all the way through. This method helps keep the flavors intact. Yes, you can freeze seafood dishes! However, seafood is best when fresh. If you freeze it, use it within three months. Pack the seafood and veggies in freezer bags. Remove as much air as you can before sealing. When ready to eat, thaw it in the fridge overnight. Reheat as mentioned above for best flavor. It takes about 15 to 20 minutes to cook seafood on a sheet pan. The high heat of 425°F (220°C) helps the seafood cook quickly. Shrimp and scallops cook fast, while salmon takes a bit longer. Check for doneness when the seafood is opaque and flakes easily. Yes, you can prep this recipe ahead of time. Arrange the seafood and veggies on the sheet pan. Cover it and store it in the fridge for up to 24 hours. When you are ready, just pop it in the oven. This saves time and makes cooking easy. Some great side dishes include: - Garlic bread - Rice pilaf - Quinoa salad - Roasted potatoes - Green salad These sides pair well with seafood and add more flavor to your meal. For the full recipe and cooking steps, refer to the main section of this article. It has all the details you need to create this tasty dish. Enjoy cooking! In this article, we explored the ingredients for a delicious sheet pan seafood feast. You learned how to choose fresh seafood and its health benefits. I shared easy step-by-step cooking instructions and useful tips for perfect results. You can also try fun variations with different seafood and veggies. Plus, I covered storage tips to keep your leftovers tasty. Remember, cooking seafood can be simple and rewarding. Enjoy your seafood feast and don’t forget to share your creations!

Sheet Pan Seafood Feast Delightful and Easy Recipe

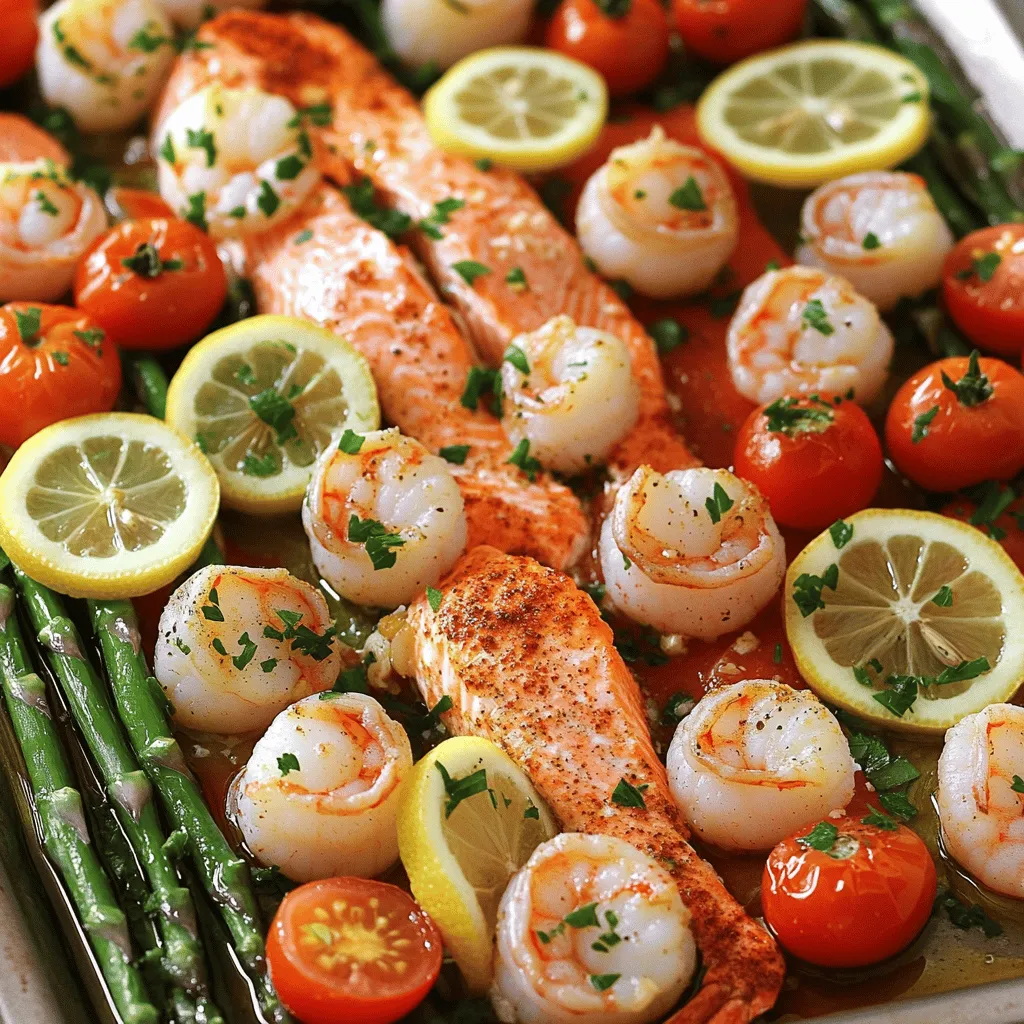
Dive into a culinary adventure with my Sheet Pan Seafood Feast! This easy recipe is perfect for anyone wanting a

To make a Chocolate Cherry Upside-Down Cake, you need fresh and simple ingredients. Here’s what you will need: - 1 cup fresh cherries, pitted and halved - 1/2 cup unsweetened cocoa powder - 1/2 cup dark brown sugar - 1/2 cup granulated sugar - 1/2 cup unsalted butter, melted - 2 large eggs - 1 teaspoon vanilla extract - 1 cup all-purpose flour - 1 teaspoon baking powder - 1/2 teaspoon baking soda - 1/4 teaspoon salt - 1/2 cup buttermilk - 1/4 cup chocolate chips (optional for extra chocolatey goodness) These ingredients work together to create a rich and flavorful cake. The fresh cherries bring a sweet-tart taste that pairs well with the chocolate. The cocoa powder adds a deep flavor that makes every bite delightful. If you want an extra boost of chocolate, feel free to toss in those chocolate chips! Using unsalted butter helps control the saltiness in your cake. Fresh cherries are best, but frozen ones can work too. Just remember to thaw and drain them first. Each ingredient plays a key role in making this cake a treat everyone will love! 1. Preheat your oven to 350°F (175°C) and grease a 9-inch round cake pan. This helps the cake not stick. 2. In a small saucepan, melt 2 tablespoons of butter over medium heat. Add 1/2 cup of brown sugar and mix until smooth. Pour this into the bottom of the prepared cake pan. 3. Now, arrange 1 cup of halved cherries in a single layer over the sugar mixture, cut side up. Set this aside for later. 4. In a large mixing bowl, whisk together the melted butter, 1/2 cup of granulated sugar, and the remaining brown sugar until it looks smooth. 1. In another bowl, combine 1/2 cup of cocoa powder, 1 cup of all-purpose flour, 1 teaspoon of baking powder, 1/2 teaspoon of baking soda, and 1/4 teaspoon of salt. This is your dry mix. 2. Gradually add the dry mix to the wet mix. Alternate with 1/2 cup of buttermilk. Mix until just combined. You do not want to over mix. If you like chocolate, fold in 1/4 cup of chocolate chips. 1. Pour the batter over the cherries in the cake pan. Smooth the top with a spatula to make it even. 2. Bake in the preheated oven for 30-35 minutes. Check if it’s done by inserting a toothpick in the center. If it comes out clean, it’s ready. 3. Remove the cake from the oven and let it cool in the pan for about 10 minutes. Then, invert the cake onto a serving plate while still warm. The cherries should be on top. 4. Let it cool for an additional 15 minutes before slicing. Enjoy your delicious creation! - Ensuring even baking: To bake evenly, use room temperature eggs and butter. This helps the batter mix well. Rotate the cake halfway through baking. This ensures each side gets even heat. - Avoiding overmixing: Mix the wet and dry ingredients just until combined. Overmixing can make your cake tough. You want a tender and soft texture. - Testing for doneness: Use a toothpick to check if the cake is done. Insert it into the center. If it comes out clean, your cake is ready. - Garnishing suggestions: Dust the top of the cake with powdered sugar for a pretty finish. You can also add some fresh cherries on top for color. - Serving ideas with ice cream: Serve the cake warm with a scoop of vanilla ice cream. The ice cream melts slightly and adds creaminess. It makes each bite even more delicious! {{image_2}} You can switch up the flavors in your cake. Different kinds of cherries can change the taste. Try using sour cherries for a tart kick. Sweet cherries give a nice balance to the cake. Each type adds its own charm. Adding different chocolate varieties can also enhance the flavor. You might use milk chocolate for a sweeter cake. Dark chocolate gives a richer taste. White chocolate can add creaminess. Mix and match to find your favorite combo! If you need a gluten-free option, replace all-purpose flour with a gluten-free blend. This keeps the cake soft and moist. Be sure to check the blend for best results. For a vegan alternative, you can swap eggs with flaxseed meal. Just mix one tablespoon of flaxseed with three tablespoons of water. Let it sit until it thickens. Use plant-based butter instead of regular butter. You can also use almond or soy milk in place of buttermilk. These changes keep your cake delicious while meeting dietary needs. To keep your Chocolate Cherry Upside-Down Cake fresh, store it in the fridge. Wrap the cake tightly with plastic wrap or place it in an airtight container. This helps prevent it from drying out. The cake stays fresh for up to three days in the fridge. If you want to serve it chilled, take it out about 30 minutes before serving. This way, the flavors come alive. If you want to save your cake for later, freezing is a great option. First, let the cake cool completely. Then, slice it into individual pieces. Wrap each piece in plastic wrap and place them in a freezer bag. Label the bag with the date, and it will stay good for up to three months in the freezer. When you're ready to enjoy, just thaw it in the fridge overnight. You can also warm it in the microwave for a few seconds. Enjoy the taste of chocolate and cherries whenever you want! How to prevent cherries from sinking? To stop cherries from sinking, coat them in a bit of flour before adding them to the batter. This light dusting helps them stay suspended. Make sure to mix the batter gently before pouring it over the cherries. Can I use frozen cherries? Yes, you can use frozen cherries. Just remember to thaw and drain them well. Excess water can make the cake soggy. Pat them dry with a paper towel before using. What to serve with Chocolate Cherry Upside-Down Cake? This cake pairs well with a scoop of vanilla ice cream. You can also serve it with whipped cream or a drizzle of chocolate sauce. Fresh berries add a nice touch too. Cake is too dense, what went wrong? If your cake is dense, you might have overmixed the batter. This can create too much gluten. Be gentle when combining wet and dry ingredients. Also, check that your baking powder and soda are fresh. How to keep the cake moist? To keep the cake moist, avoid overbaking it. Use a toothpick to test for doneness; it should come out clean but not dry. Storing the cake in an airtight container helps maintain moisture. In this blog post, we explored making a Chocolate Cherry Upside-Down Cake. We highlighted essential ingredients like fresh cherries, cocoa powder, and eggs. You learned clear steps for preparation, baking, and tips for great results. Try new variations or dietary swaps to fit your needs. Remember to store your cake properly for freshness. Baking can be fun and rewarding, so enjoy the process! Happy baking!

Chocolate Cherry Upside-Down Cake Delightful Recipe

Get ready to treat your taste buds with my Chocolate Cherry Upside-Down Cake! This dessert marries rich cocoa with juicy

For these muffins, gather these essential ingredients: - 1 cup canned pumpkin puree - 1/2 cup Greek yogurt - 1/4 cup honey or maple syrup - 2 large eggs - 1 cup rolled oats - 1/2 cup almond flour - 1/2 cup protein powder (vanilla or unflavored) - 1 teaspoon baking powder - 1/2 teaspoon baking soda - 1 teaspoon pumpkin spice - 1/2 teaspoon cinnamon - 1/4 teaspoon salt Each of these ingredients adds flavor and nutrition. The pumpkin puree gives moisture and a rich taste. Greek yogurt adds creaminess and protein. Honey or maple syrup sweetens the muffins naturally. You can make your muffins even tastier by adding: - 1/3 cup chopped walnuts or pecans - 1/3 cup chocolate chips These add-ins boost crunch and sweetness. Nuts provide healthy fats, while chocolate chips satisfy any sweet tooth. Each ingredient brings something good to the table: - Canned pumpkin puree: Full of vitamins A and C, this ingredient helps your immune system. - Greek yogurt: Packed with protein and probiotics, it supports gut health. - Honey or maple syrup: Natural sweeteners with antioxidants, they offer a healthier option than refined sugar. - Eggs: Great for protein and healthy fats, they help with muscle repair. - Rolled oats: A good source of fiber, they keep you full and support digestion. - Almond flour: Low in carbs and high in healthy fats, it’s great for energy. - Protein powder: Adds extra protein to help build muscles. - Baking powder and baking soda: These help the muffins rise and become fluffy. - Pumpkin spice and cinnamon: These spices not only add flavor but also have anti-inflammatory properties. - Salt: Enhances all the flavors. Using these ingredients, you get tasty muffins that are also nutritious! First, gather your ingredients. You will need: - 1 cup canned pumpkin puree - 1/2 cup Greek yogurt - 1/4 cup honey or maple syrup - 2 large eggs - 1 cup rolled oats - 1/2 cup almond flour - 1/2 cup protein powder - 1 teaspoon baking powder - 1/2 teaspoon baking soda - 1 teaspoon pumpkin spice - 1/2 teaspoon cinnamon - 1/4 teaspoon salt - Optional: 1/3 cup chopped walnuts or pecans - Optional: 1/3 cup chocolate chips Now, preheat your oven to 350°F (175°C). Line a muffin tin with paper liners or grease it well. In a large mixing bowl, whisk the pumpkin puree, Greek yogurt, honey (or maple syrup), and eggs. Mix until smooth. In a separate bowl, combine rolled oats, almond flour, protein powder, baking powder, baking soda, pumpkin spice, cinnamon, and salt. Gradually add these dry ingredients to the wet mix. Stir gently until just combined. Avoid overmixing, or your muffins may turn out dense. If you want to add some crunch, fold in the optional chopped walnuts or pecans and chocolate chips. This will give your muffins a tasty surprise! Next, spoon the batter into the muffin tin. Fill each cup about 2/3 full. This allows room for rising. Bake in your preheated oven for 18-20 minutes. The muffins should rise and turn golden brown. To check if your muffins are done, insert a toothpick into the center of one muffin. If it comes out clean, they are ready! If it has wet batter on it, bake for a few more minutes. Once done, let the muffins cool in the tin for about 5 minutes. Then, transfer them to a wire rack to cool completely. Enjoy your tasty pumpkin protein muffins! To make your muffins moist and fluffy, follow these tips: - Use fresh ingredients: Check your baking powder and soda for freshness. - Don’t overmix: Stir the batter until just combined. Overmixing makes muffins dense. - Add yogurt: Greek yogurt provides moisture and protein. It's a great choice! - Try adding applesauce: This can boost moisture without adding fat. Avoid these common mistakes for the best muffins: - Skipping the eggs: Eggs help bind the batter and add fluffiness. - Ignoring oven temperature: Preheat your oven to 350°F (175°C) for even baking. - Not greasing the tin: Even if you use liners, a little spray helps muffins release easily. - Not testing doneness: Use a toothpick; it should come out clean when done. Measuring correctly impacts your muffin’s texture. Here’s how: - Spoon and level flour: Don’t scoop flour directly from the bag. This packs it down. - Use dry measuring cups for solids: For oats or flour, use dry cups, and level them with a knife. - Use liquid measuring cups for wet ingredients: Make sure to check the measurement at eye level. - Weigh ingredients if possible: A kitchen scale gives the most accurate measurements. These tips will help you master your pumpkin protein muffins! {{image_2}} To make these muffins gluten-free, swap rolled oats for gluten-free oats. Almond flour works well, too. If you want more options, use coconut flour instead of almond flour. Just remember, coconut flour absorbs more liquid, so add a bit more yogurt or pumpkin puree. This way, your muffins will still be moist and tasty. Want to mix it up? Add different spices like nutmeg or ginger for a new twist. You can also stir in dried fruits, like cranberries or raisins, for sweetness. If you love chocolate, try using dark chocolate chips or cocoa powder. For a nutty taste, add sunflower seeds or chia seeds. The options are endless! If you don’t have protein powder, no worries! You can use ground flaxseed or hemp seeds instead. These add healthy fats and fiber. You could also try using more almond flour or oats to keep the texture right. Just remember, changing ingredients might alter the taste and nutrition. To keep your pumpkin protein muffins fresh, store them in an airtight container. This will help keep them moist. You can place them in the fridge for up to a week. If you prefer room temperature, they last about three days. Always check for any mold before eating. Freezing is a great way to save muffins for later. First, let the muffins cool completely. Then, wrap each muffin tightly in plastic wrap or foil. Place them in a freezer-safe bag. They can last up to three months in the freezer. When you want to enjoy one, just pull it out and let it thaw. Reheating your muffins helps bring back their fresh taste. You can use a microwave or an oven. For the microwave, heat each muffin for about 15-20 seconds. If using an oven, preheat it to 350°F (175°C) and warm the muffins for about 5-10 minutes. This will make them soft and tasty again! To make these muffins vegan, swap eggs for flax eggs. Mix one tablespoon of flaxseed meal with three tablespoons of water for each egg. Let it sit for five minutes to thicken. Also, replace Greek yogurt with a plant-based yogurt. Use maple syrup instead of honey for sweetness. If you need a substitute for almond flour, try using oat flour or whole wheat flour. Both options work well, though they may change the texture slightly. You can also grind rolled oats into a fine powder to make oat flour. This keeps it gluten-free if needed. Yes, you can use fresh pumpkin. Start by cooking the pumpkin until soft, then puree it. This may take more time than using canned pumpkin, but it gives a fresh taste. Just ensure the puree is smooth and has no chunks. You now know how to make delicious Pumpkin Protein Muffins. We covered key ingredients, their benefits, and step-by-step instructions. You learned tips for perfect baking and common mistakes to avoid. Don’t forget the fun variations to create new flavors. Proper storage will keep muffins fresh longer. With these easy methods, you can enjoy a healthy treat anytime. Happy baking!

Pumpkin Protein Muffins Nutritious and Simple Recipe

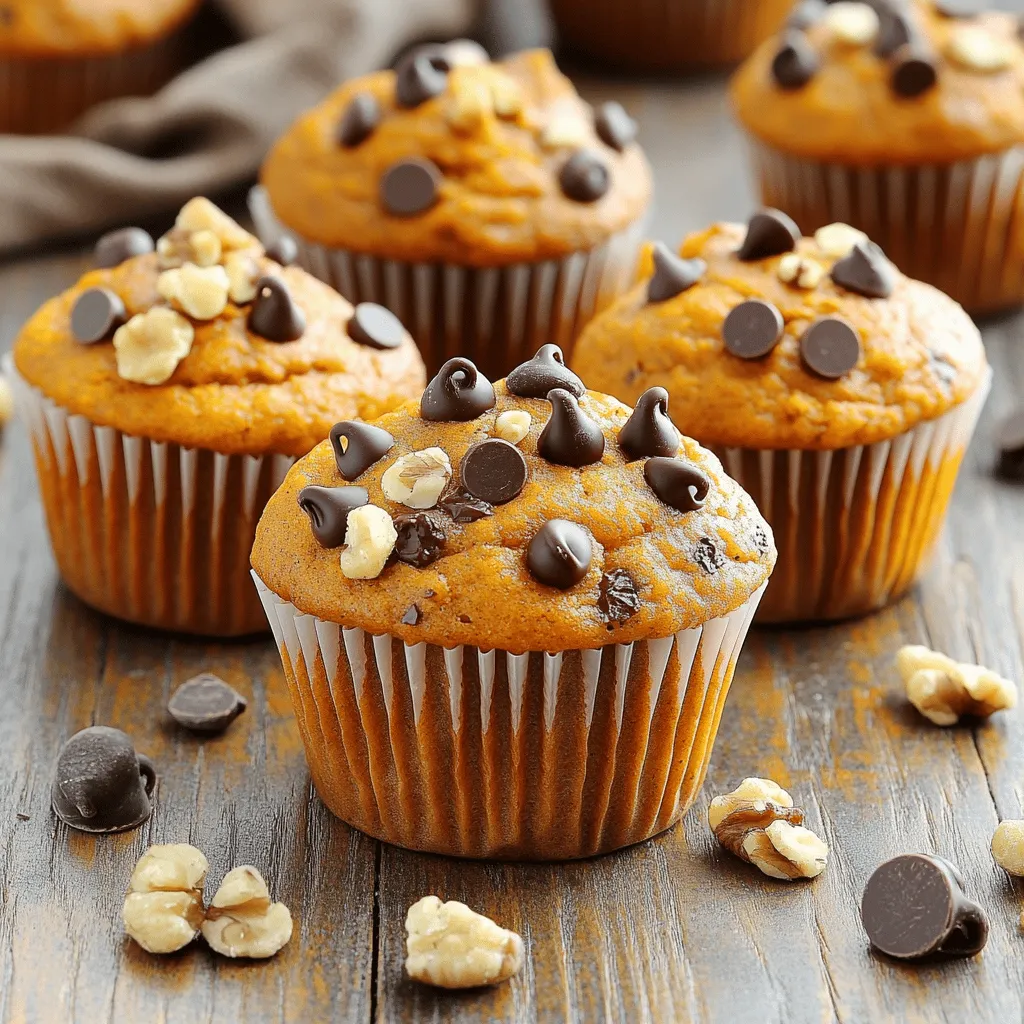
Are you looking for a tasty and healthy snack? These Pumpkin Protein Muffins are both nutritious and easy to make.

- 1 cup of fresh peaches, peeled and diced - ¾ cup granulated sugar - 1 teaspoon vanilla extract - 1 tablespoon lemon juice - 1 teaspoon ground cinnamon - ½ teaspoon nutmeg - 2 sheets of puff pastry (thawed) - ½ cup unsalted butter, melted - 1 cup all-purpose flour (for dusting) - 1 egg (beaten, for egg wash) - Powdered sugar (for dusting, optional) I love using fresh peaches in this recipe. They give the cruffins a sweet, juicy flavor. You will need to peel and dice them first. This makes about one cup, which is just enough for the filling. Next, granulated sugar is your best friend here. It brings out the natural sweetness of the peaches. You will also add some vanilla extract and lemon juice. The vanilla adds warmth, while the lemon juice brightens the flavors. For spices, we’ll mix in ground cinnamon and nutmeg. These spices add a cozy touch to the filling. Now let’s talk about the pastry. You will need two sheets of thawed puff pastry. Puff pastry gives the cruffins their flaky texture. Melted unsalted butter helps to layer the pastry. Dusting flour is key to prevent sticking. Lastly, you will brush the tops with a beaten egg for that golden finish. Having all these ingredients ready makes the process smooth. Enjoy the sweet aroma of peaches and spices as you make these delightful cruffins! - Mix diced peaches with sugar, vanilla, lemon juice, cinnamon, and nutmeg. - Let sit for about 10 minutes to blend flavors. Start by taking one cup of fresh, peeled, and diced peaches. In a medium bowl, add ¾ cup of granulated sugar, 1 teaspoon of vanilla extract, and 1 tablespoon of lemon juice. Sprinkle in 1 teaspoon of ground cinnamon and ½ teaspoon of nutmeg. Stir well to combine. The sugar helps draw out the juices from the peaches, making a tasty filling. Let this sit for about ten minutes. This wait time allows all the flavors to blend nicely. - Preheat oven to 400°F (200°C). - Line a muffin tin with paper liners. While your peach filling is resting, preheat your oven to 400°F (200°C). This temperature helps achieve a crispy crust on your cruffins. Next, grab your muffin tin. Line it with paper liners to ensure your cruffins come out easily. This step also makes for easy cleanup! - Roll out puff pastry and cut into equal squares. - Brush melted butter between layers and form stacks for shaping cruffins. Now, take your thawed puff pastry sheets. On a lightly floured surface, roll each sheet out to about ¼-inch thickness. Cut each sheet into 4 equal squares. For each square, lightly brush melted butter on one side. Stack four squares on top of each other, brushing melted butter between each layer. After stacking, cut these into two rectangles. This layering gives the cruffins their flaky texture. - Press rectangles into the muffin tin and fill with peach mixture. - Fold tops over filling and secure edges as needed. Next, take each rectangle of pastry and press it firmly into the greased muffin tin. Make sure the edges rise along the sides. Spoon the peach filling generously into each cruffin shell. After filling, fold the tops of the pastry over the filling, pinching the edges to secure them. This helps keep the delicious filling inside while baking. - Brush with egg wash and bake for 20-25 minutes. - Cool and dust with powdered sugar if desired. Before baking, brush the tops of the cruffins with a beaten egg. This will give them a lovely golden color. Bake in the preheated oven for 20 to 25 minutes. You’ll know they are done when they are puffed and golden brown. Once baked, remove them from the oven and let cool for about five minutes. Gently take the cruffins out of the tin and place them on a cooling rack. If you like, dust with powdered sugar for a sweet finish. Enjoy your tasty Peach Pie Cruffins! - Make sure the puff pastry is fully thawed before you roll it out. - Avoid overfilling each cruffin to keep them from spilling while baking. - Serve the cruffins warm with a scoop of vanilla ice cream or whipped cream. - Arrange them on a platter. Add mint or edible flowers for a pretty touch. - Try adding spices like cardamom for a warm twist. - You can switch fruits too! Apples or berries work well for different flavors. {{image_2}} You can change the fruit in your cruffins for new tastes. Use apples, pears, or mixed berries for a twist. These fruits bring their own sweet and tart flavors. Adding nuts like walnuts or pecans gives crunch. Try maple syrup instead of sugar for a richer taste. Want a lighter cruffin? Swap granulated sugar for honey or maple syrup. These natural sweeteners add flavor and cut down on refined sugars. You can also use whole wheat pastry for a healthier crust. This adds fiber and nutrients without losing taste. Make your cruffins stand out! Serve them in small ramekins for a fancy touch. This makes each cruffin feel special. Top with yogurt instead of powdered sugar for a fresh look. It adds creaminess and balances the sweetness. These small changes can impress your guests. Keep any uneaten cruffins in an airtight container at room temperature. This will keep them fresh for a couple of days. If you want to enjoy them later, make sure the container seals tightly. This way, they won’t dry out or lose their lovely texture. Freeze baked cruffins in a single layer. Once frozen, transfer them to a container. This helps prevent them from sticking together. When you're ready to enjoy them, you can pull out as many as you want without fuss. They can last for about a month in the freezer. Reheat in the oven at a low temperature. This keeps the cruffins crispy on the outside. You can also use a microwave for a few seconds if you’re in a hurry. Just be careful not to overheat them, as this can make them chewy instead of flaky. Peach pie cruffins are a fun mix of peach pie flavor and a croissant-like texture. They have flaky layers from puff pastry and a sweet peach filling. Each bite offers a warm, comforting taste, perfect for dessert. You can use canned peaches if you want. They save time and are easy to find. However, fresh peaches taste brighter and better. Canned peaches can be too sweet and mushy. If you use them, drain and rinse to lower the syrupy sweetness. Look for a golden brown color on top of your cruffins. They should be puffed up and firm to the touch. Baking time is about 20 to 25 minutes. Keep an eye on them to avoid overbaking. These cruffins pair well with whipped cream or vanilla ice cream. You can also enjoy them with a hot cup of coffee. A sprinkle of powdered sugar adds a nice touch. Yes, you can make the peach filling ahead of time. Just store it in the fridge for up to 2 days. This saves you time when you’re ready to bake. Just remember to give it a stir before using! Peach pie cruffins are a fun and tasty treat you can easily make at home. We covered fresh ingredients, how to prepare the filling, and the ideal baking steps. Remember to keep your puff pastry thawed for the best texture. You can personalize these treats with different fruits and spices. Store any leftovers so you can enjoy them later. Overall, cruffins are perfect for any occasion. So go ahead, try them, and savor each bite!

Peach Pie Cruffins Delightful and Easy Dessert Recipe

If you crave a dessert that’s both sweet and flaky, you’ve come to the right place! Today, I’ll show you

- 1 lb shrimp, peeled and deveined - 8 small corn tostadas - 1 cup shredded cabbage - Optional: 1/2 cup crumbled feta cheese - 2 ripe avocados - 1 medium tomato, diced - 1/4 cup red onion, finely chopped - 1 jalapeño, seeded and minced - Juice of 1 lime - Salt to taste - 1 tablespoon olive oil - 1 teaspoon smoked paprika - 1 teaspoon garlic powder - 1 teaspoon lime zest - Fresh cilantro for garnish To make these summer shrimp tostadas truly shine, you need fresh and quality ingredients. Start with shrimp. I prefer large shrimp, as they pack a good flavor. Make sure they are peeled and deveined before cooking. Next, grab some small corn tostadas. They create a perfect base for the toppings. Shredded cabbage adds a crunch and freshness to each bite. You can also add feta cheese for a creamy finish, but it is not required. For the guacamole salsa, choose ripe avocados. They should be soft to the touch. Dice a medium tomato for a burst of color and flavor. Red onion brings a nice bite, while jalapeño adds heat. Squeeze fresh lime juice for brightness and sprinkle salt to enhance the taste. Finally, you'll need a few seasonings. Olive oil helps with marinating the shrimp. Smoked paprika adds depth, while garlic powder gives that classic taste. Don't forget lime zest for an extra zing. Fresh cilantro is the perfect finishing touch. It adds a pop of color and fresh flavor. Gather all these ingredients, and you are ready to create a delicious meal! To marinate the shrimp, start with a medium bowl. Toss in the shrimp, olive oil, smoked paprika, garlic powder, lime zest, salt, and pepper. Mix well until the shrimp are fully coated. Let the shrimp sit for about 15 minutes to soak up the flavors. This time helps the shrimp become tasty and tender. Heat a large skillet over medium-high heat. Add the marinated shrimp to the skillet. Cook them for 5 to 7 minutes. Keep an eye on the color; they should turn pink and opaque. Once cooked, take them off the heat. This quick cooking creates juicy shrimp perfect for your tostadas. In a separate bowl, take the ripe avocados and mash them with a fork. You want a chunky texture, not too smooth. Then, add the diced tomato, finely chopped red onion, minced jalapeño, lime juice, and a pinch of salt. Stir everything together gently until combined. This salsa adds a fresh and zesty kick. Start with your small corn tostadas. First, layer on the shredded cabbage. This adds crunch and color. Next, place a generous amount of sautéed shrimp on top. Finally, add a big spoonful of guacamole salsa. If you like feta cheese, sprinkle some on top. This creates a beautiful and tasty bite. To finish, garnish your tostadas with fresh cilantro. This adds a lovely green touch. Serve the tostadas right away for the best taste. Enjoy your summer meal with friends and family. These tostadas are fun to eat and packed with flavor! To cook shrimp well, use high heat. I suggest sautéing shrimp over medium-high heat. This method gives you great flavor and texture. Cook shrimp for about 5 to 7 minutes. They should turn pink and opaque. If they curl into a tight C shape, they are done. Avoid overcooking, as it makes shrimp tough. To keep avocado fresh, use lime juice. Mix it in right after cutting the avocado. This helps prevent browning. Store any leftovers in an airtight container. Press plastic wrap against the surface to limit air exposure. For salsa consistency, mash the avocados lightly. Mix in the diced tomato and onion without pureeing. You want a chunky texture for a tasty bite. Pair these tostadas with cold drinks like lemonade or iced tea. A light beer also works well. For summer events, serve on a large platter. Arrange tostadas with toppings to make them pretty. Guests can pick their own, which adds fun to your meal. {{image_2}} You can change the shrimp for other proteins. Chicken works well and is easy to cook. Just cut it into small pieces and use the same spices. For a fish option, try white fish like tilapia or cod. If you want a vegetarian choice, use black beans or grilled veggies. They add great flavor and texture. Want to spice things up? Add chili powder or cayenne pepper. These spices give a nice kick to the shrimp. If you prefer a milder taste, skip the heat. Fresh herbs like cilantro or parsley can add a fresh twist. They brighten up the dish without overpowering the flavors. Not a fan of corn tostadas? You can use flour tostadas for a softer bite. Baked tostadas are a healthier option. They give the same crunch without frying. You can even use lettuce leaves for a low-carb choice. This keeps it light and fresh for summer days. To keep your shrimp and guacamole salsa fresh, follow these steps: - Shrimp: Place the cooked shrimp in an airtight container. - Guacamole Salsa: Store the guacamole salsa in a bowl. Cover it tightly with plastic wrap, pressing it down to reduce air exposure. These methods help prevent spoilage and keep flavors intact. You can keep the shrimp in the fridge for up to three days. If you want to freeze the shrimp, it can last up to three months. For the guacamole salsa, store it in the fridge for one to two days. Freezing guacamole salsa isn't ideal, as it can change texture upon thawing. To reheat shrimp without overcooking, use these tips: - Heat a skillet over low to medium heat. - Add a splash of water or broth to keep moisture. - Cook for one to two minutes, stirring gently until warmed. This method ensures your shrimp stay juicy and tender, avoiding a rubbery texture. You can marinate shrimp for about 15 minutes. This time allows the shrimp to soak up the flavors. If you marinate them too long, they can become mushy. Keep it short for the best texture. Yes, you can make guacamole salsa ahead of time. Store it in an airtight container in the fridge. To keep it fresh, press plastic wrap directly onto the surface. This helps prevent browning. Use it within 1-2 days for the best taste. If you can’t find corn tostadas, you have options. You can use tortilla chips or pita bread. You can also make your own tostadas by baking corn tortillas until crispy. Just bake them at 400°F for about 10 minutes. Yes, this recipe is gluten-free. Just ensure your corn tostadas are labeled gluten-free. All other ingredients in the recipe are naturally gluten-free. This makes it a great option for those with gluten sensitivities. The guacamole salsa has a mild heat from the jalapeño. If you prefer less spice, remove the seeds. For more heat, add another jalapeño or some hot sauce. Taste it as you go to find your perfect level of spice. In this post, we explored how to make delicious shrimp tostadas topped with guacamole salsa. You learned about the main ingredients, preparation steps, and serving tips. Perfecting your shrimp and ensuring fresh salsa can really enhance your dish. Remember, you can customize your tostadas with different proteins and flavors. Whether hosting friends or enjoying a family meal, these tostadas fit any occasion. Now, it’s your turn to make this simple, tasty dish. Enjoy each bite and share your creations!

Summer Shrimp Tostadas with Guacamole Salsa Delight

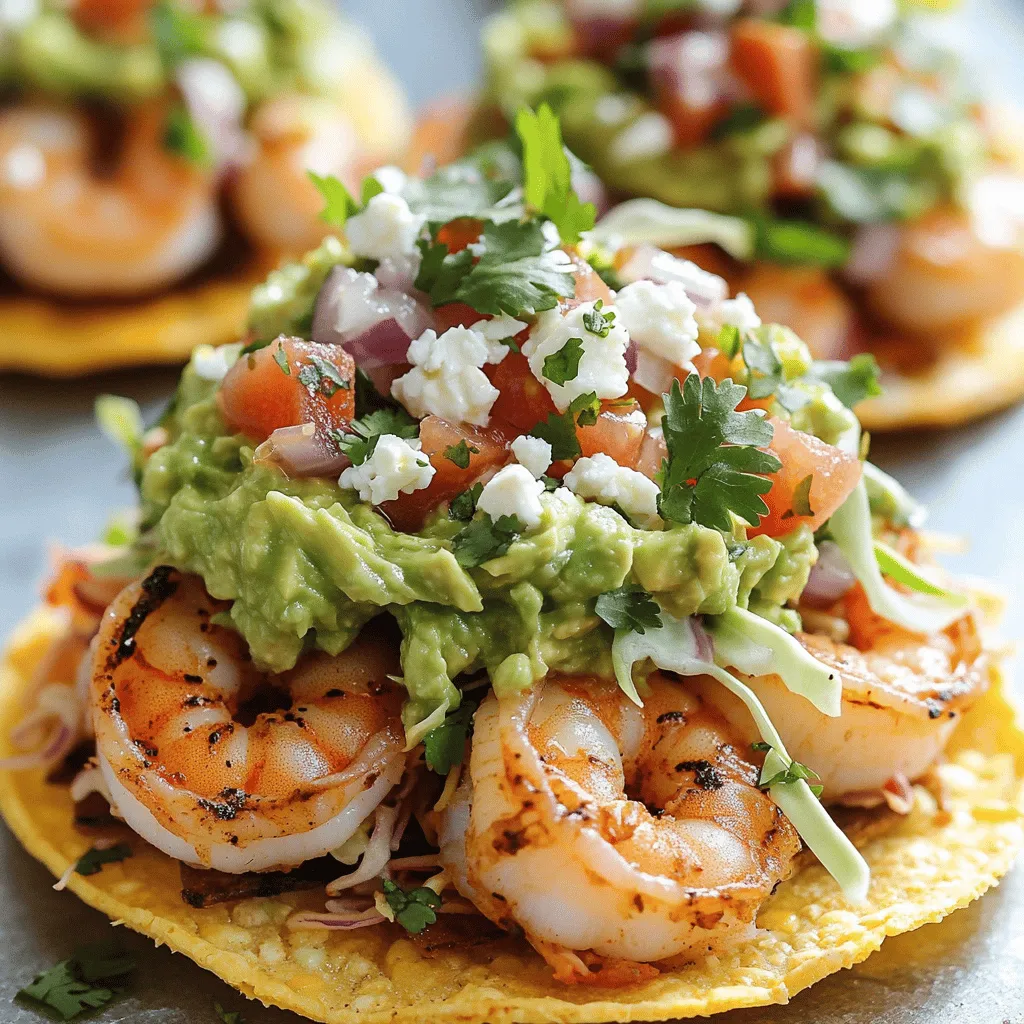
Dive into summer with my vibrant Summer Shrimp Tostadas with Guacamole Salsa! This dish blends juicy shrimp, crunchy tostadas, and

- 1 cup all-purpose flour - 1/2 cup pumpkin puree - 1/4 cup granulated sugar - 1/4 cup brown sugar, packed - 1 teaspoon baking powder - 1/2 teaspoon baking soda - 1 teaspoon pumpkin pie spice - 1/4 teaspoon salt - 1/2 teaspoon vanilla extract - 1/4 cup milk (dairy or non-dairy) - 1 large egg - 2 tablespoons melted butter or coconut oil To make perfect pumpkin spice baked donuts, you need fresh ingredients. The flour gives the donuts structure. Pumpkin puree adds moisture and flavor. Granulated and brown sugar sweeten the treat. Baking powder and baking soda help them rise. Pumpkin pie spice brings warmth and fall flavors. Salt enhances all the tastes. Vanilla extract adds a nice touch. Milk keeps the batter smooth and creamy. The egg binds everything together. Finally, melted butter or coconut oil adds rich flavor. - Powdered sugar - Cinnamon-sugar mixture - Maple syrup These toppings can make your donuts even more special. Dusting with powdered sugar gives a sweet finish. A cinnamon-sugar mix adds a warm, cozy flavor. Maple syrup is perfect for dipping and brings a nice sweetness. Choose one or mix and match! - Preheat your oven to 350°F (175°C). - Grease the donut pan with non-stick spray or oil. Start by preparing your oven. Set it to 350°F (175°C). This heat is perfect for baking the donuts. While the oven heats, grab your donut pan. Coat it with non-stick spray or oil. This step helps the donuts pop out easily after baking. - Whisk together all-purpose flour, sugars, baking powder, baking soda, pumpkin pie spice, and salt. Next, move to dry ingredients. In a large bowl, add 1 cup of all-purpose flour. Pour in 1/4 cup of granulated sugar and 1/4 cup of brown sugar. Add 1 teaspoon of baking powder and 1/2 teaspoon of baking soda. Sprinkle in 1 teaspoon of pumpkin pie spice plus 1/4 teaspoon of salt. Use a whisk to mix well. This ensures even flavor throughout the donuts. - Combine pumpkin puree, milk, vanilla extract, egg, and melted butter (or coconut oil). Now, let’s move to the wet mix. In another bowl, combine 1/2 cup of pumpkin puree. Add 1/4 cup of milk, 1/2 teaspoon of vanilla extract, and 1 large egg. Pour in 2 tablespoons of melted butter or coconut oil. Mix until smooth and creamy. This mixture adds moisture and flavor to your donuts. - Combine wet and dry ingredients without overmixing. - Transfer batter to a piping bag and fill the donut pan. It’s time to combine! Pour the wet mixture into the dry ingredients. Blend gently until just mixed. Some lumps are okay; don’t overmix. Now, grab a piping bag or a zip-top bag with one corner cut off. Fill the donut pan about 2/3 full with your batter. This ensures enough room for rising. - Bake for 10-12 minutes. - Check doneness with a toothpick. Place the pan in your preheated oven. Bake for 10 to 12 minutes. Use a toothpick to test if they are done. Insert it in the center of a donut. If it comes out clean, they’re ready! - Let cool in the pan for 5 minutes before transferring to a wire rack. Once baked, let the donuts cool in the pan for 5 minutes. This step keeps them soft. After that, carefully transfer them to a wire rack. Allow them to cool completely. Now they are ready for serving! - Ensure ingredients are at room temperature. This helps the batter mix well. - Do not overmix the batter. A few lumps are okay. Overmixing can make donuts tough. - For a great look, dust the cooled donuts with powdered sugar. - You can also dip them in a cinnamon-sugar mix for added flavor. - Serve on a rustic wooden platter. Add a side of maple syrup for dipping. - Pair these donuts with hot coffee or spiced cider for the perfect fall treat. - Adjust sweetness to taste. You can add more sugar if you prefer sweeter donuts. - Add nuts or chocolate chips to the batter. Walnuts or pecans add a nice crunch. - Chocolate chips can make the donuts extra special and fun for kids. {{image_2}} You can make pumpkin spice baked donuts even more fun. Here are some ideas: - Adding chocolate chips: Mix in 1/2 cup of chocolate chips for a sweet addition. The chocolate pairs well with pumpkin spice. - Incorporating nuts: Walnuts or pecans add crunch. Chop them up and fold in 1/4 cup to 1/2 cup. This gives texture and flavor. - Making them gluten-free: Substitute the all-purpose flour with a gluten-free blend. Look for one that works well in baking. Toppings can change the whole feel of your donuts. Consider these options: - Glazes: A maple or chocolate glaze makes a sweet finish. Just melt your choice of glaze and dip the cooled donuts. - Sprinkling with different spices: Try cinnamon, nutmeg, or even a dash of cayenne for a kick. A sprinkle can add a nice touch of flavor. Want to make your donuts a bit healthier? Here are some swaps: - Using applesauce in place of oil: Replace the melted butter or coconut oil with 1/4 cup of unsweetened applesauce. This lowers fat and adds moisture. - Substituting coconut sugar for granulated sugar: Coconut sugar gives a lower glycemic index. Use it in equal parts for a healthier sweetness. You can store your pumpkin spice baked donuts at room temperature for one day. If you want them to last longer, place them in the fridge. Make sure to use an airtight container. This helps keep them fresh and moist. Avoid leaving them uncovered, as they will dry out quickly. To freeze your baked donuts, let them cool completely first. Then, wrap each donut in plastic wrap. Place the wrapped donuts in a freezer-safe bag or container. They can stay frozen for up to three months. When you're ready to eat, remove the donuts from the freezer and thaw them in the fridge overnight. This keeps their taste and texture intact. The best way to reheat your donuts is in the oven. Preheat the oven to 350°F (175°C). Place the donuts on a baking sheet and warm them for about five minutes. This method helps keep them soft. You can also use the microwave for a quick option. Heat them for about 10-15 seconds. Just be careful not to overheat, as that can make them dry. Enjoy your warm, tasty treats! To make pumpkin spice baked donuts, start by preheating your oven to 350°F. Grease your donut pan with non-stick spray or oil. In a bowl, whisk together flour, granulated sugar, brown sugar, baking powder, baking soda, pumpkin pie spice, and salt. In another bowl, mix pumpkin puree, milk, vanilla, egg, and melted butter. Combine both mixtures but do not overmix. Transfer the batter to a piping bag, fill the pan, and bake for 10-12 minutes. Check with a toothpick for doneness. Cool for five minutes before transferring to a rack. Yes, you can use fresh pumpkin. First, cook the pumpkin by roasting or steaming it until tender. After cooling, blend it until smooth to make puree. This will give your donuts a fresh taste. Fresh pumpkin may have more moisture, so adjust flour if needed. Look for a light golden color on the donuts. Insert a toothpick into the center; it should come out clean. If it has batter on it, bake for another minute or two. Timing may vary, so start checking at 10 minutes. Yes, you can easily make these donuts vegan. Replace the egg with a flax egg or applesauce. Use almond milk or any plant-based milk instead of dairy milk. Substitute melted coconut oil for butter. These swaps maintain great flavor and texture. These donuts stay fresh for about three days at room temperature. Store them in an airtight container to keep them moist. You can also refrigerate them for up to a week, but they may lose some softness. In this article, I shared how to make tasty pumpkin spice baked donuts. You learned about the ingredients, precise steps for baking, and tips for customizing your treats. Remember to store them properly to keep them fresh longer. Don’t hesitate to experiment with flavors and toppings for your own unique twist. Enjoy baking these easy, delicious donuts with family and friends!

Pumpkin Spice Baked Donuts Irresistible Fall Treat

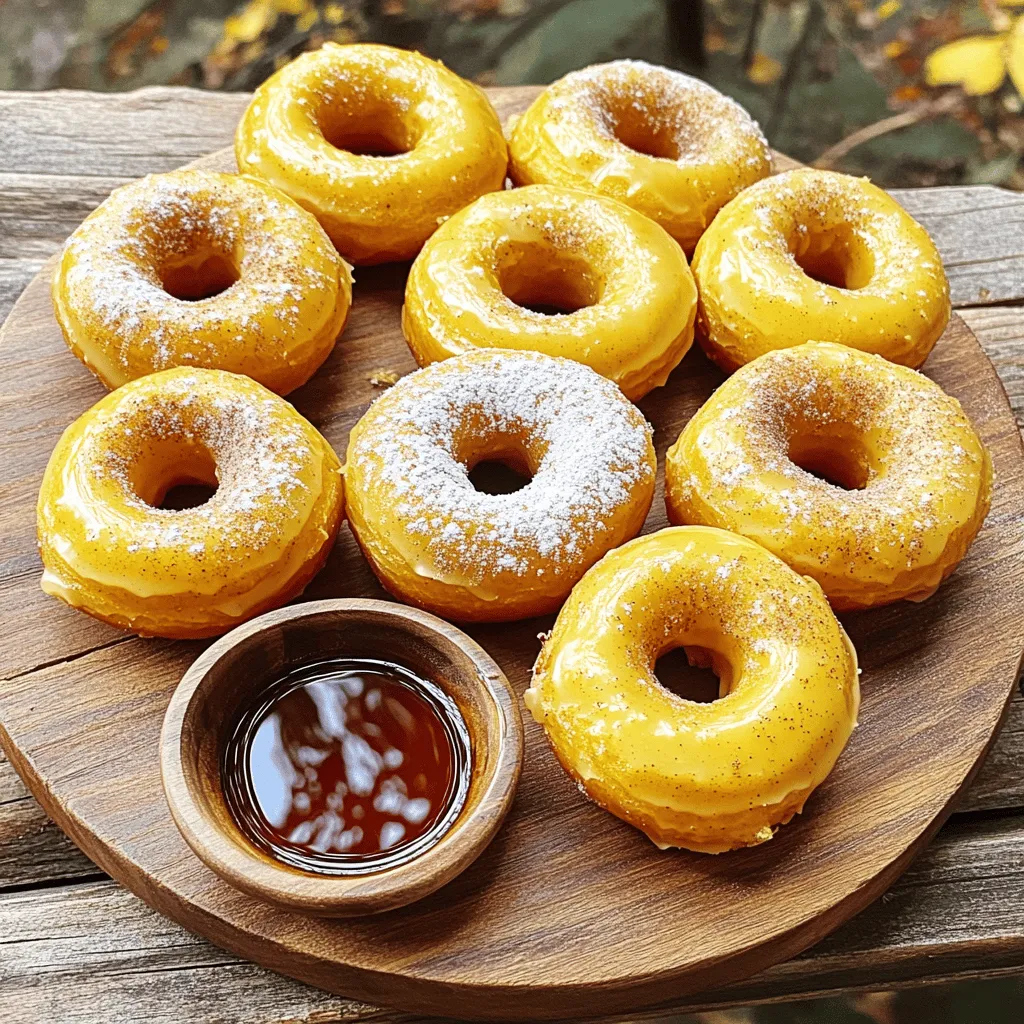
Fall is here, and what better way to celebrate than with delicious pumpkin spice baked donuts? These soft, fluffy treats

To make a great coconut curry pumpkin soup, you need a few key items. Here’s what you will need: - 2 cups pumpkin puree (fresh or canned) - 1 can (400ml) coconut milk - 1 tablespoon curry powder - 1 teaspoon turmeric powder - 1 small onion, finely chopped - 3 cloves garlic, minced - 1 tablespoon ginger, grated - 2 cups vegetable broth - 1 tablespoon olive oil - Salt and pepper to taste - Fresh coriander leaves for garnish - Red chili flakes (optional, for extra heat) These ingredients create a tasty and rich base for your soup. The pumpkin gives it a smooth texture, while the coconut milk adds creaminess. The curry and turmeric bring warmth and flavor. You can boost the taste of your soup with some extra ingredients. Consider adding: - A squeeze of lime juice for brightness - A dash of soy sauce for umami - A few chopped carrots for sweetness - A bit of bell pepper for crunch These optional ingredients can change the flavor profile without much effort. They make the soup more lively and exciting. If you have dietary needs, there are easy swaps you can make. Here are some substitutions: - Use almond milk instead of coconut milk for a lighter option. - Replace vegetable broth with chicken broth for a non-vegetarian version. - Use sweet potato puree instead of pumpkin for a different taste. - Omit the red chili flakes if you prefer a mild soup. These swaps help ensure everyone can enjoy this delicious soup. You can easily adapt the recipe to fit your needs while keeping the flavors intact. For the full recipe, check the section above. Start by gathering all your ingredients. This makes cooking easier. Chop the onion finely. Mince the garlic and grate the ginger. These steps help build flavor. Heat the olive oil in a large pot over medium heat. Add the chopped onion and sauté for 4-5 minutes until it softens. Stir often to avoid burning. Once the onion is soft, add the minced garlic and grated ginger. Cook for another 1-2 minutes. The aroma will fill your kitchen. Next, add your spices. Stir in the curry powder and turmeric. Mix these well with the onions. Cook for another minute. This step brings out the spices' full taste. Now, add the pumpkin puree and vegetable broth. Stir until everything is combined. Bring the mixture to a gentle simmer. Once it simmers, pour in the coconut milk. Stir well and let the soup cook for 10-15 minutes on low heat. This allows the flavors to meld together beautifully. After cooking, check the seasoning. Add salt and pepper to taste. If you like heat, sprinkle in some red chili flakes. Now, it’s time to blend the soup. Use an immersion blender for a smooth texture. If you don’t have one, transfer in batches to a blender. Blend until silky and creamy. Taste one last time and adjust the seasoning if needed. Ladle the soup into bowls and garnish with fresh coriander leaves for a pop of color. For the full recipe, refer to the earlier section. Enjoy your delicious creation! To change the spice level, start with less curry powder. You can add more later if you want more heat. If you like it mild, skip the red chili flakes. For extra heat, sprinkle in some flakes while cooking. Taste as you go to find what you like best. To make your soup smooth, use an immersion blender. This tool works great right in the pot. If you don’t have one, pour soup into a regular blender in small batches. Blend until creamy, then return it to the pot. Make sure to blend well to get rid of any lumps. Fresh herbs add a burst of flavor. Use coriander leaves as a garnish for a fresh taste. You can also add fresh basil or mint for a different twist. Chop them finely and sprinkle on top just before serving. This small step brightens the soup and makes it more inviting. For the full recipe, check out the earlier section. {{image_2}} You can easily make this soup vegan. Simply use vegetable broth instead of chicken broth. The coconut milk already makes it creamy and rich. This soup is packed with flavor and fits a vegan diet perfectly. This recipe is naturally gluten-free. All the ingredients listed are safe for gluten-free diets. Just make sure any broth you use is labeled gluten-free. This way, everyone can enjoy this tasty soup without worry. You can mix things up with different spices. For a kick, add cumin or coriander. If you like it spicy, toss in some diced jalapeños. You can also swap pumpkin for sweet potatoes or butternut squash. Each change gives a new taste and keeps it fun. Check out the Full Recipe for more ideas! After enjoying your coconut curry pumpkin soup, let it cool first. Use airtight containers for storage. This keeps the soup fresh and safe. Store it in the fridge for up to five days. Label your containers with the date. This way, you’ll know when to eat it. To freeze the soup, pour it into freezer-safe containers. Leave some space at the top. The soup will expand as it freezes. You can store it in the freezer for up to three months. When you're ready to eat, thaw it overnight in the fridge. This makes reheating much easier. When reheating, use a pot on low heat. Stir often to avoid sticking. If the soup is too thick, add a little broth or water. You can also microwave it in a bowl. Just cover it loosely to allow steam to escape. Heat in short bursts, stirring in between. This will help keep the soup creamy and smooth. Enjoy your delicious coconut curry pumpkin soup again! For the complete recipe, refer to the Full Recipe section. Coconut Curry Pumpkin Soup lasts about 3 to 5 days in the fridge. Make sure to store it in an airtight container. This helps keep the soup fresh and safe to eat. If you want to enjoy it later, consider freezing it. Yes, you can make this soup in a slow cooker! Just add all the ingredients to the slow cooker. Cook on low for about 6 to 8 hours or on high for 3 to 4 hours. Blend it when it’s done cooking for a smooth texture. The slow cooker brings out the flavors well. You can make this soup without coconut milk. Use almond milk or cashew cream as a substitute. These options add creaminess without the coconut flavor. You can also use vegetable broth for a lighter soup. Adjust the spices for taste, and it will still be delicious. For the full recipe, check the earlier section. This blog post covered how to make delicious Coconut Curry Pumpkin Soup. You learned about the essential and optional ingredients, along with substitutions for dietary needs. Step-by-step instructions helped guide your cooking process. Tips showed how to adjust spices and improve texture. We also explored variations like vegan and gluten-free options, and storage tips for leftovers. Enjoy experimenting with this tasty soup. It's simple and can fit your needs!

Coconut Curry Pumpkin Soup Flavorful and Easy Recipe

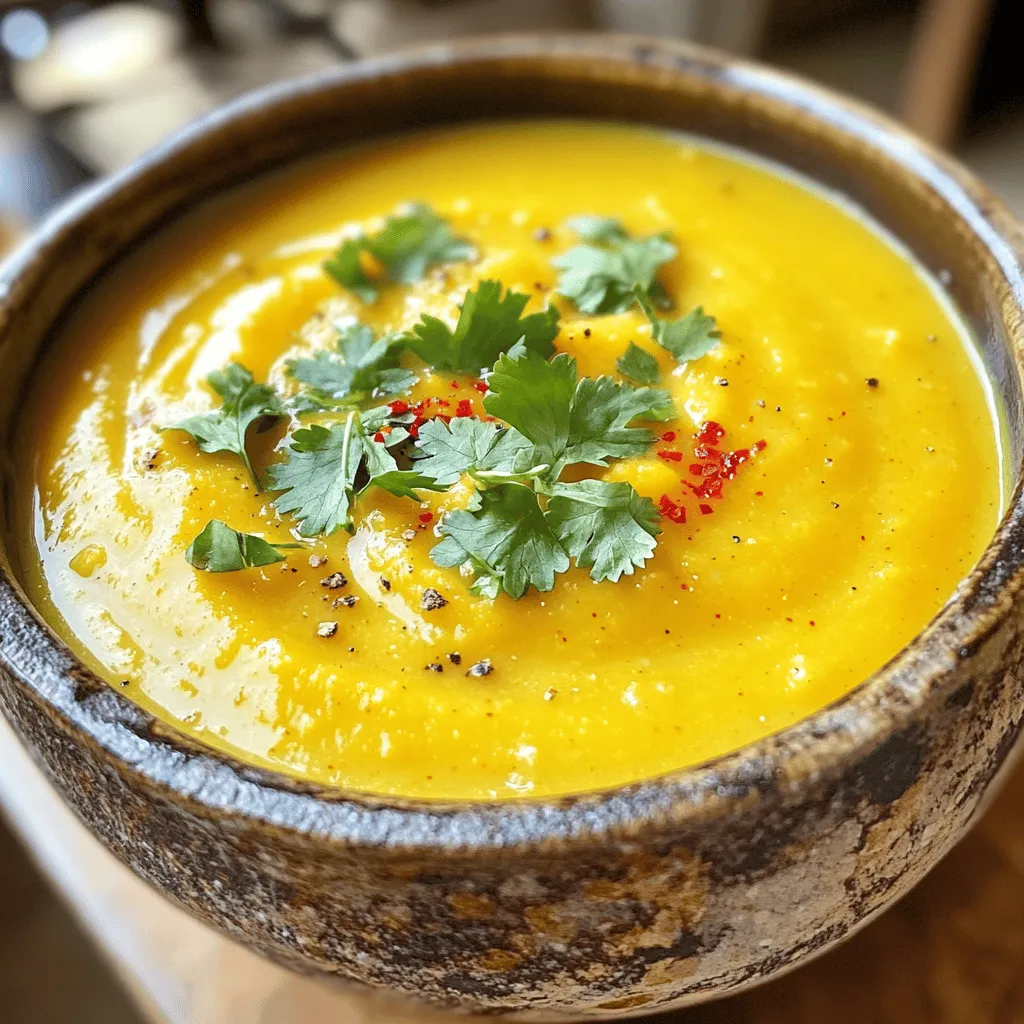
Are you ready to warm up with a flavorful twist on comfort food? This Coconut Curry Pumpkin Soup is both

- 3 cups Rice Chex cereal - 3 cups Corn Chex cereal - 1 cup pretzel sticks - 1 cup mixed nuts (e.g., almonds, cashews, pecans) - 1 cup bagel chips, broken into pieces These main ingredients form the base of your Tangy Dill Pickle Chex Mix. The Rice Chex and Corn Chex add a great crunch. Pretzel sticks bring saltiness. Mixed nuts give a nutty flavor, and bagel chips add a nice crunch. - 1/2 cup unsalted butter, melted - 1/4 cup dill pickle juice - 1 tablespoon garlic powder - 1 tablespoon onion powder - 1 tablespoon dried dill weed The flavoring ingredients enhance the taste of your snack. The melted butter makes it rich. Dill pickle juice adds tanginess. Garlic powder and onion powder give warm flavors. Dried dill weed boosts the pickle taste. - 1 teaspoon Worcestershire sauce - 1 teaspoon cayenne pepper (optional, for heat) - Salt to taste These optional ingredients can make your mix unique. Worcestershire sauce adds depth. Cayenne pepper gives heat. You can adjust the salt to fit your taste. If you want extra zing, try adding the optional ingredients. For the full details, check the Full Recipe. First, preheat your oven to 250°F (120°C). This low heat will help toast the mix slowly. While the oven warms up, prepare your baking sheet. Line it with parchment paper or a silicone mat. This will keep the mix from sticking. In a large bowl, combine the Rice Chex cereal, Corn Chex cereal, pretzel sticks, mixed nuts, and bagel chips. Toss them gently. This helps to mix everything evenly. Make sure each piece is spread out well. You want to ensure every bite has a little bit of everything. In another bowl, whisk together the melted butter and dill pickle juice. Add in the garlic powder, onion powder, dried dill weed, Worcestershire sauce, and cayenne pepper if you're feeling spicy. Whisk until everything blends smoothly. This mix gives the Chex mix its tangy flavor. Pour the butter mixture over the dry ingredients. Use a spatula to fold it all together. Make sure every piece gets a good coating. Spread the mixture evenly on your baking sheet. Bake it in the preheated oven for one hour. Stir every 15 minutes. This helps to toast the mix evenly. Once it's golden and crispy, remove it from the oven. Season with salt to taste. Let it cool fully on the baking sheet before moving it to a container. To make your Tangy Dill Pickle Chex Mix really shine, you need a good balance of seasonings. The key is to mix the right amount of garlic powder, onion powder, and dill weed. These ingredients work together to create a savory base. You can also adjust the heat with cayenne pepper. If you want some spice, add a teaspoon. If you prefer a milder taste, leave it out. This way, you can control how spicy your mix is. For the best freshness, store your Chex Mix in an airtight container. This keeps it crunchy and tasty. Do not leave it in an open bowl for too long. The ideal containers are glass jars or plastic bins with tight lids. These options help protect the mix from air and moisture. When serving, presentation matters. Use a large, colorful bowl for a fun look. You can also make individual snack bags. This is great for parties and gatherings. For a creative twist, garnish with fresh dill sprigs. It adds a pop of color and a hint of flavor. Enjoy your snack mix with friends and family! {{image_2}} You can easily switch up the flavors in Tangy Dill Pickle Chex Mix. Try adding spices like smoked paprika or chili powder for a twist. You can also mix in your favorite snack foods. Consider using cheese puffs or popcorn for extra crunch. Substitute the mixed nuts with your preferred nuts, like walnuts or peanuts, to create a new flavor profile. If you need gluten-free options, use gluten-free Chex cereals. Many brands offer rice and corn Chex that fit this need. Instead of pretzel sticks, look for gluten-free pretzels. For vegan substitutions, replace the unsalted butter with vegan butter or coconut oil. The dill pickle juice and spices remain the same, making it easy to keep the flavor intact. You can make this mix fun for the holidays! Add seasonal items like candy corn for Halloween or red and green M&Ms for Christmas. For themed gatherings, think about using colors that match your event. You can also toss in festive sprinkles for birthday parties. These fun mix-ins will make your Tangy Dill Pickle Chex Mix stand out! Tangy Dill Pickle Chex Mix can last for about two weeks when stored right. Keep it in an airtight container to maintain its crunch. If you notice any moisture, it might get soggy. Yes, you can make this snack mix ahead of time. To do this, bake and cool the mix completely. After that, store it in an airtight container. This will keep the flavor fresh and the texture crisp. You can serve Tangy Dill Pickle Chex Mix with drinks like lemonade or iced tea. It also pairs well with creamy dips, like ranch or dill dip. For a fun twist, serve it with pickles or olives on the side. While you can bake this mix at a higher temperature, it’s best to stick to 250°F. If you increase the temperature, watch it closely. Higher heat can burn the Chex and nuts quickly. If you must bake at a higher temp, reduce the baking time to avoid overcooking. Tangy Dill Pickle Chex Mix is a crunchy snack with a zesty twist. This mix combines Rice Chex, Corn Chex, pretzels, nuts, and bagel chips. It gets its unique taste from dill pickle juice and spices. The mix is perfect for parties or movie nights. Preparation Time: 15 minutes Cooking Time: 1 hour Total Time: 1 hour 15 minutes Servings: 12 If you love snack mixes, check out these similar recipes: - Spicy Sriracha Snack Mix - Sweet and Salty Trail Mix - Classic Chex Party Mix Suggested Tools: - Large mixing bowl - Baking sheet - Parchment paper or silicone mat - Spatula for mixing This blog post shared a fun recipe for Tangy Dill Pickle Chex Mix. We explored the key ingredients like Rice Chex, pretzel sticks, and mixed nuts. I detailed how to blend flavors using simple spices like dill and garlic powder. You learned the steps to bake a crunchy snack and tips for serving and storing. Enjoy making this tasty mix! Feel free to modify it for your taste. With a few easy changes, you can make it your own. Go ahead and treat yourself and your guests with this delightful snack!

Tangy Dill Pickle Chex Mix Flavorful Snack Recipe

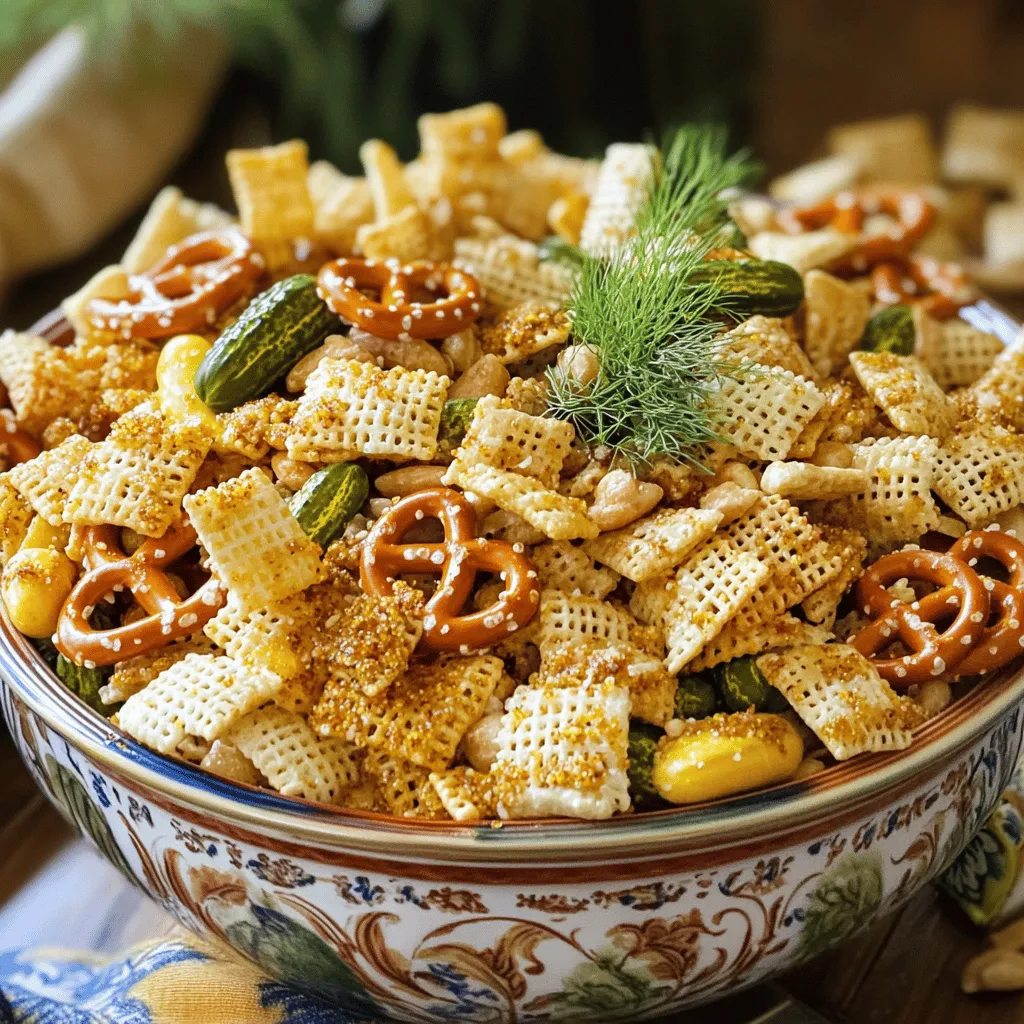
Are you ready to jazz up your snack game? This Tangy Dill Pickle Chex Mix combines crunch and flavor in

- 1/2 cup unsalted butter, melted - 1 cup brown sugar, packed - 1 large egg - 1 teaspoon vanilla extract - 1/3 cup unsweetened cocoa powder - 1/2 cup all-purpose flour - 1/4 teaspoon salt - 1/4 teaspoon baking powder - 1/2 cup semi-sweet chocolate chips - 1/2 cup unsalted butter, softened - 1/2 cup granulated sugar - 1/2 cup brown sugar, packed - 1 large egg - 1 teaspoon vanilla extract - 1 1/2 cups all-purpose flour - 1/2 teaspoon baking soda - 1/4 teaspoon salt - 1 cup semi-sweet chocolate chips To make these brookies, gather your ingredients first. The brownie layer mixes rich cocoa and chocolate chips. The cookie layer adds sweetness and texture. Each layer brings joy to this tasty treat. You can find the full recipe for perfect brookies below. Every ingredient matters. Melt the butter for the brownie layer. It adds richness. For the cookie layer, soften the butter. This helps create a fluffy texture. Use fresh eggs and pure vanilla for the best flavor. Choose good quality chocolate chips. They make a big difference in taste. Semi-sweet chips are perfect for both layers. Don't skip the salt; it enhances the sweetness. Now you are ready to bake! Enjoy the delightful process of making these brookies. It's a fun way to mix brownies and cookies into one delicious dessert. - Set oven to 350°F (177°C) - Grease or line a 9x9 inch baking pan - Combine melted butter and brown sugar in a bowl. - Mix in one egg and one teaspoon of vanilla extract. - Sift in cocoa powder, flour, salt, and baking powder. - Fold in half a cup of semi-sweet chocolate chips. - Cream half a cup of softened butter with granulated and brown sugar. - Beat in one egg and one teaspoon of vanilla extract. - Mix dry ingredients: flour, baking soda, and salt in another bowl. - Gradually add dry mix to the wet mix and fold in one cup of chocolate chips. - Spoon the brownie layer into the prepared pan, spreading it evenly. - Drop spoonfuls of the cookie dough on top without spreading. - Bake for 25-30 minutes until a toothpick comes out with moist crumbs. - Cool brookies in the pan for 15-20 minutes. - Lift them out using parchment paper and cool on a wire rack. You can find the Full Recipe above for all the details. Enjoy your delicious brookies! - Ensure proper ingredient measurements: Accurate measurements are key. Use measuring cups and spoons. This step keeps your brookies balanced and tasty. Too much flour or sugar can change the texture and flavor. Always level off your dry ingredients for best results. - Avoid overmixing the batter: Mix until just combined. Overmixing can make your brookies tough. When you fold in ingredients, do it gently. This keeps the batter light and fluffy, resulting in a perfect treat. - Serve with vanilla ice cream: A scoop of vanilla ice cream adds creaminess. The cold ice cream pairs well with warm brookies. This combination creates a delightful contrast in temperature and flavor. - Drizzle with chocolate sauce: Adding chocolate sauce makes each bite richer. You can use store-bought or homemade sauce. Drizzle it over the top for a beautiful finish. This extra touch makes the dessert even more appealing. - Cut into fun shapes: Use cookie cutters for unique shapes. This makes your brookies stand out at parties. Kids love fun shapes, and it adds a playful touch. - Use colorful sprinkles for decoration: Sprinkles add color and fun. They are easy to add and make the brookies pop. Just sprinkle them on top before serving to catch the eye of your guests. For the full recipe, check out Brookies Delight . {{image_2}} You can add nuts to your brookies for extra crunch. I love using walnuts or pecans. Just chop them up and mix them into the brownie or cookie layers. About half a cup works well. This little addition gives a fun texture and a nutty flavor. Want to switch things up? Try adding flavored extracts! Peanut butter or mint extract works wonders. A teaspoon is all you need for a nice twist. You can also use different types of chocolate. Dark chocolate chips or white chocolate chunks add a unique taste. Mixing these options can make your brookies fun and exciting. If you need a gluten-free treat, you can still enjoy brookies. Simply swap out regular flour for gluten-free flour. This change keeps the taste and texture similar. Just make sure to check your flour's baking instructions. It’s a simple way to make everyone happy! For the complete recipe, check out the Full Recipe section. To keep your brookies fresh, store them in an airtight container. This helps maintain their soft texture. You can keep them at room temperature for a few days. If you want to keep them longer, refrigerate them. Just be sure to let them cool completely before you store them. Freezing brookies is easy and a great way to save some for later. To freeze, wrap each brookie in plastic wrap. Then, place them in a freezer-safe bag. This helps prevent freezer burn. When you want to enjoy one, take it out and let it thaw at room temperature. For the best texture, you can also warm them in the oven for a few minutes. At room temperature, brookies last about 3-4 days. If you refrigerate them, they can last up to a week. Freezing can extend their life to about 2-3 months. Just remember, the fresher, the better! For the full recipe, check out the ingredients and steps above. Chocolate chip brookies are a fun mix of brownies and cookies. They have a rich brownie layer topped with cookie dough. This dessert gives you the best of both worlds. You get the chewy, fudgy brownie and the soft, sweet cookie in one bite. It’s a treat that makes everyone happy! Yes, you can make brookies ahead of time! Bake them and let them cool. After that, store them in an airtight container. They stay fresh at room temperature for a few days. If you want to keep them longer, you can freeze them. Just wrap them well in plastic wrap and foil. To check if brookies are done, insert a toothpick into the center. If it comes out with a few moist crumbs, they are perfect. You don’t want wet batter on the toothpick. The edges should look set, while the center may seem slightly soft. Yes, you can switch up the chocolate! Use dark chocolate chips for a richer taste. You can also try white chocolate or milk chocolate chips. Mixing types of chocolate can add fun flavors and textures. If your brookies are too gooey, try adjusting the baking time. Bake them a few minutes longer. You can also check your oven temperature with a thermometer. If it’s too low, the brookies may not bake fully. Make sure to follow the recipe closely for best results. For the complete recipe, check out the Full Recipe section. You now know how to make delicious brookies, combining brownies and cookies. We covered each layer's ingredients, step-by-step instructions, and helpful tips. Want to impress friends at your next gathering? Personalize your brookies with nuts or different flavors. Remember to store them properly to keep them fresh. With this guide, you can bake brookies confidently and enjoy the tasty results!

Chocolate Chip Brookies Delightful and Easy to Make

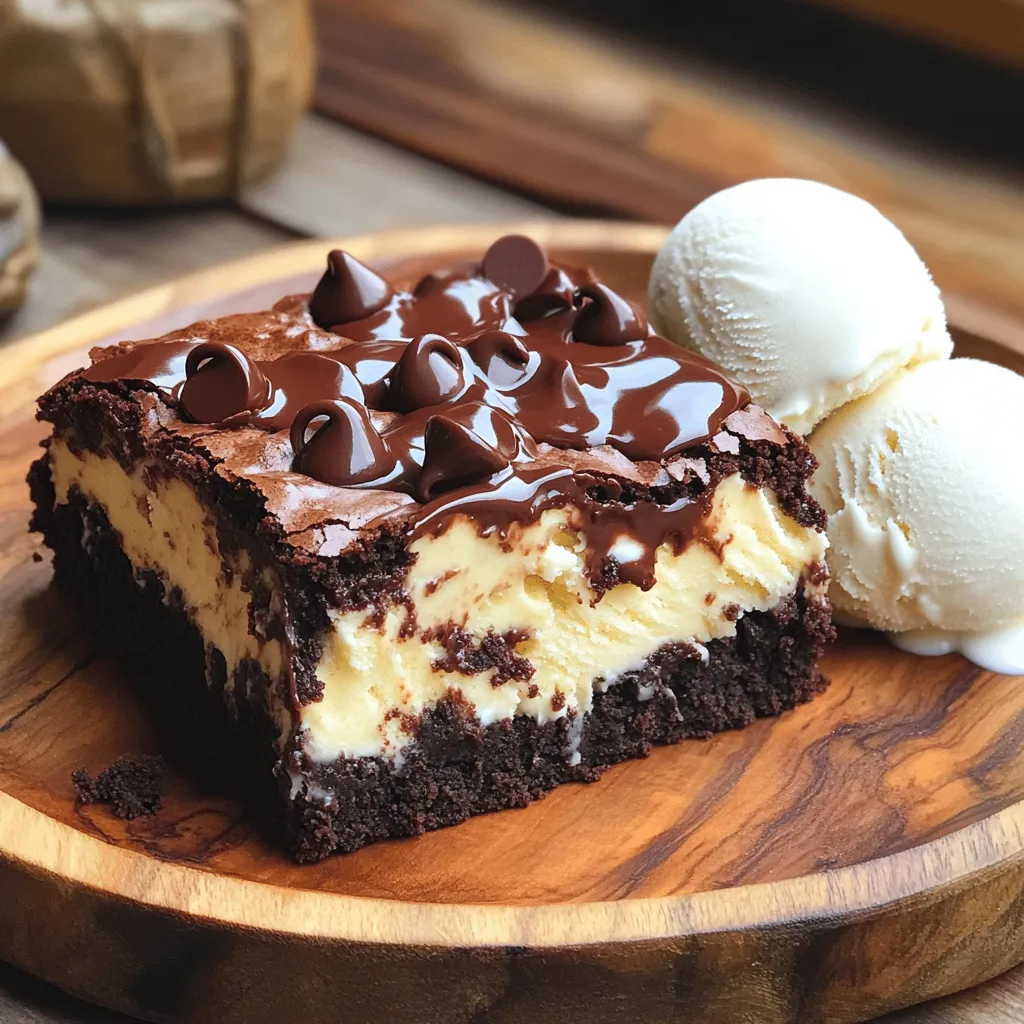
Are you ready to indulge in a sweet treat that combines brownies and cookies? Chocolate Chip Brookies are the perfect

To make a delicious apple cider cheesecake, you need several key ingredients. Here’s what you will need: - 1 ½ cups graham cracker crumbs - ⅓ cup unsalted butter, melted - ¼ cup sugar - 16 oz cream cheese, softened - 1 cup sugar (for filling) - 3 large eggs - ½ cup apple cider - 1 teaspoon vanilla extract - 1 tablespoon all-purpose flour - 1 teaspoon cinnamon - ½ teaspoon nutmeg - 1 cup sour cream These ingredients work together to create a creamy and flavorful cheesecake. The apple cider adds a unique taste that captures the essence of fall. The spices, like cinnamon and nutmeg, enhance the flavor profile, making it cozy and warm. While the cheesecake is tasty on its own, you can elevate it with a few garnishes. Here are some fun options: - Caramel sauce for drizzling - Apple slices for garnish - Whipped cream - Chopped nuts, like pecans or walnuts Adding these garnishes can make your cheesecake look even more appealing. They also add extra flavor and texture, making each bite delightful. When you shop for your ingredients, quality matters. Here are some tips to help you choose the best: - Cream Cheese: Look for full-fat cream cheese for a rich and creamy texture. Check the expiration date to ensure freshness. - Apple Cider: Choose fresh, unfiltered apple cider for the best flavor. Avoid cider with added sugars or preservatives. - Spices: Use fresh spices for a stronger flavor. Old spices can lose their potency over time. - Butter: Opt for unsalted butter so you can control the saltiness of your cheesecake. By selecting high-quality ingredients, you set the foundation for a delicious apple cider cheesecake. You can find the complete recipe for this delightful treat by following the Full Recipe link. Enjoy the process and get ready to impress your friends and family! First, gather your tools and ingredients. You will need a 9-inch springform pan, mixing bowls, and an electric mixer. Don't forget to preheat your oven to 325°F (160°C). This helps the cheesecake bake evenly. For ingredients, you need graham cracker crumbs, butter, sugar, cream cheese, eggs, apple cider, and spices. Make sure everything is at room temperature. This helps the mixture blend better. To make the crust, mix 1 ½ cups of graham cracker crumbs, ⅓ cup of melted butter, and ¼ cup of sugar in a bowl. Stir until everything is well combined. Next, press this mixture firmly into the bottom of your springform pan. This forms a solid base for your cheesecake. Bake the crust in the preheated oven for about 10 minutes. It should look slightly golden. Once done, take it out and let it cool while you prepare the filling. Now it’s time to make the filling. In a large bowl, beat 16 oz of softened cream cheese with your electric mixer. Mix until it’s smooth and creamy. Slowly add 1 cup of sugar while mixing. This helps create a light and fluffy texture. Next, add 3 large eggs one at a time. Mix well after each addition. Then, stir in ½ cup of apple cider, 1 teaspoon of vanilla extract, 1 tablespoon of flour, 1 teaspoon of cinnamon, and ½ teaspoon of nutmeg. Mix until everything is just combined. Finally, gently fold in 1 cup of sour cream. This gives the filling a nice creaminess. Pour the filling over the cooled crust. Use a spatula to smooth the top. Place the cheesecake in the oven and bake for 50-60 minutes. The edges should be set, but the center can still jiggle a bit. When it's done, turn off the oven and leave the cheesecake inside for an hour. This helps it cool gradually, preventing cracks. After an hour, take it out and refrigerate for at least 4 hours or overnight. This chilling time is key for the best flavor and texture. Enjoy your delicious Apple Cider Cheesecake! Check the Full Recipe for more details. To get a smooth texture, use room-temperature cream cheese. Cold cream cheese can create lumps. Beat the cream cheese well until it is fluffy. This will help mix in the sugar easily. Remember to add eggs one by one. This keeps the mixture smooth and creamy. Folding in the sour cream gently is crucial. This adds richness without making the batter too airy. One common mistake is overbaking the cheesecake. This can dry it out. Bake until the edges are set but the center should still jiggle. After baking, turn off the oven and let it cool inside. This prevents cracks from forming. Another mistake is skipping the chilling time. Chilling helps the cheesecake firm up and improves the flavor. Give it at least four hours or overnight for best results. To boost the apple flavor, use high-quality apple cider. Fresh cider makes a big difference. You can also add more spices, like cloves or allspice, for extra warmth. A touch of caramel sauce can enhance sweetness. Drizzle it on top right before serving. For a fun twist, try adding chopped apples to the filling. They add texture and freshness. Check out the Full Recipe for more ideas on how to make this dessert shine! {{image_2}} You can choose between baked or no-bake apple cider cheesecake. A baked cheesecake has a rich, creamy texture. It uses the oven to set, giving it a classic taste. This method enhances the flavors of apple cider and spices. The baking process also creates a slight caramelization along the edges. On the other hand, a no-bake cheesecake is lighter and fluffier. It uses gelatin or whipped cream to set. This version is quick and easy, perfect for warm days. I enjoy both styles, but a baked cheesecake feels more traditional. You can easily change the flavor of your apple cider cheesecake. Try adding spices like ginger or cloves for a warm twist. You can also mix in chopped apples or dried cranberries for texture. If you love chocolate, swirl in some melted dark chocolate. Another idea is to use flavored cream cheese, like cinnamon or maple. These small changes make a big impact on taste. You can even add a splash of bourbon for an adult version. The options are endless! If you need gluten-free or dairy-free options, don’t worry! For a gluten-free crust, use almond or gluten-free graham cracker crumbs. They work great and keep the flavor intact. For a dairy-free cheesecake, substitute cream cheese with vegan cream cheese. Use coconut cream instead of sour cream for a rich texture. Make sure to check labels for hidden dairy in other ingredients. These variations ensure everyone can enjoy this delicious fall dessert treat, no matter their diet. To keep your apple cider cheesecake fresh, store it in the fridge. Use an airtight container for best results. This method helps maintain its creamy texture and flavor. If you plan to eat it within a few days, this is ideal. Place it in the fridge after it cools completely. If you leave it out too long, it might spoil. You can freeze your apple cider cheesecake for later enjoyment. First, wrap it tightly in plastic wrap. Then, place it in a freezer-safe bag or container. Make sure to remove as much air as possible. This helps prevent freezer burn. It can stay frozen for up to three months. When ready to eat, thaw it overnight in the fridge before serving. If you want to enjoy your cheesecake warm, you can reheat it gently. Place a slice on a microwave-safe plate. Heat it for about 10-15 seconds. Check it often to avoid overheating. You want it just warm, not hot. This brings out the flavors nicely. Enjoy it plain or with extra caramel sauce for a tasty treat. Apple Cider Cheesecake lasts about 5 to 7 days in the fridge. Keep it covered to stay fresh. If you want to store it longer, try freezing it. It can last up to 3 months in the freezer. Make sure to wrap it well in plastic wrap to prevent freezer burn. Yes, you can make this cheesecake ahead of time. In fact, it tastes better after sitting in the fridge for a day. This gives the flavors more time to blend. I recommend making it a day or two before your event. Just remember to cover it well in the fridge. If you need a substitute for cream cheese, try using mascarpone cheese. It has a similar texture and taste. You can also use cottage cheese blended until smooth. Another option is ricotta cheese, but it may change the flavor a bit. To check if your cheesecake is done, look for the edges. They should be set, while the center should jiggle slightly. This slight jiggle means it will firm up as it cools. You can also use a toothpick; it should come out clean when inserted into the edges. Always remember to let it cool down properly. You learned how to make a delicious Apple Cider Cheesecake. We covered the key ingredients, step-by-step instructions, and essential tips. You found out about variations and storage methods. Don’t forget to avoid common mistakes for the best texture. Experiment with flavors to make it your own. Enjoy this treat at home or share with friends. Your cheesecake will impress everyone!

Apple Cider Cheesecake Delicious Fall Dessert Treat

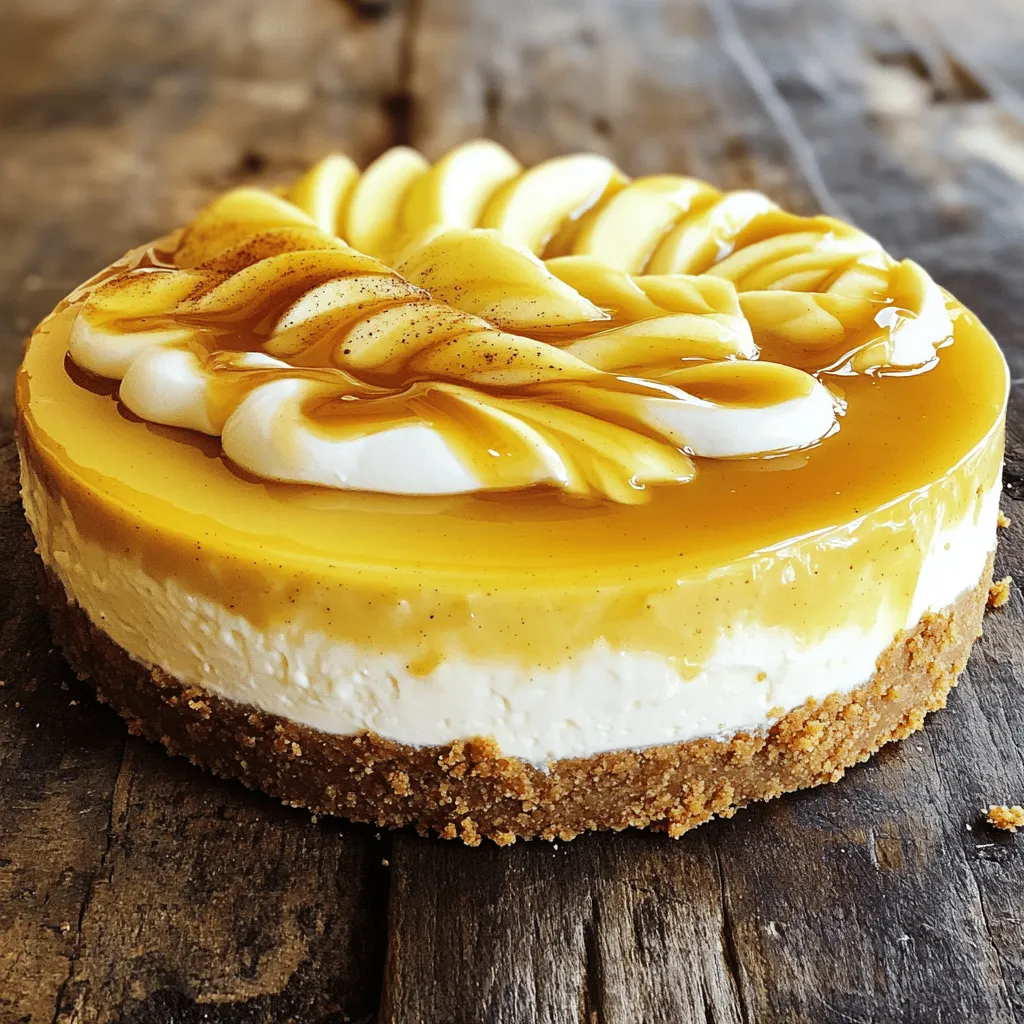
Fall brings cozy vibes and warm flavors, and there’s no better treat than apple cider cheesecake. This creamy dessert combines

Older posts
Page1 Page2 … Page56 Next →

dsad

© 2025 savorystride • Built with GeneratePress

Our Policies

  • Copyright Policy
  • Cookie Policy
  • GDPR Policy
  • Privacy Policy
  • Disclaimer
  • Terms Of Use

More Information

  • Home
  • About
  • Contact
  • Appetizers
  • Dessert
  • Dinner
  • Drinks
©2025, savorystride About Back To Top