Craving a sweet treat that’s easy to make? These No-Bake Pumpkin Cheesecake Cups are the answer! With simple ingredients and clear steps, you can whip up a delicious dessert in no time. Perfect for fall gatherings or just a cozy night at home, these cups will impress your friends and family. Join me as we dive into this fun and tasty recipe that you won’t want to miss!
Ingredients
Complete List of Ingredients
To make your no-bake pumpkin cheesecake cups, gather these items:
- 1 cup graham cracker crumbs
- 1/4 cup melted unsalted butter
- 2 tablespoons brown sugar
- 1 cup cream cheese, softened
- 1 cup pumpkin puree
- 1/2 cup powdered sugar
- 1 teaspoon vanilla extract
- 1 teaspoon pumpkin pie spice
- 1 cup heavy whipping cream
- Optional: whipped cream and cinnamon for topping
Ingredient Substitutions
You can swap some ingredients if needed. Here are options:
- Use coconut oil instead of butter for a vegan option.
- Swap brown sugar with coconut sugar for a healthier choice.
- Try Greek yogurt in place of cream cheese for a lighter filling.
- Use almond milk instead of heavy cream for a dairy-free version.
Tips on Choosing Fresh Ingredients
Choosing the right ingredients is key. Here are my tips:
- Look for cream cheese that is smooth and creamy. This gives the best texture.
- Use pure pumpkin puree, not pumpkin pie filling. This keeps flavors fresh.
- Pick fresh spices; they add a lot of flavor. Ground spices can lose taste over time.
- Check the dates on heavy cream. You want it fresh for the best results.
With these tips, you are ready to create delicious no-bake pumpkin cheesecake cups!
Step-by-Step Instructions
Preparation of the Graham Cracker Crust
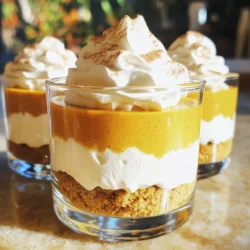
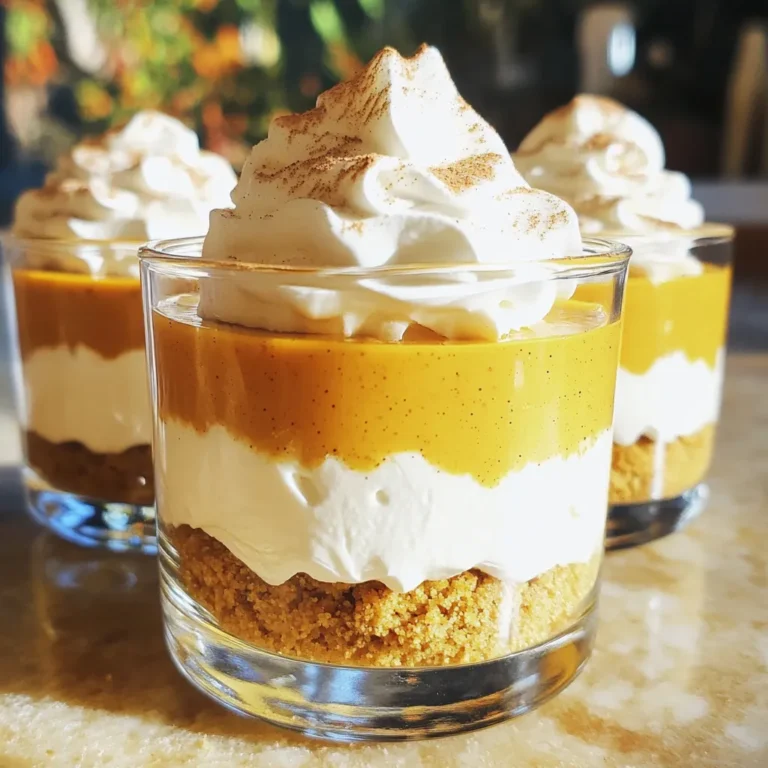
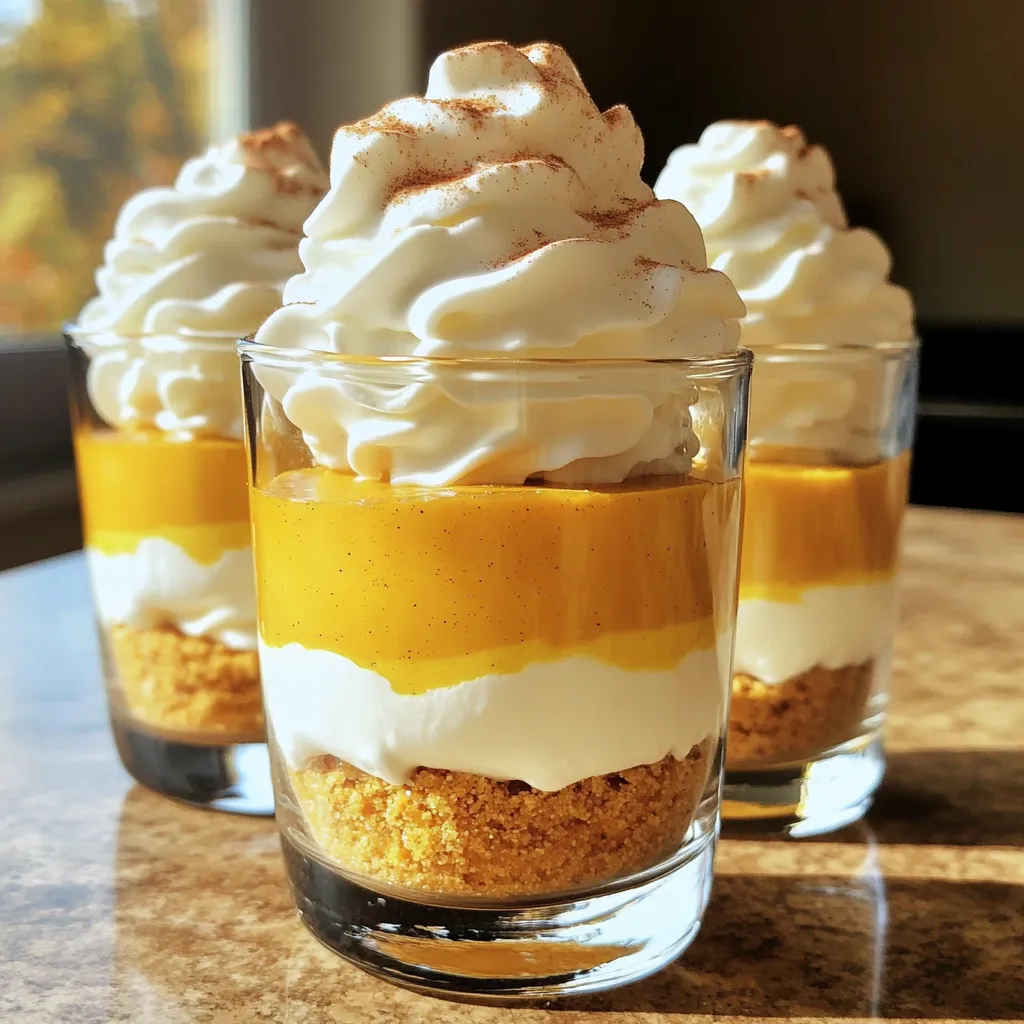
To start, gather your ingredients. You need graham cracker crumbs, melted unsalted butter, and brown sugar. In a medium bowl, mix the graham cracker crumbs with the melted butter and brown sugar. Stir until the crumbs look wet and sticky. Now, take about 2 tablespoons of this mixture and place it in the bottom of each serving cup. Press down gently to form a solid crust.
Mixing the Pumpkin Cheesecake Filling
Next, it’s time for the filling. In a large bowl, beat the softened cream cheese until it’s smooth. Then, add the pumpkin puree, powdered sugar, vanilla extract, and pumpkin pie spice. Mix well until the filling is creamy and well combined. In another bowl, whip the heavy cream until stiff peaks form. Carefully fold this whipped cream into the pumpkin mixture. Do this gently to keep the air in the whipped cream.
Assembling the Cheesecake Cups
Now, we will assemble our cheesecake cups. Spoon the pumpkin cheesecake mixture evenly over the graham cracker crust in each cup. Make sure to fill each cup to the top. You want each bite to have that creamy filling and crust together.
Chilling the Cheesecake Cups
Finally, place the cups in the fridge. Let them chill for at least 2 hours or until the filling is set. This step is key for a smooth texture. Before serving, you can add whipped cream on top and sprinkle with cinnamon for extra flavor. Enjoy your delicious no-bake pumpkin cheesecake cups!
Tips & Tricks
How to Avoid Common Mistakes
To make perfect no-bake pumpkin cheesecake cups, watch for a few common errors. First, be sure to soften your cream cheese before mixing. Cold cream cheese won’t blend well and can leave lumps in your filling. Next, when you whip the heavy cream, stop when you see stiff peaks. If you over-whip, it may turn grainy. Finally, avoid overmixing when combining the whipped cream with the pumpkin mixture. Gently fold it in to keep that fluffy texture.
Presentation Techniques for Stunning Desserts
Presentation makes a big difference. Use clear cups or glasses so the layers show through. This adds charm and makes each cup look fancy. You can drizzle some extra pumpkin puree or caramel sauce on top for added flair. A sprinkle of cinnamon or some whipped cream on top gives a nice finish. Consider adding a few crushed nuts for texture. Always let your creativity shine in your dessert display.
Making Ahead for Future Enjoyment
You can prepare these cheesecake cups in advance. Make them up to two days ahead of time. Just keep them covered in the fridge until you’re ready to serve. This saves you time on busy days and allows the flavors to meld nicely. If you want to freeze them, do so before adding the toppings. Thaw them in the fridge overnight before serving, and then add your toppings right before you enjoy them. This way, they taste fresh and delicious!
Variations
Flavor Variations for Pumpkin Cheesecake Cups
You can play with flavors in your pumpkin cheesecake cups. For a twist, try adding chocolate. Mix in mini chocolate chips to the filling. You can also use maple syrup instead of brown sugar for a richer taste. If you enjoy spices, add a pinch of nutmeg or ginger to the mix. These changes make each cup unique and fun.
Gluten-Free Options
Making these cups gluten-free is easy. Swap the graham cracker crumbs for gluten-free cookies or crushed nuts. Almond flour works great for a nutty base. Just make sure to check any labels to ensure they are gluten-free. This way, everyone can enjoy these tasty treats without worry.
Suggestions for Toppings and Garnishes
Toppings can make your cheesecake cups shine. Whipped cream is a classic choice. Add a sprinkle of cinnamon or nutmeg for extra flavor. You could also drizzle caramel sauce on top for a sweet touch. For a crunchy contrast, sprinkle some crushed nuts or toffee bits. These simple additions elevate your dessert and make it more appealing.
Storage Info
Proper Storage Techniques
To keep your no-bake pumpkin cheesecake cups fresh, store them in the fridge. Use an airtight container to prevent odors from other foods. If you don’t have a container, cover each cup tightly with plastic wrap. This method helps keep the flavors intact.
How Long Do They Last?
These cheesecake cups last for about 4 to 5 days in the fridge. Make sure to check for any signs of spoilage, like an off smell or change in texture. If you notice anything odd, it’s best to toss them out.
Freezing Instructions and Tips
You can freeze these cups for up to 2 months. First, let them chill in the fridge. Then, cover each cup with plastic wrap and foil. This helps prevent freezer burn. When ready to enjoy, thaw them in the fridge for a few hours before serving. Avoid refreezing once thawed.
FAQs
Can I use canned pumpkin instead of fresh?
Yes, you can use canned pumpkin. It saves time and is easy to find. Just make sure it is 100% pure pumpkin. Avoid pumpkin pie filling, as it has added sugar and spices.
How do I make this recipe dairy-free?
To make this recipe dairy-free, use dairy-free cream cheese and coconut cream. These substitutes will work well. You can also use almond milk whipped cream for topping.
Can I turn this into a whole cheesecake instead?
Yes, you can turn this into a whole cheesecake. Just double the filling and crust. Use a springform pan to hold everything together. Chill it longer, about 4 hours, for best results.
What can I use instead of graham crackers?
You can use digestive biscuits or cookie crumbs. For a gluten-free option, try almond flour or gluten-free cookies. Just make sure to adjust the butter to keep the crust firm.
How do I know when my cheesecake cups are set?
Your cheesecake cups are set when they feel firm to the touch. They should not jiggle when you move them. Chill them in the fridge for at least 2 hours to help them set properly.
This guide covered everything you need to make pumpkin cheesecake cups. You learned about ingredients, step-by-step instructions, and storage tips. I shared ways to avoid mistakes and how to present your desserts beautifully.
You can also explore variations and substitutions that fit your needs. Enjoying this treat is easy and fun! With these tips, you’re ready to impress your friends and family. Dive in and enjoy your baking journey!