Go Back
For these no-bake peanut butter bars, gather these simple ingredients: - 1 cup peanut butter (creamy or crunchy) - 1/2 cup honey or maple syrup - 1 cup rolled oats - 1/2 cup coconut flour - 1/2 cup chocolate chips (dairy-free if desired) - 1/4 cup unsweetened cocoa powder - 1/4 teaspoon salt - 1 teaspoon vanilla extract Each ingredient plays a key role. The peanut butter gives a smooth and rich flavor. Honey or maple syrup adds the sweet touch. Rolled oats provide texture and heartiness. Coconut flour helps to bind and thicken. Chocolate chips bring a delightful sweetness. Cocoa powder adds a deep chocolate taste. Salt enhances all the flavors. Vanilla extract rounds it all out. You can easily adjust these ingredients. If you need a nut-free option, use sun butter or soy nut butter instead of peanut butter. For a vegan version, stick with maple syrup as your sweetener. You can also choose dairy-free chocolate chips. If you are gluten-free, ensure your oats are labeled as gluten-free. - Peanut Butter: I love creamy peanut butter for a smooth mix. Crunchy peanut butter gives a nice texture. - Sweetener: Honey works well, but maple syrup is a great vegan choice. - Oats: Use rolled oats for the best texture. Quick oats can be used, but they may change the bar's texture slightly. - Coconut Flour: A little goes a long way. It absorbs moisture, so don’t use too much. - Chocolate Chips: I like to use dark chocolate chips. They add richness, but feel free to skip them for a lighter bar. - Salt: A touch of salt balances the sweetness perfectly. Don’t skip it! These ingredients work together to make a delicious treat. Enjoy experimenting with them! {{ingredient_image_1}} First, gather all your ingredients. You need peanut butter, honey or maple syrup, rolled oats, coconut flour, chocolate chips, cocoa powder, salt, and vanilla extract. Get a large mixing bowl for the peanut butter and honey. Mix them together until smooth. Then, add the vanilla extract. Make sure it blends well with the peanut butter mixture. Now, take another bowl. In this bowl, whisk together the rolled oats, coconut flour, cocoa powder, and salt. This step is key for even flavor. Slowly add the dry mix into the peanut butter mixture. Stir it well until it forms a thick dough. Finally, fold in the chocolate chips. This adds a delightful crunch to your bars. Next, prepare an 8x8-inch baking dish. Line it with parchment paper. The paper helps you lift the bars out later. Press the mixture into the dish firmly. Use your hands or a spatula to flatten it evenly. Cover the dish and refrigerate for at least 2 hours. This step is crucial for the bars to set. When they are firm, lift them out using the parchment paper. Cut into squares or rectangles, and enjoy your tasty treat! To get the right texture, you want a thick, dough-like mixture. If it’s too dry, add a bit more honey or peanut butter. This will help bind everything together. If it’s too wet, add a touch more coconut flour or oats. You want it to hold its shape when pressed in the pan. If you have nut allergies, try sunflower seed butter or soy nut butter instead of peanut butter. For sweetness, you can use agave syrup or brown rice syrup in place of honey. Adjust the amount to suit your taste. This way, you can still enjoy the bars without worry. Serve these bars chilled or at room temperature. They taste great alone but pair well with fresh fruit or yogurt. You can also drizzle melted dark chocolate on top for a fancy touch. Arranging the bars on a platter makes for a nice presentation at parties. Enjoy your tasty treat! Pro Tips Chill for Better Texture: Refrigerating the bars for a longer period, like overnight, can enhance their firmness and make them easier to cut. Customize Your Sweetness: Adjust the amount of honey or maple syrup to taste, depending on how sweet you prefer your bars. Mix in Extras: Feel free to add nuts, seeds, or dried fruit to the mixture for added flavor and texture! Use Quality Chocolate: Opt for high-quality chocolate chips for a richer flavor, especially if you're a chocolate lover! {{image_2}} You can easily change the taste of these bars. Add-ins like dried fruit, nuts, or seeds work well. Try mixing in 1/2 cup of chopped almonds or walnuts for a crunchy bite. You can also add 1/4 cup of shredded coconut for a tropical twist. For toppings, consider drizzling melted dark chocolate on top. This adds a nice touch and extra flavor. If you want to make this recipe vegan, use maple syrup instead of honey. For a gluten-free option, be sure to choose certified gluten-free oats. This way, everyone can enjoy these tasty treats without worry. You can also swap the chocolate chips for dairy-free ones if needed. Using seasonal flavors can make the bars even more special. In fall, add pumpkin spice or a scoop of pumpkin puree. This gives a warm flavor perfect for chilly days. In summer, mix in fresh berries or a dash of lemon zest. These seasonal ingredients keep the bars fresh and exciting all year long. Store your no-bake peanut butter bars in an airtight container. Keep them in the fridge to maintain freshness. Lining the container with parchment paper helps prevent sticking. Avoid exposure to heat and sunlight, as this can change the texture and flavor. You can freeze these bars for longer storage. Wrap each bar tightly in plastic wrap. Place the wrapped bars in a freezer-safe bag or container. They will stay fresh for up to three months. To enjoy, thaw them in the fridge overnight before serving. These bars can last up to a week in the fridge. Check for any change in smell or texture to ensure they are still good. If you notice any signs of spoilage, it’s best to discard them. For the freshest taste, enjoy them within the first few days. No-Bake Peanut Butter Bars last about one week when stored in the fridge. Keep them in an airtight container to maintain freshness. You can also freeze these bars for up to three months. Just wrap them well in plastic wrap and then place them in a freezer bag. This method keeps them tasty and prevents freezer burn. Yes, you can use crunchy peanut butter instead of creamy. It will add a fun texture to the bars. The flavor will stay the same, so you won’t lose any taste. If you love the crunch, go for it! If you don’t have coconut flour, you can use almond flour or oat flour. Both options work well in this recipe. Just remember, coconut flour absorbs more moisture. You may need less of your substitute. Adjust the amount to get the right texture. In this post, we covered everything from key ingredients to storage tips. You learned about ingredient options for different diets, and how to mix and set your bars perfectly. You can customize your treats to suit your taste and needs, too. Whether you want vegan options or new flavors, there's something for everyone. With the right storage, your no-bake peanut butter bars will stay fresh. Now, you're ready to enjoy these delicious bars any time! Happy making!

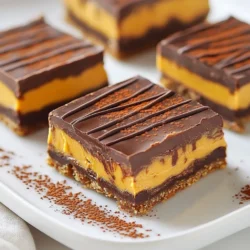
No-Bake Chocolate Peanut Butter Dream Bars

Delicious and easy-to-make no-bake bars with a rich chocolate and peanut butter flavor.
Prep Time 10 minutes
Total Time 2 hours 10 minutes
Course Dessert
Cuisine American
Servings 16
Calories 150 kcal

Ingredients
  

  • 1 cup peanut butter (creamy or crunchy)
  • 1/2 cup honey or maple syrup
  • 1 cup rolled oats
  • 1/2 cup coconut flour
  • 1/2 cup chocolate chips (dairy-free if desired)
  • 1/4 cup unsweetened cocoa powder
  • 1/4 teaspoon salt
  • 1 teaspoon vanilla extract

Instructions
 

  • In a large mixing bowl, combine the peanut butter and honey (or maple syrup) until smooth.
  • Stir in the vanilla extract, ensuring it’s well mixed.
  • In another bowl, whisk together the rolled oats, coconut flour, cocoa powder, and salt.
  • Gradually add the dry ingredients to the peanut butter mixture, stirring until well combined. The mixture should be thick and dough-like.
  • Fold in the chocolate chips until evenly distributed.
  • Line an 8x8-inch square baking dish with parchment paper, leaving some overhang to make removal easier.
  • Press the mixture evenly into the bottom of the prepared baking dish, using your hands or a spatula to flatten it down tightly.
  • Cover and refrigerate for at least 2 hours to firm up.
  • Once set, lift the bars out of the dish using the parchment paper overhang and cut into squares or rectangles.

Notes

Arrange the bars on a serving platter and drizzle with melted dark chocolate for an elegant touch. Enjoy chilled or at room temperature!
Keyword bars, chocolate, no bake, peanut butter