Craving a rich, homemade treat? Look no further! In this post, I’ll share the secrets to making ultra creamy chocolate ice cream that will melt in your mouth. With simple ingredients and easy steps, you’ll become a dessert hero in no time. Whether you want to keep it classic or add fun flavors, I’ve got tips for everyone. Let’s dive into this delicious chocolate delight together!
Why I Love This Recipe
- Indulgent Flavor: This ice cream is rich and decadent, offering a deep chocolate flavor that satisfies any sweet tooth.
- Ultra Creamy Texture: The blend of heavy cream and whole milk creates a luxuriously smooth texture that melts in your mouth.
- Customizable Add-Ins: You can easily add chocolate chips or your favorite mix-ins for an extra layer of deliciousness.
- Simple Homemade Delight: With just a few basic ingredients, you can create a delightful treat that rivals any store-bought ice cream.
Ingredients
Essential Ingredients
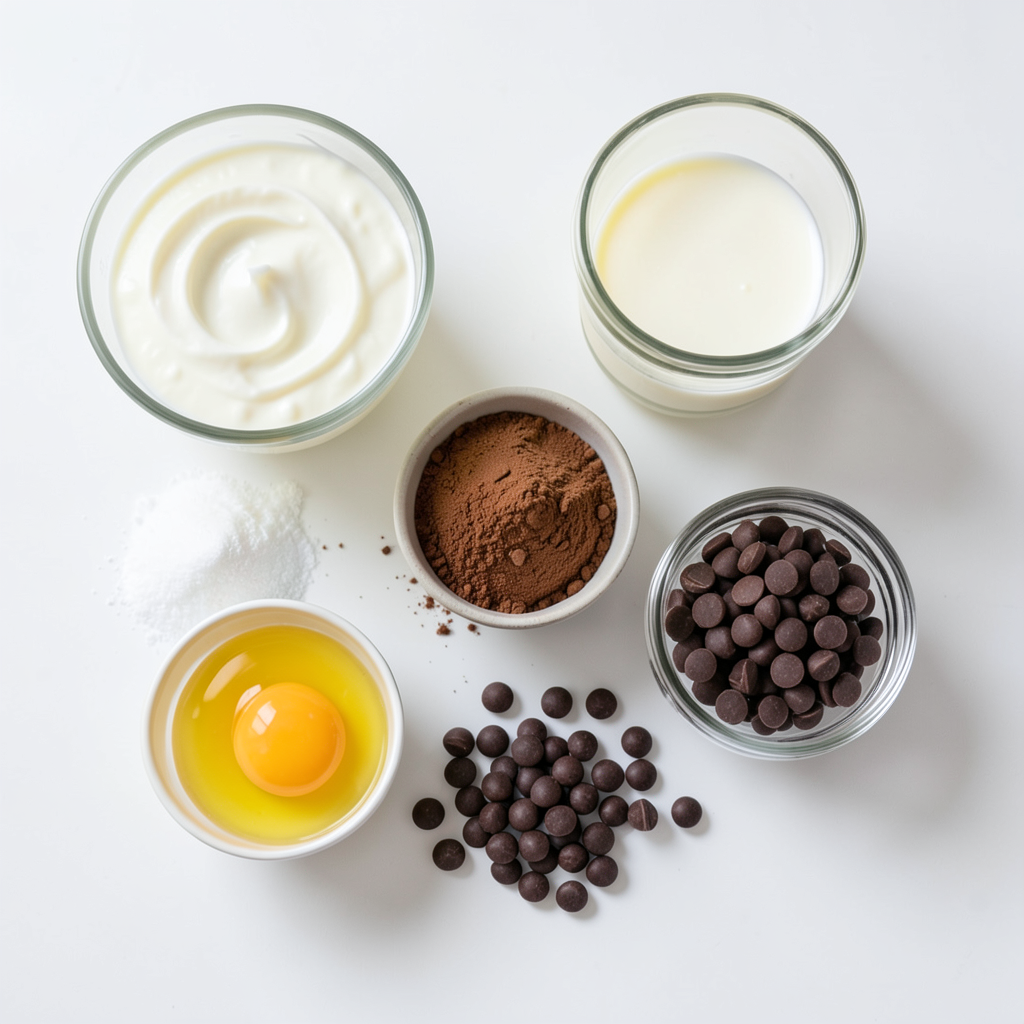
To make ultra creamy chocolate ice cream, you will need:
- 2 cups heavy cream
- 1 cup whole milk
- 3/4 cup granulated sugar
- 1 cup unsweetened cocoa powder
- 1 teaspoon vanilla extract
- 1/2 teaspoon salt
- 4 large egg yolks
These key ingredients create a rich and smooth texture in your ice cream. The heavy cream adds creaminess, while the cocoa powder gives it a deep chocolate flavor. The sugar balances the bitterness of the cocoa and enhances sweetness.
Optional Add-Ins
You can elevate your ice cream with extra treats:
- 1/2 cup semi-sweet chocolate chips
- Flavor variations (e.g., peppermint extract, coffee)
Adding chocolate chips gives you delightful chunks of chocolate in every bite. If you like different flavors, try peppermint extract for a refreshing twist or coffee for a rich depth. These options make your ice cream more fun and unique!
Step-by-Step Instructions
Preparing the Base
First, gather your ingredients. You will need heavy cream, whole milk, granulated sugar, and cocoa powder. In a medium saucepan, combine the 2 cups of heavy cream, 1 cup of whole milk, and 3/4 cup of granulated sugar. Heat this mix over low heat. Stir it gently with a whisk until the sugar dissolves completely. This step is key for a smooth texture.
Next, slowly add in 1 cup of unsweetened cocoa powder. Whisk it until the mixture is fully blended and smooth. This step creates the rich chocolate flavor in your ice cream.
Tempering the Egg Yolks
Now, let’s work on the egg yolks. Take 4 large egg yolks and place them in a separate bowl. Whisk them well until they are smooth.
Now, it’s time to temper the egg yolks. Slowly pour about 1 cup of the warm chocolate mixture into the yolks. Whisk constantly to avoid cooking the eggs. This step helps keep your ice cream creamy and rich.
Cooking the Mixture
Next, pour the tempered egg yolk mixture back into the saucepan. Stir it into the remaining chocolate mix. Cook this mixture over medium heat. Keep stirring constantly for about 8 to 10 minutes. You want it to thicken enough to coat the back of a spoon.
After thickening, remove the saucepan from the heat. Add in 1 teaspoon of vanilla extract and 1/2 teaspoon of salt. If you like chocolate chunks, you can fold in 1/2 cup of semi-sweet chocolate chips at this point. This adds extra texture and flavor.
Let the mixture cool to room temperature. After that, cover it and refrigerate for at least 4 hours, or overnight for the best results. This chilling time is crucial for a creamy ice cream.
Tips & Tricks
Achieving a Creamy Texture
Egg yolks are key for smooth ice cream. They add richness and help bind the mix. Use four large egg yolks in this recipe for best results. This small step makes a big difference in creaminess.
Chilling the mixture is also very important. After cooking, let it cool to room temp. Then, cover and chill it for at least four hours. For better results, chill it overnight. Cold mixtures churn better, leading to a creamier texture.
Ice Cream Maker Usage
If you have an ice cream maker, follow its instructions closely. Make sure the bowl is frozen before adding the mixture. This helps it churn properly. Churn until it reaches a soft-serve texture.
Don’t worry if you don’t have an ice cream maker. You can still make this ice cream! Pour the chilled mixture into a shallow dish. Freeze it for about 30 minutes, then stir it. Repeat this every 30 minutes for about 2-3 hours. This manual method gives good results, too.
Pro Tips
- Use Quality Cocoa Powder: The flavor of your ice cream is heavily influenced by the cocoa powder. Choose a high-quality, unsweetened cocoa powder for the richest chocolate taste.
- Egg Tempering is Crucial: When adding the warm chocolate mixture to the egg yolks, do it slowly while whisking to prevent the eggs from scrambling. This step ensures a smooth and creamy texture.
- Chill the Base Thoroughly: Allowing the mixture to chill for at least 4 hours (or overnight) develops the flavors and ensures a smoother ice cream consistency when churning.
- Experiment with Add-Ins: Feel free to get creative! Add-ins like crushed cookies, nuts, or fruit can elevate your ice cream. Just be sure to fold them in gently at the end.
Variations
Flavor Additions
You can easily change the flavor of your ice cream in fun ways. For a minty kick, add a few drops of peppermint extract. A splash of coffee extract gives a deep taste. You can also mix in crushed cookies like Oreos or add fresh fruits like raspberries or strawberries for a twist.
- Flavored extracts: Try peppermint or coffee.
- Crushed cookies: Use Oreos or graham crackers.
- Fresh fruits: Add berries or bananas.
Alternative Bases
Not everyone can enjoy dairy ice cream. If you need a dairy-free option, swap heavy cream and milk with coconut milk or almond milk. This gives you a rich, creamy texture.
For those watching sugar intake, use low-sugar sweeteners like stevia or erythritol. It keeps the ice cream sweet without the extra calories.
- Dairy-free: Use coconut or almond milk.
- Low-sugar options: Try stevia or erythritol.
Storage Info
Freezing Tips
- Use airtight containers for best results.
- Glass or plastic containers work well.
- Leave some space at the top to allow for expansion.
- To avoid ice crystals, cover the ice cream surface with plastic wrap before sealing.
- Churned ice cream should freeze quickly to stay creamy.
Shelf Life
- Enjoy your chocolate ice cream within 2 to 3 weeks for the best taste.
- After this time, it may lose its smooth texture.
- Signs of spoilage include ice crystals, off smells, or a change in color.
- If it feels grainy or hard, it’s best to toss it.
FAQs
What can I substitute for heavy cream?
You can use several non-dairy alternatives for heavy cream. Coconut cream works well. It gives a rich texture and a hint of coconut flavor. Another good option is cashew cream, made by blending soaked cashews with water. This option is creamy and neutral in taste.
When using these substitutes, you may need to adjust for consistency. Non-dairy creams can be thinner. You might want to cook them longer to thicken. This way, your ice cream stays creamy.
Can I make this ice cream without an ice cream maker?
Yes, you can make ice cream without a machine. Use a simple manual churning technique. Start by pouring your chilled mixture into a shallow dish. Place it in the freezer.
Every 30 minutes, stir the mixture with a fork. This breaks up ice crystals and keeps it smooth. Repeat this for about 3 to 4 hours, or until it is firm.
How do I make chocolate ice cream less sweet?
To reduce sweetness, you can adjust the sugar levels. Cut back on the sugar in the recipe. Start with half the amount and taste as you go. You can always add more if needed.
Another option is to use alternative sweeteners. Try using stevia or erythritol. Both provide sweetness without the extra sugar. Just remember to adjust measurements, as they can be sweeter than sugar.
This blog post covered how to make rich, homemade chocolate ice cream. We explored essential ingredients like heavy cream and cocoa powder. You learned step-by-step methods for preparing, cooking, and chilling your ice cream base. The tips shared on achieving a creamy texture will ensure your dessert turns out perfect. Remember, you can customize flavors and find storage methods to keep it fresh. Try different variations and have fun with your ice cream. Enjoy creating this delight in your kitchen!