
Welcome to a brunch experience like no other! Today, I'm sharing my recipe for Savory Brunch Herb and Feta Stuffed Crepes Delight. These soft, flavorful crepes are perfect for a relaxed weekend or a special gathering. Packed with fresh herbs and creamy feta, they burst with taste and are sure to wow your guests. Let’s dive in and whip up this delightful dish together!
Why I Love This Recipe
- Deliciously Savory: The combination of feta cheese, fresh herbs, and spinach creates a rich and flavorful filling that elevates the crepes to a whole new level.
- Perfect for Any Time: This recipe is versatile enough to be enjoyed at breakfast, brunch, or even as a light dinner, making it a great go-to option.
- Customizable Filling: You can easily swap out the herbs or add other vegetables, allowing you to tailor the filling to your taste preferences.
- Impressive Presentation: These stuffed crepes look beautiful on a plate, especially when garnished with fresh herbs and cherry tomatoes, making them great for entertaining.
Ingredients
Ingredients for the Crepes
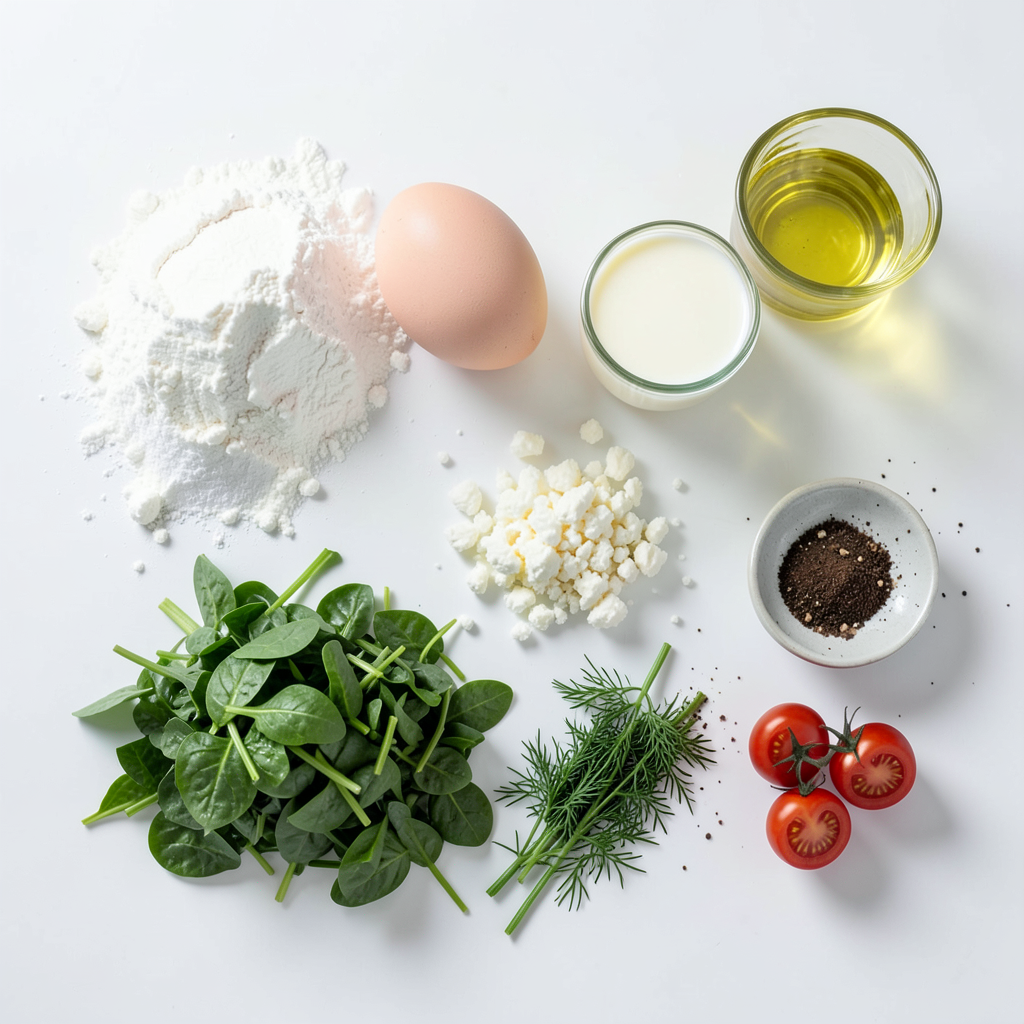
To make delightful crepes, you need just a few simple items. Here’s what to gather:
- 1 cup all-purpose flour
- 2 large eggs
- 1 ½ cups milk
- 2 tablespoons melted butter
- 1 pinch of salt
These ingredients create a smooth batter. The flour gives structure, while the eggs and milk provide a rich texture.
Ingredients for the Filling
The filling adds great taste and nutrition. You will need:
- 1 cup feta cheese, crumbled
- 1 cup fresh spinach, chopped
- 2 tablespoons fresh dill, chopped
- 2 tablespoons fresh chives, chopped
- 1 tablespoon olive oil
- Salt and pepper to taste
Feta brings a tangy flavor. Spinach and herbs add freshness and color, making a tasty mix.
Ingredients for Garnish
Garnishing makes your dish look amazing. For this, use:
- Fresh herbs (additional dill and chives)
- Cherry tomatoes, halved
These bright colors not only enhance the look but also add some extra flavor.
Step-by-Step Instructions
Preparing the Crepe Batter
Start by whisking 1 cup of all-purpose flour and a pinch of salt in a bowl. Next, add 2 large eggs. Gradually pour in 1 ½ cups of milk while whisking. This helps avoid lumps. Then, stir in 2 tablespoons of melted butter until the batter is smooth. Let the batter rest for 30 minutes. This makes the crepes easier to cook.
Cooking the Crepes
Heat a non-stick skillet over medium heat. Lightly grease it with butter to prevent sticking. Pour about 1/4 cup of the crepe batter into the skillet. Swirl it to cover the bottom evenly. Cook until the edges lift, about 1-2 minutes. Flip the crepe and cook for another minute. Stack the cooked crepes on a plate. Repeat with the remaining batter.
Preparing the Filling
In a bowl, mix 1 cup of crumbled feta cheese with 1 cup of chopped fresh spinach. Add 2 tablespoons of chopped fresh dill and 2 tablespoons of chopped fresh chives. Drizzle in 1 tablespoon of olive oil. Season with salt and pepper to taste. Stir well until everything is combined. Adjust the seasoning if needed.
Stuffing the Crepes
Take one crepe and place a generous spoonful of the filling in the center. Fold the crepe over the filling. Then, fold in the sides to secure the filling inside. Repeat this step for all the crepes. Make sure they are well-closed to keep the filling from spilling out.
Warming the Stuffed Crepes
In a clean skillet, lightly heat the stuffed crepes for about 2-3 minutes. This warms them through without overcooking. Keep an eye on them to avoid burning.
Serving and Garnishing
Plate the warm, stuffed crepes. To make them look pretty, garnish with fresh herbs like dill and chives. Add halved cherry tomatoes for a bright splash of color. This makes for a lovely presentation. Enjoy your delicious savory brunch!
Tips & Tricks
Perfecting the Crepe Texture
To get the best crepes, start with a smooth batter. Whisk your flour and salt first. Then, slowly add eggs and milk. This method helps avoid lumps. Let the batter rest for 30 minutes. This step allows the flour to absorb the liquid. It also helps create a tender crepe. When cooking, use a non-stick skillet. Heat it to medium, and add just a little butter. This way, your crepes won’t stick.
Flavor Enhancements for the Filling
The filling is where you can shine. Start with crumbled feta; it adds creaminess. Fresh spinach gives a nice pop of color and nutrition. Dill and chives offer a bright, herbaceous flavor. You can also add a squeeze of lemon juice for tanginess. Adjust the salt and pepper as you mix. Taste the filling to ensure it’s just right for you. Don't forget, the filling should be bold enough to stand out.
Common Mistakes to Avoid
First, don’t rush the batter resting time. Skipping this can lead to tough crepes. Next, avoid using too much batter in the skillet. About 1/4 cup is perfect. If you use too much, the crepes will be thick and hard to fold. Also, keep your skillet at a steady medium heat. If it’s too hot, your crepes may burn. Lastly, taste your filling before stuffing. You want it to be well-seasoned and flavorful.
Pro Tips
- Rest the Batter: Letting the crepe batter rest for at least 30 minutes allows the gluten to relax, resulting in more tender crepes.
- Use a Non-Stick Skillet: A non-stick skillet is crucial for making crepes, as it prevents sticking and allows for easy flipping.
- Experiment with Fillings: Feel free to customize the filling with other herbs or vegetables like arugula, sun-dried tomatoes, or olives for added flavor.
- Serve Immediately: Stuffed crepes are best served warm, so enjoy them straight from the skillet for optimal taste and texture.
Variations
Vegetarian Options
You can easily make this dish vegetarian. Simply use more vegetables in the filling. Try adding mushrooms, bell peppers, or zucchini. These veggies add flavor and texture. You can also swap feta with ricotta for a creamier filling. This makes the dish rich and satisfying.
Gluten-Free Substitutes
To make gluten-free crepes, use gluten-free flour. Look for a blend that includes xanthan gum. This helps to mimic the texture of regular flour. You can also use almond flour or buckwheat flour. Just make sure the flour is labeled gluten-free. These options keep the taste great while catering to gluten sensitivities.
Additional Fillings to Try
Feel free to get creative with your fillings. You can add cooked chicken or shrimp for extra protein. Roasted vegetables like eggplant or asparagus work well too. For a spicy kick, try adding jalapeños or crushed red pepper. These variations let you personalize the crepes to your taste.
Storage Info
Storing Uncooked Crepe Batter
You can store your uncooked crepe batter. Place it in an airtight container. Keep the batter in the fridge for up to two days. Make sure to stir it well before using. If it thickens, add a little milk to thin it out again.
Storing Cooked Stuffed Crepes
Cooked stuffed crepes also need proper storage. Place them in a single layer on a plate. Cover with plastic wrap or foil to keep them fresh. You can store them in the fridge for up to three days. For longer storage, consider freezing them.
Reheating Instructions
To reheat your stuffed crepes, use a skillet. Heat it over medium-low heat. Place the crepes in the pan and cover with a lid. This helps them warm evenly. Heat for about 3-5 minutes on each side, or until warm. You can also use a microwave. Place the crepes on a plate and cover with a damp paper towel. Heat for 30 seconds to 1 minute, checking often. Enjoy your flavorful crepes!
FAQs
Can I make crepes ahead of time?
Yes, you can make crepes ahead of time. Cook them and let them cool. Place them in a stack with parchment paper between each crepe. Store them in the fridge for up to three days. Just reheat them in a skillet before serving.
What can I substitute for feta cheese?
If you want to swap feta cheese, try goat cheese or ricotta. Both have a creamy texture and rich flavor. You can also use a sharp cheddar or a dairy-free cheese for a different taste.
How do I prevent my crepes from sticking?
To stop crepes from sticking, use a non-stick skillet. Make sure to grease it lightly with butter or oil before each crepe. Let the pan heat up well before adding batter. This way, your crepes will flip easily.
Can I freeze stuffed crepes?
Yes, you can freeze stuffed crepes. After you fill and warm them, let them cool completely. Place them in a single layer on a baking sheet. Once frozen, transfer them to a freezer bag. They can last for up to two months. Reheat directly from the freezer in a skillet or oven.
You now have all the tools to make delicious crepes. We covered the key ingredients, from batter to toppings. You learned step-by-step how to cook and fill them.
With tips for the best texture and common mistakes to avoid, you’ll impress anyone. Don't forget the fun variations and storage ideas for leftovers. Enjoy making and sharing these tasty crepes!