Craving sushi but short on time? You’re in luck! In this guide, I'll show you how to make Instant Pot sushi rice quickly and easily. With just a few ingredients and simple steps, you'll be on your way to enjoying delicious sushi in no time. Whether you're a beginner or a pro, these tips and tricks will help you achieve the perfect texture and flavor. Let's get started!
Why I Love This Recipe
- Perfect Texture: The rinsing process ensures that your sushi rice has the ideal sticky yet fluffy texture, making it perfect for sushi rolls.
- Quick and Easy: Using the Instant Pot cuts down on cooking time, allowing you to prepare sushi rice in just 30 minutes.
- Flavorful Addition: The combination of rice vinegar, sugar, and salt creates a deliciously balanced flavor that enhances your sushi dishes.
- Versatile Base: This sushi rice recipe can be used not only for sushi but also as a tasty side for various Asian dishes.
Ingredients
Main Ingredients for Instant Pot Sushi Rice
To make the best sushi rice in your Instant Pot, you will need:
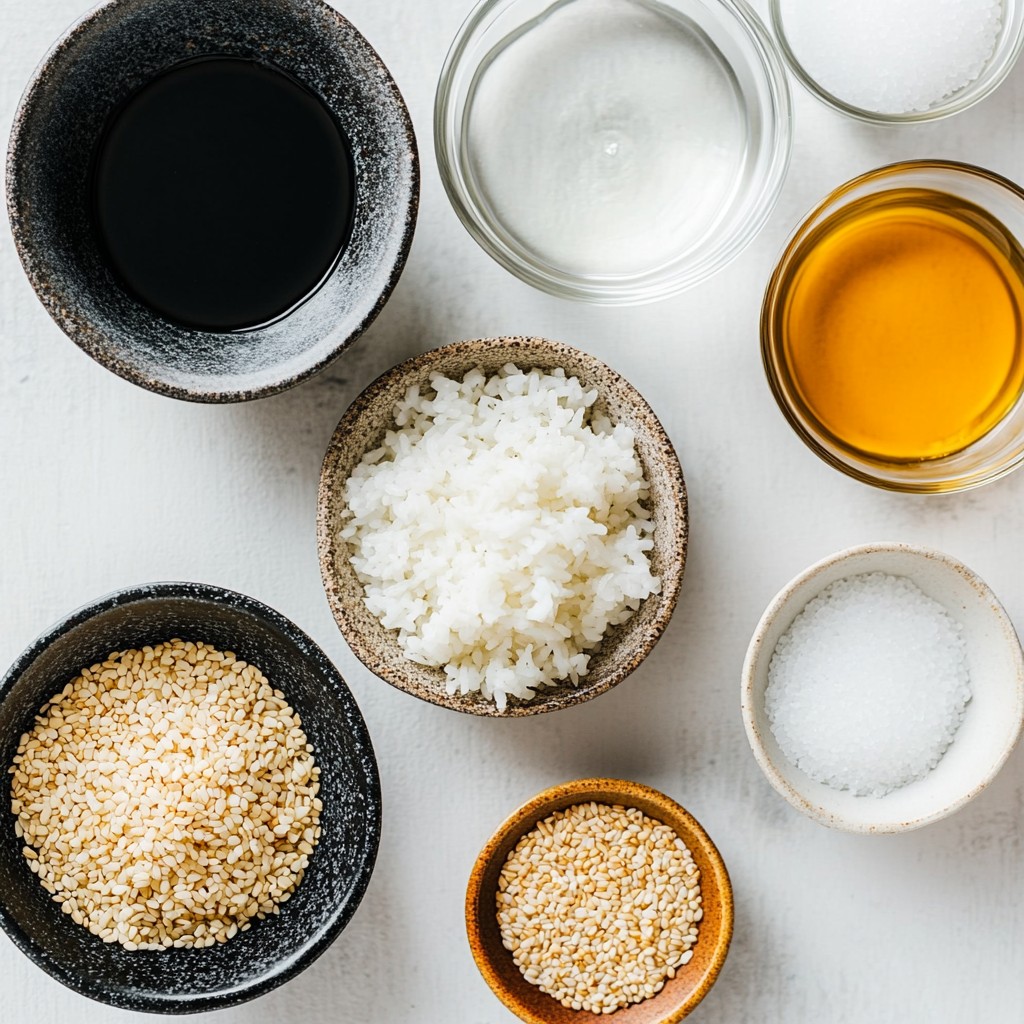
- 2 cups sushi rice
- 2 1/4 cups water
- 1/4 cup rice vinegar
- 2 tablespoons sugar
- 1 teaspoon salt
These ingredients create a balanced flavor for your sushi rice. The sushi rice helps achieve that perfect sticky texture, while the vinegar, sugar, and salt bring a lovely taste.
Optional Ingredients for Extra Flavor
You can add a bit more flavor with:
- 1 tablespoon sesame oil
Adding sesame oil gives your sushi rice a nutty taste. It can enhance the overall flavor, making your sushi more delicious.
Tools Required for Preparation
To prepare your sushi rice, gather these tools:
- Instant Pot
- Fine-mesh strainer
- Rice paddle or fork
- Small mixing bowl
Having these tools ready will make your cooking process smooth. The Instant Pot cooks the rice perfectly, while the strainer ensures you rinse away excess starch. A rice paddle or fork helps fluff the rice gently without breaking it.
Step-by-Step Instructions
Preparing the Sushi Rice
Start by rinsing the sushi rice. Use a fine-mesh strainer and cold water. Rinse until the water runs clear. This step is key. It removes excess starch, which keeps the rice from being too sticky. You want the grains to stay separate.
Cooking the Rice in the Instant Pot
In your Instant Pot, combine the rinsed sushi rice and the water. Spread the rice evenly across the bottom of the pot. Close the lid and set the valve to Sealing. Select the Rice setting or use manual pressure for 6 minutes. When cooking ends, let the pot release pressure naturally for about 10 minutes. After that, switch the valve to Venting to release any remaining steam. Carefully open the lid and fluff the rice with a rice paddle or fork to keep the grains whole.
Seasoning the Rice
While the rice cooks, mix the rice vinegar, sugar, and salt in a small bowl. Stir until the sugar and salt dissolve. If you want to add flavor, include sesame oil. Once the rice is ready, drizzle the vinegar mixture over the hot rice. Use a cutting motion to fold the mixture into the rice gently. This helps combine the flavors without mashing the grains. Allow the rice to cool slightly before using it for sushi.
Tips & Tricks
Achieving Perfect Sushi Rice Texture
To get the best texture in your sushi rice, rinsing is key. Rinse the rice under cold water. Use a fine-mesh strainer and rinse until the water runs clear. This helps remove excess starch. Less starch leads to better texture.
When you cook the rice, spread it evenly in the Instant Pot. This ensures even cooking. After cooking, let the rice sit for about 10 minutes. This step helps the rice finish cooking with steam. Fluff the rice gently with a rice paddle. This keeps the grains intact.
Common Mistakes to Avoid
One common mistake is not rinsing the rice enough. Always rinse until the water is clear. Another mistake is using too much water. For sushi rice, the ratio should be 2 cups of rice to 2 1/4 cups of water.
Also, don’t skip the natural release step. This allows the rice to set properly. Lastly, don’t overmix when adding the vinegar mixture. Use a gentle folding motion to combine flavors.
Flavor Enhancements and Serving Suggestions
To enhance the flavor, try adding sesame oil. Just a tablespoon can add depth. You can also add a dash of soy sauce when serving.
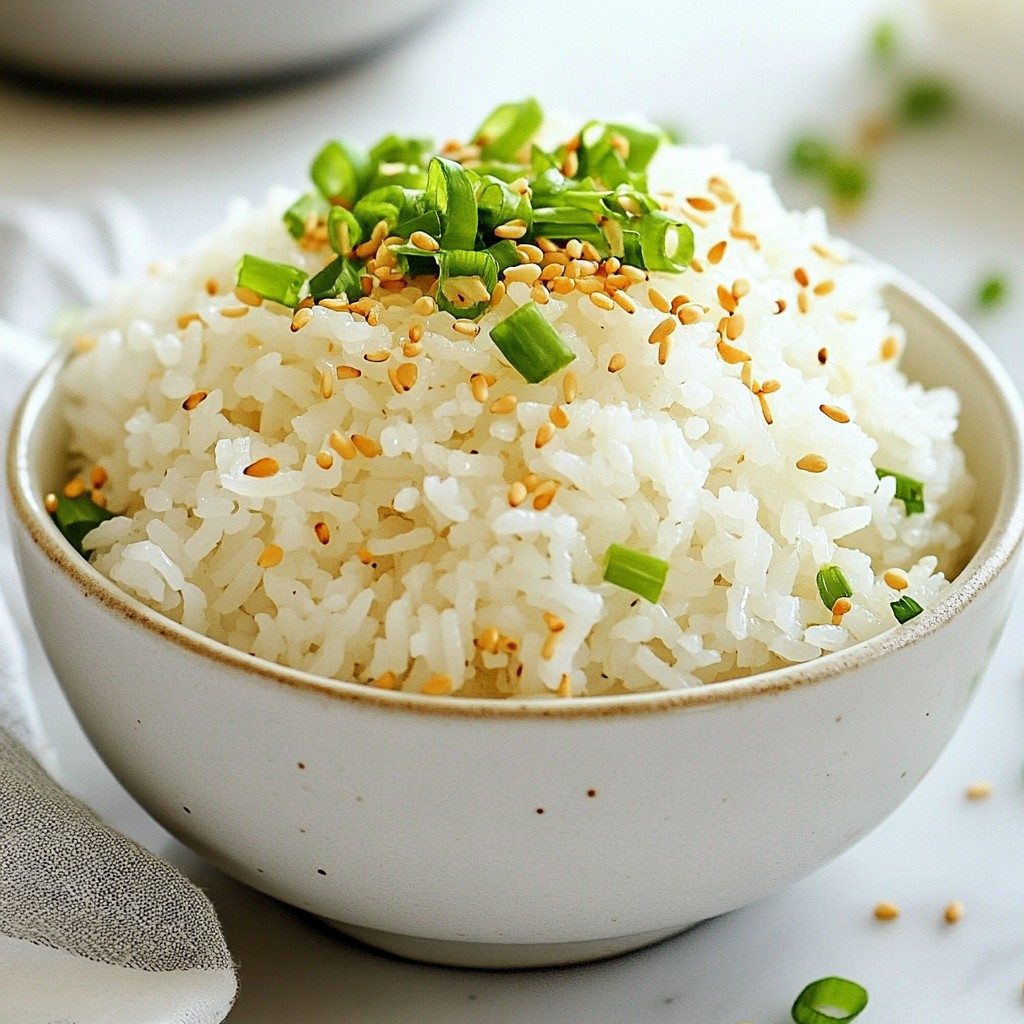
For serving, present the sushi rice in a wooden bowl. Garnish with sesame seeds or sliced green onions. This makes your dish look elegant and tasty. Enjoy your sushi rice with fresh fish or vegetables for a full meal!
Pro Tips
- Rinse Thoroughly: Rinsing the sushi rice until the water runs clear is crucial for removing excess starch, which helps achieve the perfect sticky texture.
- Natural Release: Allowing the Instant Pot to naturally release pressure for 10 minutes ensures the rice finishes cooking gently, resulting in a fluffier texture.
- Vinegar Mixture Temperature: Adding the vinegar mixture to hot rice helps the flavors meld better, so be sure to drizzle it while the rice is still warm.
- Cooling Technique: Spread the sushi rice out on a wide surface to cool it down quickly, which helps prevent it from becoming too sticky and makes it easier to handle for sushi rolls.
Variations
Sushi Rice with Brown Rice
You can make sushi rice with brown rice for a healthier option. Brown rice has more fiber and nutrients. Use 2 cups of brown sushi rice and 2 3/4 cups of water. The cooking time will be longer. Set your Instant Pot to manual pressure for about 22 minutes. After cooking, let it release naturally for 10 minutes.
Adding Aromatics or Vegetables
You can add fun flavors with aromatics or veggies. Try adding a clove of minced garlic or a slice of ginger to the water when cooking. For veggies, mix in finely chopped carrots or green onions after cooking. This adds color and taste to your sushi rice.
Making Sweet Sushi Rice for Desserts
Sweet sushi rice is great for desserts. Use the same base recipe but add more sugar. Mix 1/4 cup of sugar with the vinegar, along with 1/2 teaspoon of vanilla extract. This gives a lovely sweet flavor. Use this rice to make sweet sushi rolls with fruits like mango or strawberries.
Storage Info
How to Store Leftover Sushi Rice
After making sushi rice, you might have some left. To store it, let it cool first. Place the rice in an airtight container. This keeps it fresh for up to three days in the fridge. If you want to keep it longer, freezing is a great option.
Reheating Sushi Rice
To reheat sushi rice, you can use a microwave. Place the rice in a bowl and add a splash of water. Cover it with a damp paper towel or lid. Heat it for about one minute. Check if it’s warm. If it’s not, heat it in 30-second bursts. Stir it gently to avoid clumps.
Freezing Sushi Rice for Future Use
If you want to freeze sushi rice, divide it into smaller portions. Use freezer bags or containers. Press out the air before sealing. Label each bag with the date. Frozen sushi rice can last for up to three months. When ready to use, thaw it in the fridge overnight and reheat as mentioned above.
FAQs
What is the best rice to use for sushi?
The best rice for sushi is sushi rice, also called short-grain rice. It has a sticky texture that holds well when making sushi rolls. This rice type absorbs water easily and gives you the perfect bite. Brands like Nishiki or Koshihikari are excellent choices. They create that classic sushi feel you want.
Can I use regular rice for sushi rice?
You can use regular rice, but it may not give the same result. Long-grain rice does not stick well. This means your sushi may fall apart. If you don't have sushi rice, try using Calrose rice as a substitute. It is a medium-grain rice and works better than long-grain.
How long does sushi rice last once cooked?
Cooked sushi rice lasts about 3 to 5 days in the fridge. Make sure to store it in an airtight container. This helps keep the rice fresh. You can also freeze it for up to a month. Just make sure to cool it completely before freezing.
To sum up, making sushi rice in an Instant Pot is simple and fun. You learned about key ingredients, tools needed, and step-by-step cooking. I shared tips to make perfect rice and avoid common mistakes. You can also try delicious rice variations and easy storage methods. These insights help you create great sushi at home. Enjoy the process and surprise your friends with your skills!