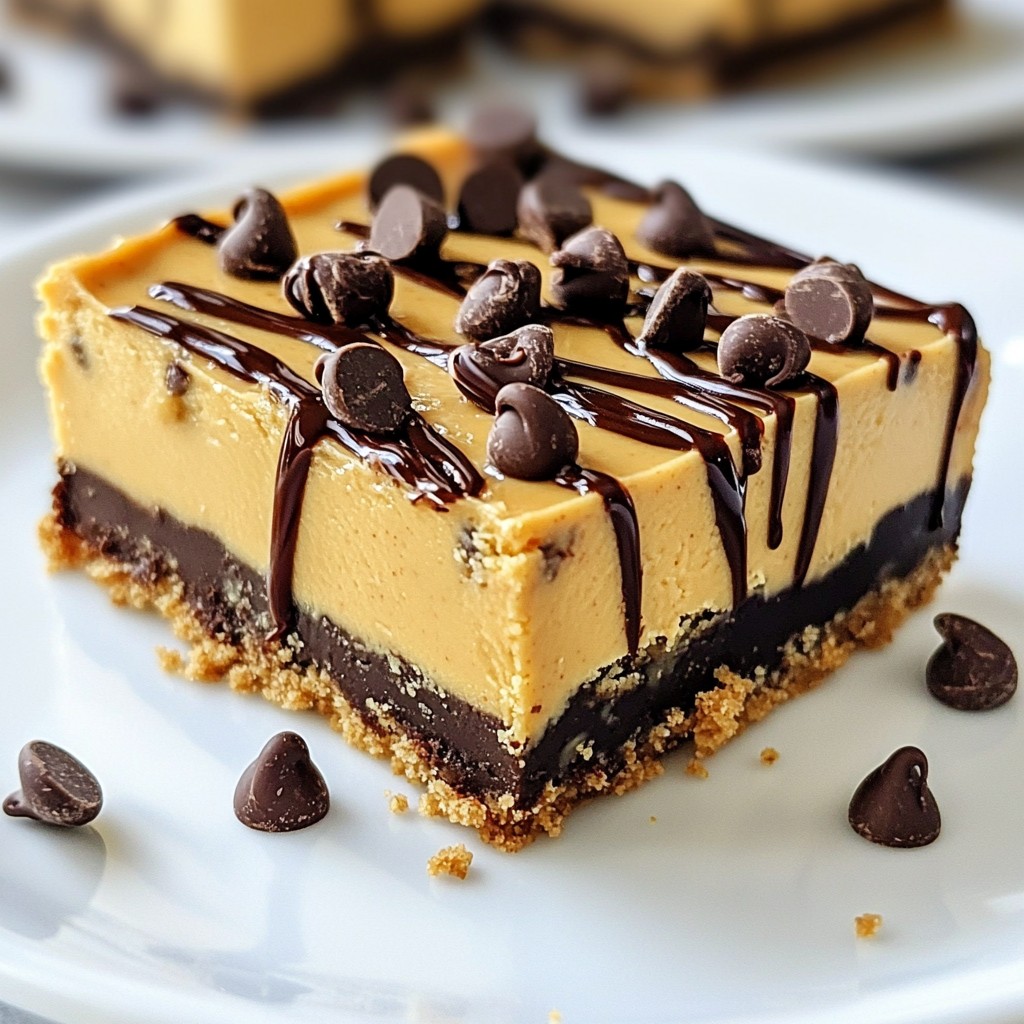
If you love chocolate and peanut butter, you’re in for a treat! These Chocolate Peanut Butter Cheesecake Bars combine creamy cheesecake and rich chocolate for a delightful dessert. They’re easy to make and perfect for any occasion. Follow my simple guide to whip up this tasty dessert, complete with helpful tips and variations. Get ready to impress your friends and family with these sweet bars that will have everyone coming back for more!
Why I Love This Recipe
- Decadent Flavor: The combination of rich chocolate and creamy peanut butter creates an indulgent taste that’s hard to resist.
- Easy to Make: This recipe is straightforward and doesn't require baking skills, making it perfect for bakers of all levels.
- Perfect for Gatherings: These cheesecake bars are easy to slice and serve, making them an ideal dessert for parties and gatherings.
- Customizable Toppings: You can get creative with toppings, like adding crushed nuts or sprinkles, to make each batch unique!
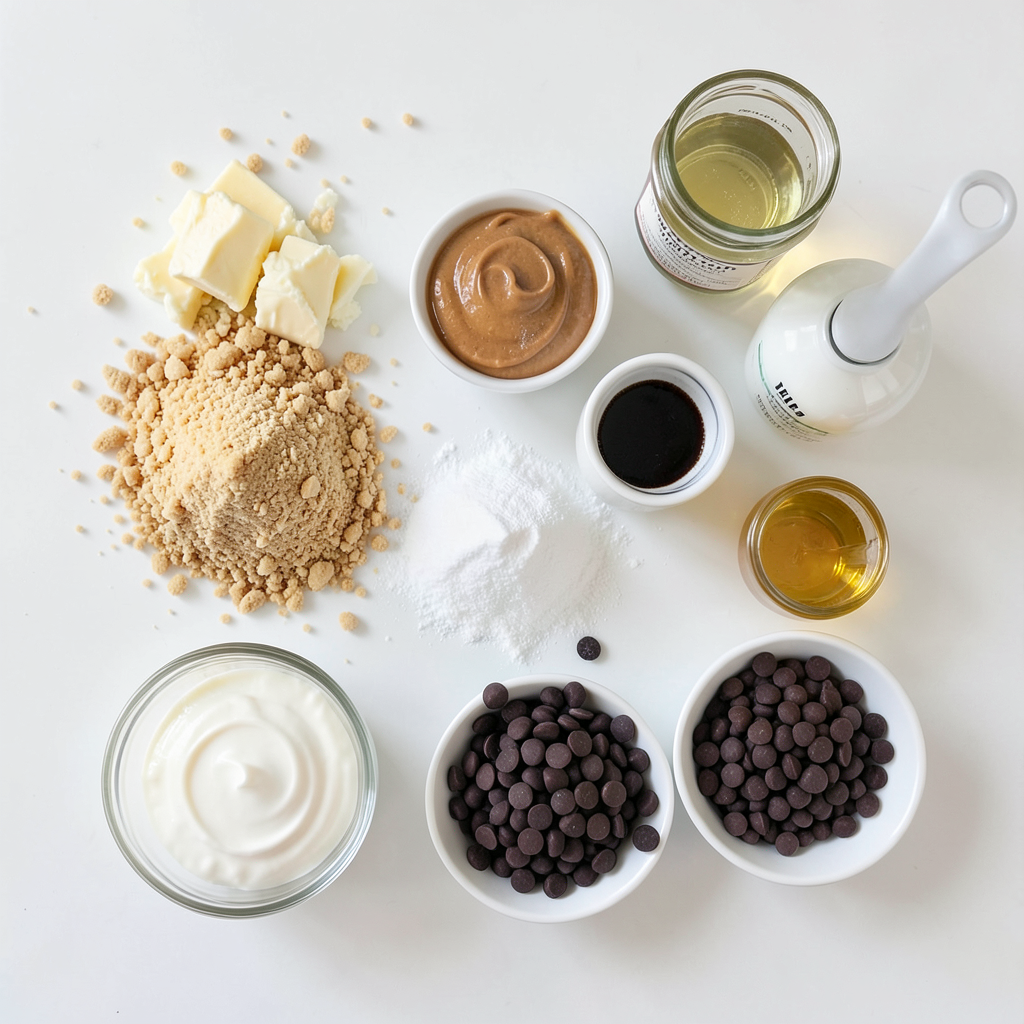
Ingredients
Main Ingredients
To make these chocolate peanut butter cheesecake bars, gather these essential components:
- 1 cup graham cracker crumbs
- 1/2 cup unsalted butter, melted
- 1/4 cup granulated sugar
- 16 oz cream cheese, softened
- 1 cup creamy peanut butter
- 3/4 cup powdered sugar
- 1 teaspoon vanilla extract
- 1 cup heavy whipping cream
- 1/2 cup semi-sweet chocolate chips
- 1 tablespoon coconut oil (for chocolate drizzle)
Optional Ingredients
You can customize your bars with these tasty options:
- Chopped nuts for extra crunch
- Sea salt for a sweet and salty mix
- Mini chocolate chips mixed into the filling
- Flavored extracts like almond or coffee
Necessary Tools
To prepare these cheesecake bars, you will need:
- An 8x8-inch baking pan
- Parchment paper for easy removal
- Mixing bowls (medium and large)
- Electric mixer for smooth mixing
- Spatula for spreading the filling
- Microwave-safe bowl for melting chocolate
Step-by-Step Instructions
Preparing the Crust
To make the crust, start by preheating your oven to 350°F (175°C). Grab an 8x8-inch baking pan and line it with parchment paper. This makes it easy to lift the bars later. In a medium bowl, mix together 1 cup of graham cracker crumbs, 1/2 cup of melted unsalted butter, and 1/4 cup of granulated sugar. Use a fork or your hands to combine these ingredients well. Press the mixture firmly into the bottom of the pan to create a solid layer. Bake the crust for 8 to 10 minutes or until it turns lightly golden. Once done, take it out and let it cool completely.
Making the Cheesecake Filling
Now, let’s prepare the creamy filling. Take a large mixing bowl and beat 16 ounces of softened cream cheese with an electric mixer. Mix it until it is smooth and creamy. Next, add 1 cup of creamy peanut butter, 3/4 cup of powdered sugar, and 1 teaspoon of vanilla extract. Beat this mixture until it is fluffy and well combined. In another bowl, whip 1 cup of heavy cream until stiff peaks form. Gently fold this whipped cream into the peanut butter mixture. Make sure no streaks remain for a smooth filling.
Assembling the Bars
After the filling is ready, it’s time to assemble the bars. Pour the peanut butter cheesecake filling over the cooled crust. Use a spatula to spread it out evenly. Make sure the filling is smooth and covers the entire crust. This step is key for a perfect bite.
Chilling and Serving
Now, you need to chill the cheesecake bars to let them set. Place the assembled bars in the fridge for at least 4 hours, or overnight for best results. Once they are set, melt 1/2 cup of semi-sweet chocolate chips with 1 tablespoon of coconut oil in a microwave-safe bowl. Heat in 20-second increments, stirring each time until smooth. Drizzle this melted chocolate over the cheesecake bars in a fun pattern. Chill for an extra 30 minutes to let the chocolate harden. Finally, lift the bars out of the pan using the parchment paper. Slice them into bars and serve chilled. Enjoy this delightful treat!
Tips & Tricks
Achieving the Perfect Texture
To get a creamy cheesecake, start with room temperature cream cheese. Cold cream cheese will not mix well. Use an electric mixer to whip it until smooth. This makes the filling light and fluffy. When you whip the heavy cream, beat it until stiff peaks form. This adds air and makes the cheesecake bars lighter.
Substitutions and Adjustments
If you have allergies, you can change some ingredients. You can use dairy-free cream cheese for a vegan option. Almond butter is a great swap for peanut butter if you have nut allergies. For a sugar-free version, use a sugar substitute in place of granulated and powdered sugar.
Storage Tips
To keep your cheesecake bars fresh, store them in an airtight container in the fridge. They will last for up to a week. If you want to keep them longer, freeze them. Cut the bars before freezing, and wrap each piece tightly. They can last up to three months in the freezer. Make sure to thaw them in the fridge before serving.
Pro Tips
- Chill Your Ingredients: For the best texture, make sure your cream cheese is at room temperature and your heavy cream is cold before whipping.
- Don't Overmix: When folding in the whipped cream, do so gently to maintain the light and airy texture of the cheesecake filling.
- Use Quality Chocolate: Opt for high-quality semi-sweet chocolate chips for the drizzle to enhance the overall flavor of the bars.
- Let It Set: Allow the cheesecake to chill overnight for the best results; this helps the flavors develop and the texture to firm up perfectly.
Variations
Flavor Additions
You can make these bars even more exciting! Try adding vanilla extract for a warm taste. Just a teaspoon will do. If you want a bold flavor, mix in some espresso powder. It gives a nice kick and pairs well with chocolate.
Healthier Alternatives
Want a lighter version? Use Greek yogurt instead of cream cheese. It will cut the calories and add protein. You can also use natural peanut butter that has no added sugar. For a lower sugar option, try using monk fruit sweetener instead of powdered sugar. It keeps the sweetness without the extra calories.
Different Toppings
Toppings can change the game! Besides the chocolate drizzle, consider using chopped nuts for crunch. Caramel sauce adds a sweet and rich layer, too. You can also sprinkle some sea salt on top. This contrast makes each bite even more delicious.
Storage Info
Short-Term Storage
To store cheesecake bars in the refrigerator, place them in an airtight container. You can also cover them tightly with plastic wrap. This keeps the bars fresh and prevents them from drying out. Make sure to place them in the fridge right after they cool. They will stay tasty for up to five days.
Long-Term Storage
For long-term storage, you can freeze the cheesecake bars. First, cut them into squares. Wrap each square tightly in plastic wrap. Then, place them in a freezer-safe bag or container. This helps to keep them fresh. To thaw, take them out of the freezer and place them in the fridge overnight. They will taste great after thawing!
Shelf Life
These chocolate peanut butter cheesecake bars have a good shelf life. In the fridge, they last for about five days. If you freeze them, they can last up to three months. Just remember to keep them well-wrapped to avoid freezer burn. Enjoy these delightful treats whenever you crave something sweet!
FAQs
How long do I need to chill the cheesecake bars?
You should chill the cheesecake bars for at least 4 hours. This time helps them set properly. If you can, chill them overnight for the best taste and texture. The longer they chill, the firmer they become. This waiting time makes a big difference in how they slice and taste.
Can I make these bars ahead of time?
Yes, you can make these bars ahead of time! They stay fresh in the fridge for about a week. This means you can prepare them for a party or a special occasion. Just be sure to store them in an airtight container. You can also freeze them for up to three months. Thaw them in the fridge before serving for the best texture.
What can I substitute for cream cheese?
If you want a dairy-free or vegan option, you can use cashew cream. Blend soaked cashews with a bit of lemon juice for a creamy texture. Tofu is another option; use silken tofu for a smoother finish. Both substitutes work well in this recipe. They will change the taste slightly, but the bars will still be delicious.
This blog post covered all you need for making delicious cheesecake bars. We discussed the essential ingredients, tools, and provided step-by-step instructions. You learned how to achieve the perfect texture and explored fun variations and storage tips.
Try different toppings or flavors to make these bars your own. With the right approach, you can impress anyone who tastes them. Enjoy your baking adventure!