Get ready for a sweet treat that combines the best of both worlds: chocolate chip cookies and cheesecake! These Chocolate Chip Cheesecake Cookies are rich, creamy, and oh-so-delicious. They'll impress everyone, from kids to adults. Whether you're baking for a party or just indulging yourself, this recipe is easy to follow and packed with flavor. Let's dive into the scrumptious world of these cookies and make your taste buds dance!
Why I Love This Recipe
- Rich Creamy Texture: The combination of cream cheese and butter creates a wonderfully rich and creamy texture that melts in your mouth.
- Chocolatey Delight: With semi-sweet chocolate chips folded in, each bite is a delicious burst of chocolate flavor that pairs perfectly with the cheesecake base.
- Quick and Easy: This recipe is simple to follow, making it perfect for both novice and experienced bakers looking for a quick treat.
- Perfect for Any Occasion: Whether it's a casual gathering or a special celebration, these cookies are sure to impress and satisfy any sweet tooth.
Ingredients
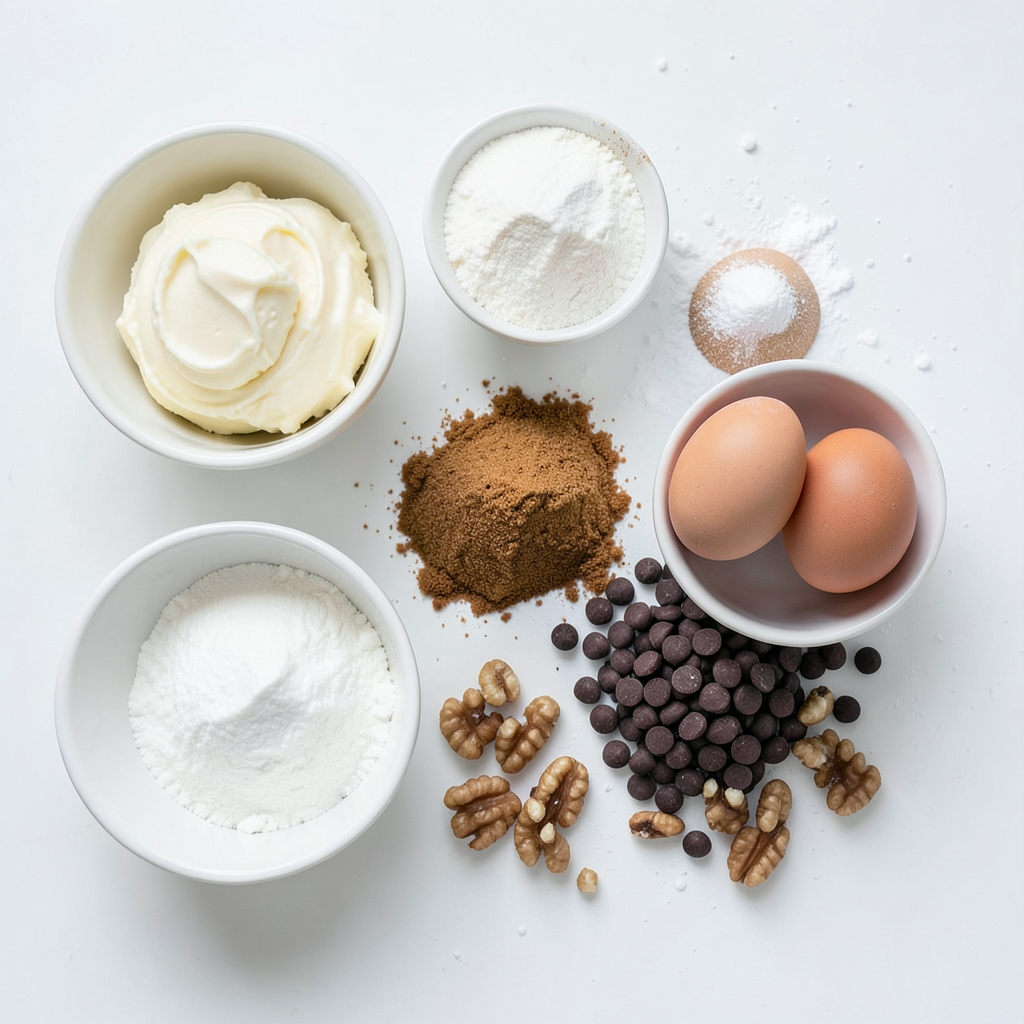
List of Ingredients
- 1 cup (2 sticks) unsalted butter, softened
- 1 cup cream cheese, softened
- 1 cup granulated sugar
- 1 cup brown sugar, packed
- 2 large eggs
- 2 teaspoons vanilla extract
- 3 cups all-purpose flour
- 1 teaspoon baking soda
- 1/2 teaspoon salt
- 1 cup semi-sweet chocolate chips
- 1/2 cup chopped walnuts (optional)
- 1/4 cup powdered sugar (for dusting)
To make chocolate chip cheesecake cookies, you need simple yet rich ingredients. The butter and cream cheese give these cookies their soft texture. The sugars add sweetness and help with browning.
Eggs help bind everything together. Vanilla extract adds a warm flavor. The flour forms the base of the dough. Baking soda helps the cookies rise, while salt balances the sweet taste.
Chocolate chips are the star here, giving bursts of chocolate in every bite. If you like a crunch, add walnuts. Dusting with powdered sugar at the end gives a nice finish.
Each ingredient plays a role in creating these tasty treats. When mixed together, they create magic in your oven. Enjoy gathering these ingredients and preparing for a fun baking session!
Step-by-Step Instructions
Prepping the Oven and Mixing
Start by preheating your oven to 350°F (175°C). This step is key for baking cookies evenly. While the oven heats, line your baking sheets with parchment paper. This makes for easy cleanup and helps prevent sticking.
In a large mixing bowl, cream together the softened butter, cream cheese, granulated sugar, and brown sugar. Use a hand mixer or a sturdy spoon. Beat them until the mixture is light and fluffy. This process adds air, creating a nice texture for the cookies.
Incorporating Wet Ingredients
Next, add the eggs one at a time. Mix well after each egg to ensure they blend smoothly. After that, pour in the vanilla extract. This adds a lovely flavor to your cookies. Make sure everything is fully incorporated.
Combining Dry Ingredients
In a separate bowl, whisk together the flour, baking soda, and salt. This step makes sure the baking soda and salt are evenly distributed. Slowly add this dry mix into the wet ingredients. Mix just until combined. Avoid overmixing to keep the cookies soft.
Folding in Add-ins
Now it's time to fold in the chocolate chips. You can also add chopped walnuts if you like a crunch. Use a spatula to gently mix these in without breaking the chips. This will give you delicious bites of chocolate in every cookie.
Baking the Cookies
Using a cookie scoop or a tablespoon, drop rounded balls of dough onto your prepared baking sheets. Space them about 2 inches apart. This gives them room to spread while baking.
Bake the cookies for 10 to 12 minutes. You want the edges to turn golden while the centers stay soft. After baking, allow them to cool on the sheets for about 5 minutes. Then transfer them to a wire rack to cool completely.
For a sweet touch, dust the cooled cookies with powdered sugar. This makes them look fancy and adds extra sweetness. Enjoy your tasty treats!
Tips & Tricks
Achieving the Perfect Texture
To get the best texture in your cookies, start with proper mixing. Cream the butter and cream cheese until light and fluffy. This helps add air and makes your cookies soft. Add the sugars next and mix well. Then, add the eggs one at a time. This ensures even mixing and a smooth batter.
For baking, keep an eye on the time. Bake at 350°F for 10-12 minutes. The edges should be golden, but the centers should stay soft. If you bake too long, the cookies will be hard. Let them cool on the baking sheet for five minutes. This helps them set before moving to a wire rack.
Presentation Suggestions
When serving, stack the cookies on a decorative plate. Add a few chocolate chips on top for a pop of color. A light dusting of powdered sugar makes them look fancy. This small touch adds sweetness and flair.
Store your cookies in an airtight container to keep them fresh. They can last up to a week at room temperature. If you want to keep them longer, freeze them. Just wrap them well in plastic wrap and put them in a zip-top bag. To enjoy later, thaw them at room temperature or warm them in the oven.
Pro Tips
- Use Room Temperature Ingredients: Allow your butter and cream cheese to soften at room temperature for easier mixing and a smoother batter.
- Chill the Dough: For thicker cookies, chill the dough for about 30 minutes before baking. This helps the cookies hold their shape better.
- Variations: Experiment with different types of chocolate chips or nuts for unique flavors. Dark chocolate or white chocolate can be delicious alternatives.
- Storage Tips: Store the cookies in an airtight container at room temperature for up to a week, or freeze them for longer storage.
Variations
Gluten-Free Chocolate Chip Cheesecake Cookies
To make these cookies gluten-free, swap the all-purpose flour for a gluten-free blend. Look for a mix with xanthan gum for the best texture. This helps hold the cookies together. You may need to adjust the flour amount slightly. Start with 2 ½ cups and add more if the dough is too sticky. Gluten-free cookies may bake a bit differently. Watch them closely to avoid over-baking.
Vegan Chocolate Chip Cheesecake Cookies
For a vegan version, replace the cream cheese with a dairy-free cream cheese. Use flax eggs instead of regular eggs. To make a flax egg, mix 1 tablespoon of ground flaxseed with 2.5 tablespoons of water. Let it sit for five minutes to thicken. Swap the butter for coconut oil or a plant-based butter. These swaps give you soft cookies with a cheery taste.
Add-Ins and Flavor Variations
Get creative with your cookies by adding mix-ins. Dried fruits like cranberries or cherries add a nice chewiness. You can also try nuts like pecans or almonds for extra crunch. Spices like cinnamon or nutmeg can enhance the flavor too. Consider using flavored extracts like almond or peppermint. These small changes can create a new twist on the classic taste.
Storage Info
How to Store Cookies
To keep your chocolate chip cheesecake cookies fresh, follow these easy steps:
- Short-term storage: Place the cookies in an airtight container. Keep them at room temperature. They will stay fresh for up to a week. If you want to keep them even longer, add a slice of bread in the container. This keeps the cookies moist.
- Freezing for long-term storage: For longer storage, freeze the cookies. First, let them cool completely. Then, place them in a freezer-safe bag. You can stack them, but separate layers with parchment paper. They can last for three months in the freezer.
Reheating and Refreshing Cookies
Sometimes, cookies can lose their soft texture. Here are some tips to bring them back to life:
- Reheating cookies: To refresh your cookies, preheat your oven to 300°F (150°C). Place the cookies on a baking sheet. Heat them for about 5-10 minutes. Keep an eye on them to avoid overcooking. This will warm them and make them soft again.
- Storing options for optimal shelf life: If you want to keep your cookies longer, freeze them as mentioned above. If they are in the fridge, use an airtight container. Always check for any signs of spoilage, especially if they have been stored for a while.
FAQs
What are Chocolate Chip Cheesecake Cookies?
Chocolate chip cheesecake cookies are soft, chewy treats. They taste like cheesecake and cookies combined. The cream cheese gives them a rich, creamy flavor. The chocolate chips add sweetness and texture. These cookies are perfect for any dessert lover.
Can I make these cookies ahead of time?
Yes, you can make these cookies ahead of time. You can store the dough in the fridge. This keeps the dough fresh for up to three days. You can also freeze the dough for up to three months. Just scoop the dough into balls and freeze them on a tray. Once frozen, place the balls in a bag. This way, you can bake fresh cookies anytime.
How do I prevent my cookies from spreading too much?
To prevent spreading, chill the dough before baking. After mixing, let it sit in the fridge for at least 30 minutes. Use parchment paper on your baking sheets too. This helps keep the cookies from spreading too much. Make sure your butter is softened but not melted. Lastly, do not skip the flour measurement. Too little flour can cause spreading.
Can I substitute cream cheese in the recipe?
Yes, you can substitute cream cheese. Use mascarpone cheese for a similar texture. You can also use Greek yogurt for a lighter option. However, these substitutes will change the flavor slightly. Cream cheese gives the cookies their rich taste, so keep that in mind.
What’s the best way to serve Chocolate Chip Cheesecake Cookies?
Serve these cookies on a nice plate for gatherings. Stack them high and dust with powdered sugar. This adds a touch of elegance. You can also pair them with ice cream for a fun dessert. These cookies are great for parties, picnics, or just a snack at home.
This blog post covered how to make delicious chocolate chip cheesecake cookies. We discussed the key ingredients and step-by-step instructions, ensuring perfect texture and presentation. I shared helpful tips, variations for different diets, and storage options for freshness.
These cookies are easy to make and a joy to share. Enjoy baking them with family or friends. You’ll love the results and the smiles they bring. Happy baking!