Skip to content
DisclaimerTerms Of UseGDPR PolicyCookie Policy

savorystride

  • Home
  • Drinks
  • Appetizers
  • Dinner
  • Dessert
  • About
  • Contact
  • Privacy Policy
DisclaimerTerms Of UseGDPR PolicyCookie Policy

Hazel

- 2 cups whole wheat flour - 1 cup all-purpose flour - 1 teaspoon baking soda - 1 teaspoon salt - 1 cup chopped fresh figs (about 10-12 figs) - ½ cup chopped walnuts - 1 tablespoon honey - 1 ¼ cups buttermilk (or substitute with milk mixed with vinegar) Fresh Fig and Walnut Soda Bread needs simple, wholesome ingredients. Whole wheat flour gives the bread a hearty texture. All-purpose flour keeps it light and fluffy. Baking soda helps the bread rise, creating a lovely crumb. Salt adds flavor and balances the sweetness of figs and honey. Figs bring natural sweetness and moisture. I love using fresh figs, but dried figs will work too. Walnuts add a nice crunch and nutty flavor. Honey sweetens the dough, making it delicious. Buttermilk keeps the bread tender. If you lack buttermilk, mix milk with vinegar for a quick substitute. - Quantity Recommendations: Use the exact amounts in the recipe for best results. - Ingredient Substitutes for Dietary Needs: - Gluten-free: Use a gluten-free flour blend instead of wheat flour. - Nut-free: Omit walnuts or swap with pumpkin seeds. - Dairy-free: Use almond milk mixed with vinegar instead of buttermilk. These swaps will keep your soda bread tasty, no matter your needs. I encourage you to experiment and find what works best for you! For the full recipe, check out the details above. Mixing Dry Ingredients Start by getting a large mixing bowl. Add 2 cups of whole wheat flour and 1 cup of all-purpose flour. Sprinkle in 1 teaspoon of baking soda and 1 teaspoon of salt. Use a whisk to mix these dry ingredients well. Make sure there are no lumps. This base will give your bread a nice rise. Incorporating Figs and Walnuts Next, take 1 cup of chopped fresh figs and ½ cup of chopped walnuts. Gently fold them into the flour mix. Be careful to distribute them evenly without crushing the figs. This adds sweetness and crunch to your bread. Combining Buttermilk and Honey In a separate bowl, combine 1 ¼ cups of buttermilk and 1 tablespoon of honey. Whisk them together until they are well mixed. The honey will add a nice touch of sweetness to the dough. Forming the Dough Now, pour the wet mixture into the dry ingredients. Use a spatula or your hands to mix them gently. You want a shaggy dough to form. It should be slightly sticky but not too wet. Remember, do not overwork the dough. Shaping the Loaf Transfer the dough onto a floured surface. Shape it into a round loaf. Aim for about 1.5 inches thick. This loaf will rise nicely in the oven. Scoring and Baking Procedures Place the shaped loaf on a baking sheet lined with parchment paper. Take a sharp knife and score an "X" on top of the loaf. This helps it bake evenly. Preheat your oven to 400°F (200°C) and bake the loaf for 30-35 minutes. It should turn golden brown and sound hollow when tapped on the bottom. Once done, let it cool for at least 15 minutes. Enjoy your homemade bread! For the full recipe, check the details above. Achieving the Right Dough Consistency To get the best dough, mix your dry ingredients well. This helps blend the flavors. When you add the wet ingredients, mix gently. Your dough should feel slightly sticky but not too wet. If it’s too dry, add a splash of buttermilk. If it’s too wet, sprinkle in a bit more flour. The right consistency makes a big difference in texture. Tips for Even Baking For even baking, make sure your oven is preheated to 400°F (200°C). When you shape the loaf, aim for a 1.5-inch thickness. This helps it cook through without burning. Scoring the top with an X allows steam to escape, which helps it rise. Keep an eye on your bread in the last few minutes. The golden brown crust means it’s done! Ideal Pairings Fresh fig and walnut soda bread pairs well with creamy cheese like goat cheese or brie. You can also enjoy it with butter or a drizzle of honey. These flavors complement the bread’s sweetness. If you like savory, try it with spreads like hummus or olive tapenade. Presentation Ideas To make your bread look pretty, serve it warm on a wooden board. Add a few whole figs and walnuts around it for color. This adds a rustic touch and makes it inviting. You can also slice it into thick pieces for easy serving. Don’t forget to offer a small dish of honey on the side. This will encourage everyone to dive in! For the full recipe, check out the [Full Recipe]. {{image_2}} Dried Figs Instead of Fresh If fresh figs are hard to find, use dried figs. They add a sweet, chewy taste. Chop the dried figs into smaller pieces for better mixing. The texture will be different but still tasty. Different Nuts or Seeds You can swap walnuts for other nuts like pecans or almonds. Seeds like sunflower or pumpkin seeds also work well. Each nut or seed brings a unique flavor and crunch to the bread. Spices to Add for Extra Flavor To spice things up, try adding cinnamon or nutmeg. About half a teaspoon will do. These spices add warmth to the bread and pair nicely with figs. Incorporating Other Fruits Feel free to add more fruits like raisins or cranberries. They bring extra sweetness and color. Just keep the total fruit amount the same to maintain texture. Adding fruits makes the bread even more fun! To keep your fresh fig and walnut soda bread at its best, store it in a cool, dry place. Wrap the bread in a clean kitchen towel. This helps keep the crust crisp while preventing it from getting too dry. You can also place it in a paper bag for extra breathability. Avoid airtight containers for short-term storage, as these can trap moisture and make the bread soggy. Enjoy the bread within 2 to 3 days for the best taste and texture. If you want to save your bread for later, freezing is a great option. Slice the bread before freezing. Place the slices in a single layer on a baking sheet. Freeze them for about an hour until firm. Then, transfer the slices to a freezer-safe bag or container. This method helps prevent freezer burn. You can freeze the bread for up to 3 months. To reheat after freezing, take out the desired number of slices. You can use the oven or toaster. For the oven, preheat it to 350°F (175°C). Place the slices on a baking sheet and warm them for 10 to 15 minutes. If using a toaster, toast the slices until they are heated through and crisp again. Enjoy your bread as if it were fresh! Can I make this recipe gluten-free? Yes, you can! Use a gluten-free flour blend. Look for blends that have xanthan gum. This will help the bread hold together well. What can I use instead of buttermilk? You can use regular milk mixed with vinegar. Just mix one tablespoon of vinegar with enough milk to make 1 ¼ cups. Let it sit for five minutes. This will mimic buttermilk's tangy taste. How do I know when the bread is done baking? Tap the bottom of the loaf. If it sounds hollow, it’s done. You can also check the color. It should be golden brown. How to prevent overworking the dough? Mix gently. Use a spatula or your hands to combine the wet and dry ingredients. Stop as soon as it comes together. The dough should be a little sticky. Can I double the recipe? Yes, you can double the recipe easily. Just make sure to use a bigger bowl and baking sheet. Keep an eye on the baking time. It may need a few extra minutes. For the full recipe, check the earlier sections. You learned about making delicious soda bread with fresh figs and walnuts. We covered ingredients, measurements, and substitutions. Step-by-step instructions helped you prepare the dough and bake it perfectly. Useful tips and tricks enhanced your baking skills, while variations showed how to make it your own. We wrapped up with storage info and answered common questions. Now, you’re ready to enjoy baking this tempting treat. Have fun experimenting with flavors and sharing it with others!

Fresh Fig and Walnut Soda Bread Simple Recipe Guide

Are you ready to bake something delicious? This Fresh Fig and Walnut Soda Bread is simple and packed with flavor.

To make these delicious bars, you need some key ingredients. Here’s a list for you: - 1 cup finely grated zucchini (about 1 medium zucchini) - 1 cup all-purpose flour - 1/2 cup unsweetened cocoa powder - 1/2 teaspoon baking powder - 1/2 teaspoon baking soda - 1/4 teaspoon salt - 1/2 cup granulated sugar - 1/2 cup brown sugar, packed - 1/2 cup vegetable oil - 2 large eggs - 1 teaspoon vanilla extract - 1 cup semi-sweet chocolate chips - 1/4 cup chopped walnuts (optional) These ingredients blend together to create a rich and moist treat. The zucchini adds moisture without a strong flavor. You won’t even know it’s in there! If you lack any of these ingredients, don’t worry! Here are some swaps you can use: - Zucchini: You can use finely grated carrots or apples instead. - All-purpose flour: Use whole wheat flour for a nutty taste. - Granulated sugar: Coconut sugar works well as a natural option. - Vegetable oil: You can replace it with melted coconut oil or applesauce. - Eggs: Use flaxseed meal (1 tablespoon mixed with 2.5 tablespoons water) for a vegan option. These swaps keep the bars tasty and maintain their moistness. Don’t hesitate to get creative! For making these bars, you’ll need some handy tools: - 8x8 inch baking dish - Parchment paper - Mixing bowls (medium and large) - Whisk or electric mixer - Spatula for mixing - Sifter for dry ingredients - Toothpick to test doneness Using the right tools makes the process smoother and more fun. Plus, it helps you achieve that perfect bake! Check out the Full Recipe for complete instructions and tips. Start by gathering all your ingredients. This makes things easy and fun. You need 1 cup of finely grated zucchini, about 1 medium zucchini. Next, measure 1 cup of all-purpose flour and 1/2 cup of unsweetened cocoa powder. Don’t forget the baking powder, baking soda, and salt. You’ll need 1/2 cup each of granulated and brown sugar. For moisture, grab 1/2 cup of vegetable oil. You also need 2 large eggs and 1 teaspoon of vanilla extract. Lastly, get 1 cup of semi-sweet chocolate chips and 1/4 cup of chopped walnuts if you like nuts. First, preheat your oven to 350°F (175°C). Grease and line an 8x8 inch baking dish with parchment paper. It helps with easy removal later. In a medium bowl, sift together the flour, cocoa powder, baking powder, baking soda, and salt. This step is key for a smooth batter. In a large bowl, mix the granulated sugar, brown sugar, and vegetable oil until well combined. Then, add the eggs and vanilla extract. Blend until the mixture looks creamy. Gradually add the dry mix to the wet mix. Stir gently until just combined. Over-mixing can make the bars tough. Now, fold in the grated zucchini, chocolate chips, and walnuts if you are using them. Make sure everything is evenly mixed. Pour the batter into your prepared baking dish. Spread it out evenly with a spatula. Bake for 25-30 minutes. Check with a toothpick; it should come out clean with a few moist crumbs. Once baked, let the bars cool in the pan for about 10 minutes. Then, transfer them to a wire rack to cool completely. These bars are sure to be a hit! You can find the full recipe with all the details to make these tasty treats. To make your zucchini bars soft and moist, start with fresh zucchini. Grate it finely and press out extra water using a clean cloth. This step keeps the bars from being too soggy. Use a mix of granulated and brown sugar for a rich flavor. The brown sugar adds moisture and sweetness. Avoid over-mixing your batter. Stir just until the dry and wet ingredients are combined. This keeps the bars light and fluffy. One common mistake is using too much flour. Measure it correctly, spooning it into your cup, then leveling it off. Another mistake is not prepping the zucchini well. If it's too wet, it can make the bars dense. Also, avoid opening the oven door too early. This can cause your bars to sink. Wait until the last few minutes to check for doneness. To make your bars even better, try adding nuts or spices. Chopped walnuts give a nice crunch. You can also add a teaspoon of cinnamon for warmth. For a fun twist, mix in some peanut butter chips or mint chocolate chips. These add unique flavors and surprise your taste buds. If you like a more decadent treat, drizzle some melted chocolate on top before serving. For the full recipe, check back to see how to bring it all together. {{image_2}} If you want to make this treat lighter, swap out some ingredients. Use applesauce instead of oil. It keeps the bars moist and cuts calories. You can also use a sugar substitute like stevia or erythritol. These options help reduce sugar without losing sweetness. For a lower-carb version, try almond flour instead of all-purpose flour. This change adds healthy fats and fiber. To make gluten-free moist double chocolate zucchini bars, use a gluten-free flour blend. These blends often contain rice flour, almond flour, or tapioca flour. They work well in baking. You can also add a little xanthan gum to help with texture. Always check labels to ensure all ingredients are truly gluten-free. Enjoy the same great taste without the gluten! Feel free to switch things up with flavors. Instead of semi-sweet chocolate chips, try dark chocolate or white chocolate chips. You can also add spices like cinnamon or nutmeg for extra warmth. If you love nuts, feel free to swap walnuts for pecans or hazelnuts. Each swap gives a new twist to the classic recipe. Explore different flavors to find your favorite! For the full recipe, check out the details above. To keep your zucchini bars fresh, place them in an airtight container. Make sure the bars are completely cool before storing them. You can also wrap them in plastic wrap for extra protection. This helps to keep them moist and soft. You can freeze these bars for up to three months. To freeze, cut the bars into squares. Wrap each square in plastic wrap, then place them in a freezer bag. When you're ready to eat, let them thaw in the fridge overnight. You can also reheat them in the microwave for about 15-20 seconds. When stored properly, these zucchini bars last about a week at room temperature. For the best taste, eat them within a few days. If you see any signs of mold or off smells, it's best to throw them away. Enjoy your Moist Double Chocolate Zucchini Bars fresh for the best flavor! Yes, you can use frozen zucchini. Just make sure to thaw it first. Drain off excess water to avoid making the batter too wet. Frozen zucchini works well in this recipe. You can use applesauce or mashed bananas as egg substitutes. Use 1/4 cup of either for each egg. This keeps the bars moist and adds natural sweetness. You can also use flaxseed meal mixed with water as a binding agent. Check the bars after 25 minutes. Insert a toothpick into the center. If it comes out clean or with a few moist crumbs, they are done. Keep an eye on them to avoid overbaking. The edges should look set, and the center should not jiggle. For the full recipe, visit the Moist Double Chocolate Zucchini Bars section above. You now know how to make moist double chocolate zucchini bars. From picking fresh ingredients to adjusting for dietary needs, you have all the tips. Avoid common mistakes to get the best texture. Remember, variations let you create new flavors. Store leftover bars properly to keep them fresh. With these steps, you’ll bake with confidence. Enjoy your tasty treats and share them with friends. Happy baking!

Moist Double Chocolate Zucchini Bars Delicious Treat

Are you ready to enjoy a guilt-free dessert that’s rich and moist? These Double Chocolate Zucchini Bars blend the sweetness

Let’s break down the key ingredients for Classic Italian Zucchini Pasta Casserole. Each part plays a role in making this dish rich and tasty. - Zucchini and Pasta Components - 3 medium zucchinis, sliced into thin rounds - 2 cups cooked pasta (such as penne or fusilli) - Dairy and Sauce Requirements - 1 cup marinara sauce - 1 cup ricotta cheese - 1 cup shredded mozzarella cheese - 1/2 cup grated Parmesan cheese - 1 large egg - Seasoning and Garnishing Essentials - 2 cloves garlic, minced - 1 teaspoon dried oregano - 1 teaspoon dried basil - Salt and pepper to taste - Olive oil for drizzling - Fresh basil leaves for garnish Gather these ingredients, and you will have everything you need for a delicious casserole. The combination of zucchini and pasta creates a hearty meal. The cheeses add creaminess, while the herbs bring fresh flavor. This recipe is simple yet elegant, making it perfect for any occasion. You can find the full recipe later in the article, so let’s get cooking! - Preheating the Oven First, set your oven to 375°F (190°C). Preheating helps cook the casserole evenly. - Sautéing the Zucchini Take a skillet and drizzle some olive oil. Heat it on medium. Add your sliced zucchinis and minced garlic. Cook until the zucchinis are tender, about 5-7 minutes. Season with salt, pepper, oregano, and basil. Once done, set them aside to cool a bit. - Mixing the Pasta Mixture In a large bowl, combine the cooked pasta, marinara sauce, ricotta cheese, and the large egg. Add half of the mozzarella and half of the Parmesan cheese. Mix until blended well. Carefully fold in the sautéed zucchinis. - Assembling the Casserole Grease a 9x13 inch baking dish with olive oil. Pour the zucchini and pasta mix into the dish, spreading it out evenly. Top it with the rest of the mozzarella and Parmesan cheese. - Covering and Initial Baking Cover the dish with aluminum foil. Bake in your preheated oven for 20 minutes. This helps keep it moist. - Final Baking Steps After 20 minutes, take off the foil. Bake for another 10-15 minutes. Look for melted, golden cheese on top. When it's done, let it cool for a few minutes. Garnish with fresh basil leaves before serving. For more detailed guidance, check the Full Recipe. Optimal Zucchini Slicing Techniques Slice zucchini into thin rounds. This helps them cook evenly. You want them to be about 1/4 inch thick. If they are too thick, they might stay crunchy. A sharp knife makes slicing easy and safe. Cheese Substitutions for An Enhanced Flavor You can change up the cheese to fit your taste. Instead of ricotta, try cottage cheese for a lighter dish. Swap mozzarella for provolone for a bolder flavor. Mixing different cheeses can give depth to your casserole. Adjusting Seasonings to Personal Preference Taste is key! Start with the basic seasonings in the recipe. Then, add more salt, pepper, or herbs as you like. Want a spicy kick? Add red pepper flakes. Love garlic? Toss in more minced garlic for extra zing. Alternative Cooking Methods You can cook this casserole in different ways. If you prefer, use a stovetop. Heat the mixture in a skillet, then transfer to a baking dish. A slow cooker works well too. Just layer the ingredients and set on low for 4 hours. Adjustments for Different Portions Need to feed a crowd? Double the recipe for a big dish. For fewer servings, cut the ingredients in half. Adjust the baking time as needed. Always check for that golden cheese on top to know it’s ready. For the complete recipe, check out the Full Recipe section. {{image_2}} You can make this dish even better by swapping some ingredients. Here are a few ideas: - Adding Proteins: You can add cooked chicken or sausage to boost flavor and protein. Cooked ground turkey also works well. Just mix it in with the pasta. - Changing Up the Cheese Types: Try different cheeses like feta or goat cheese for a tangy twist. You can also use sharp cheddar for a bold taste. Mix and match to find your favorite. - Incorporating Other Vegetables: Add bell peppers, spinach, or mushrooms for more color and nutrition. These veggies pair well with zucchini and enhance the dish’s flavor. This casserole can fit many diets with a few simple swaps: - Gluten-Free Pasta Options: If you need gluten-free, use rice or quinoa pasta. They cook well and taste great in this dish. Make sure to check the package for cooking times. - Vegan Adaptations: For a vegan version, replace the cheese with plant-based alternatives. Use tofu or cashew cream instead of ricotta and nutritional yeast for a cheesy flavor. This keeps it vegan and delicious. These variations let you create a tasty dish that fits your needs. Check out the Full Recipe for more details on making this delightful casserole! Refrigeration Tips After enjoying this tasty casserole, cool it down to room temperature. Place it in an airtight container. It stays fresh in the fridge for about 3 to 4 days. If you want, you can also slice it before storing. This way, it’s easy to grab a piece later. Freezing Guidelines and Tips To freeze your leftover casserole, use a freezer-safe container. Wrap it tightly with plastic wrap or aluminum foil. It can last for up to 2 to 3 months in the freezer. When ready to eat, let it thaw in the fridge overnight before reheating. Best Methods for Reheating Casserole The best way to reheat is in the oven. Preheat your oven to 350°F (175°C). Place the casserole in an oven-safe dish. Cover it with foil to keep it moist. Bake for about 20 minutes or until it is heated through. Tips for Maintaining Texture To keep the texture nice, avoid microwaving if you can. Microwaving can make it soggy. If you must use a microwave, heat it in short bursts. Stir in between to help it heat evenly. Enjoy your warm, tasty casserole! For the full recipe, check out Classic Italian Zucchini Pasta Casserole. What to serve with Classic Italian Zucchini Pasta Casserole? You can serve this casserole with a side salad. A simple green salad pairs well. Garlic bread is another great choice. It adds a nice crunch and flavor. Can I prepare this casserole in advance? Yes, you can prepare this casserole ahead of time. Just assemble it and store it in the fridge. Cover it well to keep it fresh. Bake it when you're ready to serve. How long does it last in the fridge? This casserole stays fresh for up to three days in the fridge. Make sure to keep it covered. If you want to enjoy it later, freezing is an option. Can I use fresh zucchini instead of frozen? Absolutely! Fresh zucchini works just as well. Slice it thin, just like frozen. It will add a lovely texture to your casserole. How do I know when the casserole is fully cooked? You can tell by checking the cheese on top. It should be melted and golden brown. Also, the edges will bubble slightly. A knife inserted in the center should come out hot. This blog post covered how to make a delicious zucchini pasta casserole. You learned about essential ingredients, step-by-step instructions, and helpful tips. Don't forget to try ingredient swaps for variety. You can even adjust for dietary needs with ease. This dish is versatile and can fit your taste. Store leftovers wisely and reheat them well to keep them tasty. Enjoy your cooking journey, and share your results!

Classic Italian Zucchini Pasta Casserole Delight

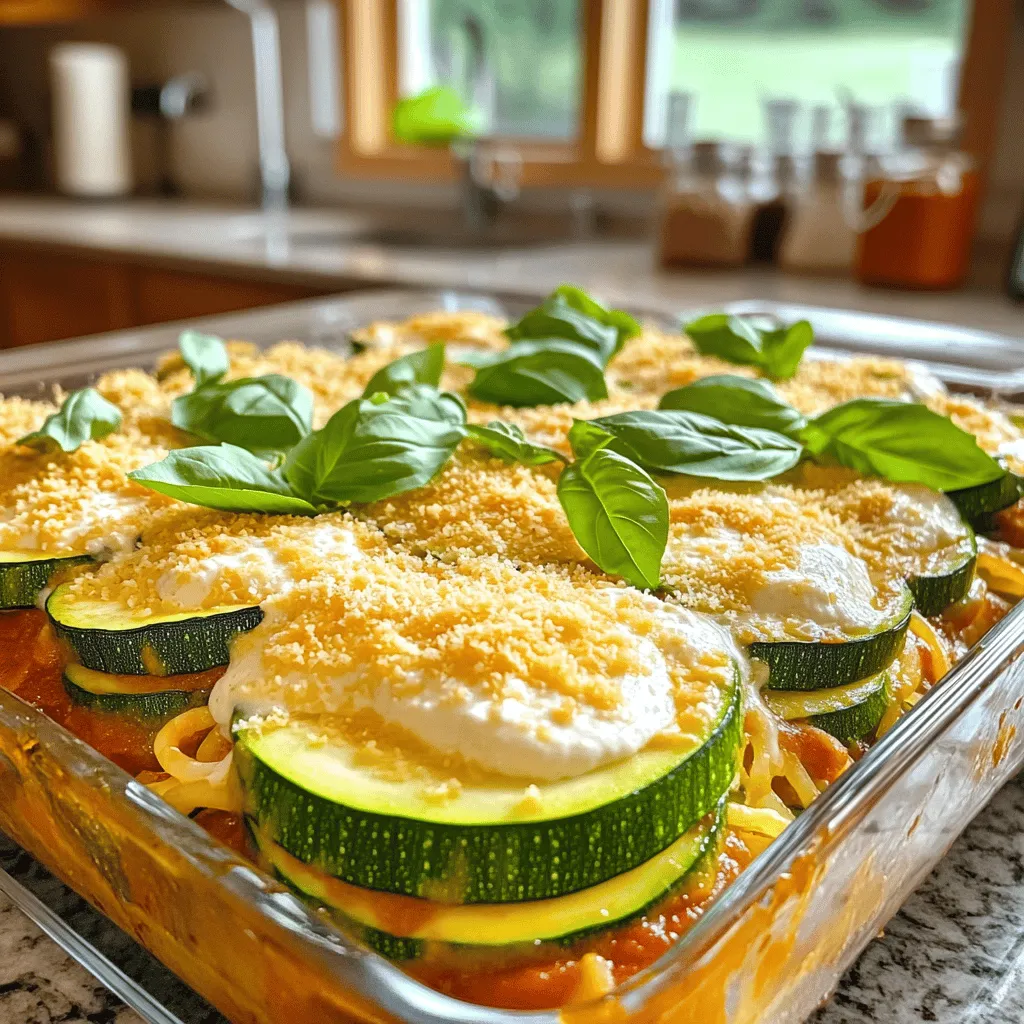
If you’re looking for a tasty and simple dish, the Classic Italian Zucchini Pasta Casserole Delight is for you. This

- 1 pre-made pie crust - 4 large ripe tomatoes - 1 cup fresh mozzarella cheese - 1/2 cup grated parmesan cheese - 1/4 cup fresh basil leaves - 1/4 cup mayonnaise - 2 teaspoons Dijon mustard - 1 teaspoon garlic powder - 1 teaspoon dried oregano - Salt and pepper - Olive oil for drizzling - Other herbs for flavor To make a savory tomato pie, you need fresh and tasty ingredients. The pie crust can be store-bought or homemade. I often choose a pre-made crust for convenience, especially on busy days. Using ripe tomatoes is key. They add a juicy and sweet flavor. I prefer large tomatoes for this recipe, as they slice nicely. Fresh mozzarella cheese melts perfectly, making the pie creamy. Parmesan cheese gives a nice sharp taste. Basil is a must! It adds a fresh and fragrant touch. Mix in a bit of mayonnaise and Dijon mustard for a creamy base. Garlic powder and dried oregano boost the flavor. Don't forget salt and pepper; they bring all the ingredients together. You can drizzle olive oil for extra richness. Feel free to add other herbs, like thyme or parsley, to change things up. This combination of flavors makes a pie that is sure to impress. For the full recipe, check out the detailed instructions. 1. First, preheat your oven to 375°F (190°C). 2. Take your pre-made pie crust and place it in a 9-inch pie dish. 3. Poke the bottom of the crust with a fork. This helps to avoid bubbling. 4. Bake the crust for 10 minutes. It will be slightly golden. 5. Once done, remove the crust and let it cool for a bit. 1. In a mixing bowl, add 1/4 cup of mayonnaise, 2 teaspoons of Dijon mustard, 1 teaspoon of garlic powder, and 1 teaspoon of dried oregano. 2. Season with salt and pepper to your taste. 3. Mix all these ingredients well until smooth. 4. Spread this mixture evenly over the bottom of the baked pie crust. 5. Next, layer half of the sliced tomatoes over the mayonnaise mixture. 6. Add half of the mozzarella cheese and half of the parmesan cheese. 7. Sprinkle half of the chopped basil on top of the cheese layers. 8. Repeat this process with the remaining tomatoes, mozzarella, parmesan, and basil. 1. Drizzle a bit of olive oil over the top of your pie for added flavor. 2. Place the pie in the preheated oven and bake for 30-35 minutes. 3. Look for bubbly and golden brown cheese to know it's done. 4. After baking, remove the pie from the oven. Let it cool for about 10 minutes before slicing. For the full recipe, refer to the entire guide above. Enjoy your savory tomato pie warm or at room temperature! You might want to switch out some ingredients. Here are my favorite swaps: - Alternative cheeses: Try goat cheese or cheddar if you like stronger flavors. - Vegan options: Use vegan mozzarella and a plant-based mayo for a tasty twist. Adding some spices can take your pie to the next level: - Adding spices: A pinch of red pepper flakes brings heat. Try smoked paprika for a smoky touch. - Using different herbs: Thyme or rosemary can give a nice depth. Mix in cilantro for a fresh twist. How you serve the pie matters: - Garnishing techniques: Fresh basil leaves look great on top. A drizzle of balsamic glaze adds flair. - Serving ideas: Serve slices warm or at room temperature. Pair with a light salad for a complete meal. For the full recipe, check out the details above! {{image_2}} You can add more veggies to your savory tomato pie. Zucchini makes a great choice. Just slice it thinly and layer it with the tomatoes. Spinach also adds a nice touch. Use fresh leaves and mix them in with the cheese. Bell peppers are another tasty option. Choose red, yellow, or green for a pop of color. Dice them finely and layer them with the other veggies. This medley makes each bite more exciting and colorful. For a Mediterranean flair, try adding olives and feta cheese. Black olives provide a nice salty punch. Crumble feta cheese on top for creaminess. Both flavors pair well with the tomatoes. You can also switch the crust to pita bread. Just layer the ingredients on top of the pita. This gives a unique texture and taste. You will enjoy this twist if you love Mediterranean flavors. Your savory tomato pie can change with the seasons. In summer, use fresh garden tomatoes. They are juicy and full of flavor. In winter, try using sun-dried tomatoes. They will give a rich taste to your pie. You can also adapt to local ingredients. Visit your local farmer's market for fresh produce. This way, your pie will reflect the seasons and local flavors. Each variation makes your savory tomato pie even more special. For the full recipe, check out the Sizzling Savory Tomato Pie section above. To store leftovers, let the pie cool first. Wrap it in plastic wrap or foil. You can also place it in an airtight container. This keeps the pie fresh. The cooked pie lasts about 3 to 4 days in the fridge. Always check for any signs of spoilage before eating. For freezing, wait until the pie has cooled. Wrap it tightly in plastic wrap. Then, cover it with foil to prevent freezer burn. The pie can be frozen for up to 3 months. When you're ready to eat it, thaw the pie in the fridge overnight. Reheat it in the oven at 350°F (175°C) for about 20 minutes or until warm. You can enjoy day-old pie in many ways. Serve it cold or at room temperature. You can also slice it and warm it up in a pan. Another idea is to chop the pie into pieces. Add it to a salad for a tasty twist. You could even use the pie filling in an omelet or a frittata. These methods help you make the most of your leftovers! Yes, you can make Savory Tomato Pie ahead of time. It's easy and saves time. To prepare, bake the pie as directed in the Full Recipe. After cooling, cover it with plastic wrap or foil. Store it in the fridge for up to two days. When ready to eat, just reheat it in the oven at 350°F (175°C) for about 15-20 minutes. This keeps the crust crisp and the cheese melty. Savory Tomato Pie pairs well with many side dishes. Here are some great options: - A light garden salad with a simple vinaigrette - Roasted vegetables for a warm side - Garlic bread for extra flavor - Fresh fruit salad for a sweet touch These sides will enhance your meal and make it even more enjoyable. You can tell the pie is done by looking for a few signs. The cheese should be bubbly and golden brown. The tomatoes should look soft but not mushy. You can also insert a knife into the center; it should come out hot. Let the pie cool for about 10 minutes before slicing. This helps the filling set and makes serving easier. In this blog post, I covered how to make a savory tomato pie. We looked at key ingredients, from ripe tomatoes to fresh herbs. I gave step-by-step instructions for preparing the crust and filling. I also shared tips for flavor enhancements and creative variations. You can enjoy this dish in many ways. Use leftovers for new meals. With this recipe, you have a tasty and easy option to impress anyone. Enjoy your cooking and make it your own!

Savory Tomato Pie Flavorful and Easy Recipe Guide

Are you ready to take your taste buds on a delicious adventure? Savory Tomato Pie is a crowd-pleaser, and making

- 4 small cucumbers, sliced into rounds or spears - 1 ½ cups distilled white vinegar - 1 cup water - 2 tablespoons sugar - 1 tablespoon salt - 1 teaspoon mustard seeds - 1 teaspoon dill seeds - 4 cloves garlic, peeled - 1 teaspoon crushed red pepper flakes (optional for heat) - Fresh dill sprigs for garnish When choosing cucumbers, pick firm ones with bright skin. Small cucumbers work best for crunch. You can use pickling cucumbers for extra flavor. The vinegar in this recipe gives a nice tang. You can switch it up with apple cider vinegar for a different taste. Adding garlic boosts the flavor. If you like heat, add crushed red pepper. This is optional, so adjust it to your liking. Fresh dill sprigs add a lovely aroma and taste. If you want a sweeter pickle, add a bit more sugar. This ingredient list is simple. With everything ready, you can make these crunchy, flavorful snacks in no time. For the full recipe, follow the steps carefully to ensure great results. Start by washing your cucumbers. Rinse them well under cold running water. This step removes dirt and helps clean the skin. For slicing, you can choose rounds or spears. I love spears for dipping! To get the best shape, use a sharp knife. Cut each cucumber evenly. This helps them pickle nicely. Fresh cucumbers are key. They should feel firm and have no soft spots. Using fresh cucumbers makes your pickles crisp and tasty. Next, it’s time to make the brine. In a medium saucepan, mix 1 ½ cups of distilled white vinegar, 1 cup of water, 2 tablespoons of sugar, and 1 tablespoon of salt. Add mustard seeds, dill seeds, and crushed red pepper flakes if you want some heat. Heat this mixture over medium heat. Stir until the sugar and salt dissolve completely. Once they dissolve, remove the pan from the heat. Let the brine cool to room temperature. Cooling helps the flavors mix and infuse better. Now, let’s put it all together. Grab clean, sterilized glass jars with tight-sealing lids. Start by adding your sliced cucumbers to the jars. Tuck in the garlic cloves and fresh dill sprigs for added flavor. Once the cucumbers are in, pour the cooled brine over them. Make sure the cucumbers are fully submerged. Seal the jars tightly with the lids. Place them in the fridge. Let them sit for at least 24 hours, but 3-5 days is best for full flavor. Enjoy these crunchy pickles as a snack or on sandwiches. For the full recipe, check out the details above! To get the best taste from your refrigerator pickles, marinating time is key. I suggest letting them sit for at least 24 hours. However, if you want bold flavors, wait 3 to 5 days. The longer they sit, the better they taste. You can also adjust the sweetness and spice levels. If you prefer sweeter pickles, add more sugar. For a spicy kick, increase the crushed red pepper flakes. Start small and taste as you go. To keep your pickles crunchy, use fresh cucumbers. Choose small, firm ones. Avoid old or soft cucumbers. Also, don’t skip the salt in your brine. It helps keep the pickles crisp. Using sterilized jars is important for your pickles. It keeps them safe and helps them last longer. Bacteria can ruin your pickles, so always start with clean jars. A quick method for sterilizing jars at home is boiling. Place jars in boiling water for 10 minutes. Let them air dry before adding your pickles. You can also run them through the dishwasher on a hot cycle. For long-lasting pickles, seal the jars tightly. Store them in the fridge right away. Proper storage helps maintain flavor and crunch. {{image_2}} You can change up the flavors in your pickles easily. Try adding herbs and spices like: - Garlic - Mustard seeds - Peppercorns - Dill Each spice adds its own twist. Do you want sweet or savory? Use less sugar for a tangy bite. For a sweet treat, add more sugar or even some honey. Want something unique? Try adding: - Turmeric for color - Ginger for a zing These add exciting flavors and give your pickles a special touch. Don't be afraid to mix and match! Cucumbers are great, but you can pickle many veggies. Consider these options: - Carrots - Cauliflower - Bell peppers - Radishes Mixing different vegetables makes a colorful jar. Each veggie brings a new taste. For example, carrots add sweetness while radishes give a spicy kick. When you make mixed vegetable refrigerator pickles, the flavors blend together. This can create a delightful surprise in each bite! Experiment with what you have on hand. Enjoy your fridge full of crunchy, tasty snacks! For the full recipe, check out the [Full Recipe]. Refrigerator pickles taste best when eaten fresh. You can keep them for about 2 to 4 weeks. After this time, they may lose crunch and flavor. Always check for signs of spoilage. If you see mold or an off smell, it’s time to toss them out. Store jars in the coldest part of your fridge. This helps keep them fresh longer. Make sure the lids are tight. This keeps air out and prevents spoilage. You can freeze pickles, but it changes their texture. Freezing makes them soft, so I don’t recommend it for crunch. Refrigerating them keeps their crispness intact. Over time, the flavor may change. They can become more tangy the longer they sit. If you want to reuse jars, clean them well. Sterilize them in hot water or a dishwasher. This keeps new batches safe and tasty. Refrigerator pickles usually last 2 to 4 weeks in the fridge. The key factors that affect their shelf life include the ingredients used and how well the jars are sealed. If you notice any signs of spoilage, like mold or an off smell, discard them right away. Yes, you can use different vinegars. Apple cider vinegar and red wine vinegar offer unique flavors. Each vinegar gives the pickles a different taste. I recommend using distilled white vinegar for a classic flavor, but feel free to experiment! Refrigerator pickles are super versatile. You can add them to sandwiches for crunch. They also work well in salads and tacos. Try serving them with grilled meats or as a snack on their own. You can even chop them up for a tangy relish. If your pickles taste too salty, rinse them under cold water. This helps reduce the saltiness. For next time, use less salt in the brine. You can also add a bit of sugar to balance the flavor. You now have a solid guide to making crunchy refrigerator pickles. We covered key ingredients, step-by-step instructions, and tasty variations. Remember, fresh ingredients lead to the best flavors. Experiment with spices to find your perfect balance. Store your pickles well to keep them fresh longer. With time and practice, you'll master this easy kitchen skill. Happy pickling!

Homemade Refrigerator Pickles Crunchy and Flavorful Snack

Get ready to elevate your snacking game with my easy Homemade Refrigerator Pickles! These crunchy, flavorful treats bring fresh taste

To make a tasty breakfast frittata, gather these ingredients: - 6 large eggs - 1/2 cup milk - 1 cup spinach, chopped - 1/2 cup cherry tomatoes, halved - 1/2 cup bell pepper, diced (any color) - 1/4 cup red onion, finely chopped - 1/2 cup feta cheese, crumbled - 2 tablespoons olive oil - Salt and pepper to taste - Fresh herbs (like basil or parsley) for garnish You can change the frittata to fit your taste. Here are some ideas: - Use egg whites or a plant-based egg substitute for a lighter option. - Swap feta for goat cheese or cheddar for a different flavor. - Try adding zucchini, mushrooms, or broccoli for more veggies. - Replace spinach with kale or arugula to mix up the greens. - Add cooked bacon, ham, or sausage for extra protein. This frittata serves four and has a good balance of nutrients. Each serving has: - Calories: About 200 - Protein: 12g - Carbohydrates: 5g - Fat: 14g - Fiber: 1g This dish is packed with protein from eggs and cheese. The veggies add vitamins and minerals. Enjoy this healthy meal as part of your day. For the full recipe, see the details above. To make your Easy Breakfast Frittata, follow these steps closely. Start by gathering your ingredients. You will need six large eggs, milk, spinach, cherry tomatoes, bell pepper, red onion, feta cheese, olive oil, salt, and pepper. 1. Preheat your oven to 350°F (175°C). 2. In a large bowl, whisk the eggs and milk together until they mix well. Add salt and pepper to taste. 3. Heat olive oil in an oven-safe skillet over medium heat. Add the red onion and bell pepper. Sauté them for about 3 to 4 minutes until they soften. 4. Next, stir in the chopped spinach and cherry tomatoes. Cook for another 2 minutes until the spinach wilts down. 5. Pour the egg mixture over the vegetables in the skillet. Gently stir everything together to combine. 6. Sprinkle the crumbled feta cheese evenly on top of the egg mixture. 7. Cook on the stovetop for 2 to 3 minutes. You want the edges to start setting. 8. Now, transfer the skillet to the preheated oven. Bake for 15 to 20 minutes. The frittata is done when the eggs are fully set and lightly golden. 9. Once baked, remove the skillet from the oven. Let it cool for a few minutes before slicing. 10. Finally, garnish with fresh herbs and serve warm or at room temperature. To make the best frittata, here are some tips to keep in mind: - Use a non-stick skillet to prevent sticking. - Don’t overcook the vegetables. They should be soft but not mushy. - Make sure to whisk the eggs and milk well. This helps create a fluffy texture. - If you have leftover frittata, let it cool before storing it. For a more visual guide, check out the video demonstration linked in the article. This will help you see each step in action. Enjoy your cooking! To get a fluffy frittata, use fresh eggs. Fresh eggs whip up better. Combine eggs with milk for a nice texture. Whisk them well until mixed. Avoid overcooking the frittata on the stovetop. Cook just until the edges set. This keeps the center light and fluffy. You can mix and match ingredients in your frittata. Use any veggies you like. Try mushrooms, zucchini, or broccoli. If you want meat, add cooked sausage or bacon. Cheese is great too. Swap feta for cheddar or goat cheese. Each change gives a new flavor! Timing is key for a great frittata. Preheat your oven to 350°F. After mixing your ingredients, cook on the stovetop for 2-3 minutes. Then, bake in the oven for 15-20 minutes. Check for doneness by gently shaking the pan. If it wobbles slightly, it’s ready. For the full recipe, follow the steps outlined above. {{image_2}} You can easily make a vegetarian frittata. Swap meat for more veggies. Try adding mushrooms, zucchini, or asparagus. You can also use kale instead of spinach. These options add great flavor and nutrition. Mix and match your favorite veggies. This way, you keep it fresh and fun! If you love meat, add ham or bacon for extra flavor. Cook the meat first, then remove it. Add it back when you pour in the eggs. This gives you tasty bites throughout. You can also use cooked sausage or turkey. Each choice brings its own unique taste. Good news! Frittatas are naturally gluten-free. You can enjoy them without worry. Just be sure to check any added ingredients. Use gluten-free cheese or milk if needed. Create a colorful mix of veggies and meats. This way, your frittata stays safe and delicious. For more details, check the Full Recipe. After you enjoy your frittata, let it cool. Then, cover it tightly with plastic wrap or foil. You can also use an airtight container. This way, it stays fresh for up to three days in the fridge. To reheat your frittata, use the oven or microwave. For the oven, preheat it to 350°F (175°C). Place slices on a baking sheet and heat for 10-15 minutes. If you prefer the microwave, warm it for 30-60 seconds. This keeps it moist and tasty. If you want to freeze your frittata, slice it first. Wrap each piece in plastic wrap, then place them in a freezer bag. It’s best to use it within three months. To reheat, let it thaw overnight in the fridge. Then, microwave or bake as described earlier. This makes meal prep easy and fun! You can enjoy your Morning Sunshine Frittata anytime. For the complete recipe, check the Full Recipe section. You can use tofu or chickpea flour as an egg replacement. Silken tofu works well for a creamy texture. Just blend it until smooth. For chickpea flour, mix it with water to create a batter. Use 1 cup of either as a substitute for 6 eggs. These options keep your frittata tasty and healthy. They also add protein and fiber. You can find chickpea flour in many stores or online. Tofu is easy to find and very versatile. Yes, you can make a frittata ahead of time! Cook it fully and let it cool. Once cool, slice it into portions. Store in an airtight container in the fridge for up to 4 days. You can also reheat it in the oven or microwave. This makes it a great choice for busy mornings. Just grab a slice and enjoy! A frittata is done when the edges are set and the center is slightly firm. You can gently shake the pan; it should not jiggle. The top will look golden and slightly puffed. To check, insert a knife in the center. If it comes out clean, it is ready. Cooking times may vary, so keep an eye on it. Following the Full Recipe will help you get it just right! You learned about making a great frittata. We covered key ingredients and cooking steps. I shared tips to customize and store your frittata. Remember, it’s easy to swap ingredients for your taste. Use my advice to avoid mistakes while cooking. With practice, you will master this dish. Enjoy creating your perfect frittata that suits you!

Easy Breakfast Frittata Quick and Healthy Recipe

Are you looking for a quick and healthy breakfast option? This Easy Breakfast Frittata is the answer! Packed with protein

Fresh okra is the star of this dish. Look for firm, bright green pods. They should feel smooth to the touch. Choose okra that is small to medium-sized for the best taste. Larger okra can be tough and stringy. The right seasonings make this dish pop. Here’s what you need: - 1 pound fresh okra, sliced into ½ inch rounds - 1 cup buttermilk - 1 cup cornmeal - ½ cup all-purpose flour - 1 teaspoon garlic powder - 1 teaspoon onion powder - ½ teaspoon cayenne pepper (adjust to taste) - Salt and black pepper to taste Buttermilk adds tang and moisture. Cornmeal gives crunch. Garlic and onion powder boost flavor. Cayenne adds heat, but you can adjust it. Dipping sauces can elevate your fried okra. Here are a few ideas: - Spicy remoulade - Classic ranch dressing - Creamy garlic aioli Each sauce adds a unique twist. Try them all to find your favorite! For the full recipe, check out my Crispy Fried Okra Delight 🥘. To start, rinse the fresh okra under cold water. This helps clean off any dirt. After rinsing, use a paper towel to pat them dry. Removing moisture is key. If you skip this step, the batter won’t stick well. Next, slice the okra into ½ inch rounds. This size helps them fry evenly. Place the sliced okra in a large bowl. Pour in the buttermilk and mix well so all pieces are coated. Let it sit for about 15 minutes. This soaking time allows the flavors to soak in. In a second bowl, combine the cornmeal, all-purpose flour, garlic powder, onion powder, cayenne pepper, salt, and black pepper. Stir until mixed well. This mix gives your okra a flavor boost and a crispy crust. After the soaking time, take each piece of okra out of the buttermilk. Dredge them in the cornmeal mixture. Make sure they are well coated. Shake off any excess flour to avoid clumping. A good coat makes for extra crunch. Heat about 1 inch of vegetable oil in a heavy skillet over medium-high heat. To test if the oil is hot enough, drop a small pinch of the cornmeal mix in. If it bubbles and sizzles, you’re ready to fry. Carefully place the okra into the hot oil. Do not overcrowd the skillet. Fry them in batches if needed. Cook for about 3 to 4 minutes, or until they turn golden brown. This timing ensures they get crispy without burning. Once fried, use a slotted spoon to move the okra to a plate lined with paper towels. This step helps drain any extra oil. Serve the crispy fried okra hot and enjoy. If you want the full recipe, check out the details above. To get the best crunch from your okra, follow these simple tips. First, dry the okra well after washing. Moisture can make the coating soggy. Next, let the okra sit in buttermilk for about 15 minutes. This helps the coating stick better. For the coating, mix cornmeal with flour and spices. This combo gives a great crunch. Finally, fry the okra in hot oil. The oil should be around 350°F. This keeps the outside crispy and the inside tender. Many people make simple mistakes when frying okra. One mistake is overcrowding the pan. Fry in small batches to ensure even cooking. Another mistake is not heating the oil enough. If the oil is too cool, the okra will soak up oil and become greasy. Also, avoid skipping the buttermilk step. It adds flavor and helps the coating stick. Lastly, don’t forget to shake off excess coating before frying. This keeps the pieces from clumping together. The right tools can make your frying easier. A heavy skillet or a deep fryer works best for frying okra. Cast iron skillets hold heat well and give a nice crisp. Use a slotted spoon to lift out the okra. This lets the oil drain quickly. A thermometer helps you check the oil temperature. For frying, a paper towel-lined plate is perfect for draining excess oil. If you like, consider using a deep-frying basket for easy handling. For the full recipe, check out the Crispy Fried Okra Delight. {{image_2}} Want to turn up the heat? Add more cayenne pepper to the cornmeal mix. You can also mix in some chili powder for extra flavor. This spice adds a kick that will excite your taste buds. Make sure to taste the mixture before coating the okra. Adjust the spice level to match your preference. You can always add more, but it's hard to take spice away. If you need a gluten-free option, swap the all-purpose flour with a gluten-free blend. You can use rice flour or almond flour for a nice crunch. Make sure the cornmeal you choose is certified gluten-free. This way, everyone can enjoy crispy fried okra without worry. The flavors will still shine through, and you won’t miss the gluten at all. Want to make your okra even more exciting? Add thinly sliced vegetables to the mix. Bell peppers, zucchini, or even jalapeños work great. Just slice them thin so they cook fast. Dredge them in the same cornmeal mix. This gives you a colorful and tasty snack. You’ll get a variety of textures and flavors with every bite. For a full recipe, check out Crispy Fried Okra Delight 🥘. To store leftover crispy fried okra, let it cool to room temperature. Place it in an airtight container. If you have a lot, layer it with paper towels. This helps absorb moisture and keeps it crispy. Store the container in the fridge. It’s best to eat the okra within a couple of days for the best taste. When reheating, the goal is to keep that crispy texture. Avoid the microwave, as it makes fried food soggy. Instead, preheat your oven to 375°F (190°C). Spread the okra on a baking sheet. Heat it for about 10-15 minutes until hot and crispy again. You can also use an air fryer. This gives a crunchy finish, just like when it was first made. Crispy fried okra lasts about 3 to 4 days in the fridge. Make sure it’s in a sealed container. If you freeze it, it can last up to 3 months. However, freezing may change the texture. For the best flavor and crunch, eat it fresh. If you want to know how to make it, check the Full Recipe for details. The best oil for frying okra is vegetable oil. It has a high smoke point, which means it can heat up without burning. Other good choices include canola oil and peanut oil. These oils also add great flavor without overpowering the okra. Always use fresh oil for the best results. Yes, you can make crispy fried okra in an air fryer. Preheat the air fryer to 400°F. After coating the okra, place a single layer in the basket. Cook for about 10-12 minutes, shaking the basket halfway through. This method gives you a healthier version with less oil. You still get that great crunch! To reduce okra's sliminess, start by soaking it in buttermilk for about 15 minutes. This helps draw out moisture. You can also coat it in cornmeal and flour before frying. Another trick is to slice the okra and let it sit for a few minutes to dry out. These steps help ensure a crispy texture. For the full recipe, check out the Crispy Fried Okra Delight section! Crispy fried okra is a treat you can master at home. We covered key ingredients like fresh okra and essential seasonings. I shared steps to prepare, coat, and fry for the best texture. Tips on equipment and common mistakes helped improve your skills. Variations offer fun twists, and storage info ensures your leftovers stay great. Enjoy your fried okra adventures and impress your friends with delicious results!

Crispy Fried Okra Irresistible Southern Snack

Crispy fried okra is the ultimate Southern snack that no one can resist! Imagine golden, crunchy bites packed with flavor.

- Ripe peaches - Arugula or mixed greens - Red onion - Fresh basil leaves - Goat cheese - Candied pecans - Balsamic glaze - Olive oil - Salt and pepper Using fresh, quality ingredients makes this salad shine. Start with ripe peaches. Look for peaches that are soft but not too mushy. They should smell sweet and fragrant. Next, choose arugula or mixed greens. Arugula has a peppery taste that pairs well with sweet peaches. Mixed greens can add variety and texture. Red onion adds a crunchy bite. Slice it thinly for a sharp flavor that won’t overpower. Fresh basil leaves bring an aromatic touch to the dish. For the creamy element, crumbled goat cheese is perfect. Its tanginess balances the sweetness of the peaches. Candied pecans add a delightful crunch and sweetness. They bring the entire salad together. Now, for dressing, balsamic glaze gives a rich, sweet finish. Olive oil adds smoothness. Don’t forget salt and pepper for seasoning. These ingredients combine to create a fresh and flavorful experience. This is a crucial part of the Millionaire Peach Salad. For the full recipe, please refer to the complete list above. - Wash and slice the peaches. - Combine greens and red onion in a large bowl. First, you need to wash the peaches under cool water. This step is key for freshness. After washing, slice the peaches into wedges. Set them aside for later. Next, take your greens, like arugula or mixed greens, and add them to a large bowl. Then, thinly slice the red onion and toss it in with the greens. This mix adds a nice crunch and flavor. - Drizzle with olive oil and season. - Toss gently to coat. Now, drizzle olive oil over the greens and red onion. Add a pinch of salt and pepper for flavor. Toss the ingredients gently to coat them evenly. This simple dressing brings out the salad's natural flavors. - Layer greens and peaches. - Top with goat cheese and pecans. - Finish with balsamic glaze. For assembly, arrange the dressed greens on a large platter or individual plates. Layer the peach slices on top. This makes the salad look colorful and inviting. Next, sprinkle the crumbled goat cheese and candied pecans generously on the salad. They add creaminess and crunch. Finally, drizzle balsamic glaze over the entire salad. The glaze adds a sweet touch that ties everything together. Enjoy your fresh and flavorful Millionaire Peach Salad! For more details, check the Full Recipe. - Use ripe peaches for the best taste. Sweet, juicy peaches make the salad shine. - Consider using flavored balsamic glaze. It adds a unique twist to your dish. - Serve on a large white platter. This highlights the vibrant colors of the salad. - Add extra garnishes for visual appeal. A few basil leaves or peach slices elevate the look. - Pair with a light white wine. A crisp wine complements the salad’s flavors. - Serve as a side or main dish. This salad works well for lunch or dinner. Enjoy it with family and friends. For the complete recipe, check the Full Recipe section. {{image_2}} You can change the fruit based on the season. Substitute ripe peaches with strawberries or figs. Both fruits add a sweet touch. You can also adjust the greens. Try using kale or spinach when they are fresh. This keeps the salad vibrant and tasty. Want a vegan version? Simply omit the goat cheese. The salad will still be yummy without it. For extra crunch, use nuts or seeds. Sunflower seeds or walnuts work great. These add texture and flavor to your dish. Dressing can change the whole taste of your salad. Experiment with different vinaigrettes. A simple lemon vinaigrette adds a fresh zing. You can also try adding citrus juices. Orange or lime juice brightens the salad and enhances its flavors. To keep your Millionaire Peach Salad fresh, store the parts separately. This helps them stay crisp. Use airtight containers for each component. For example, place the arugula, peaches, goat cheese, and candied pecans in their own containers. For the best taste, consume the salad within 1-2 days. This keeps the flavors bright. Avoid adding dressings until you are ready to serve. This way, the greens won’t get soggy. You typically do not reheat this salad. It tastes best cold. If you need to refresh it, simply chill it in the refrigerator for a bit. This will restore its freshness without cooking it. Millionaire Peach Salad is a bright and tasty dish. It combines fresh peaches, arugula, goat cheese, and candied pecans. This salad has a sweet and savory flavor. The balsamic glaze adds a nice touch. The mix of textures makes it fun to eat. You get crisp greens and soft cheese. Each bite brings joy. This salad is perfect for summer meals or special gatherings. You can prep parts of the salad before your meal. Slice the peaches and store them in a bowl with lemon juice. This keeps them fresh and bright. You can also mix the greens and red onion in another bowl. Keep the cheese and pecans separate until you serve. Wait to add the dressing until just before serving. This way, your salad stays crisp and tasty. Yes, you can use canned peaches, but keep in mind the taste. Canned peaches are softer and sweeter. They may not have the same crunch as fresh ones. If you use canned peaches, drain them well. This helps avoid extra juice in your salad. Fresh peaches give a brighter flavor and better texture. If you can, try to use fresh peaches for the best salad. If you don't have goat cheese, there are good options. Feta cheese gives a nice salty flavor. Ricotta is creamy and mild, making it a good choice. You can also try blue cheese for a sharper taste. Each cheese brings its own style to the salad. Choose based on your taste and what you have on hand. Yes, Millionaire Peach Salad is gluten-free. All the ingredients in this salad do not contain gluten. Peaches, greens, goat cheese, and nuts are safe for gluten-free diets. Just check the labels on any store-bought items, like balsamic glaze. Some brands may add gluten, so it’s best to confirm. Enjoy this salad worry-free if you follow a gluten-free diet. This blog post covered how to make a lovely Millionaire Peach Salad. We detailed the fresh ingredients, step-by-step instructions, and tips for flavor and presentation. Consider ripe peaches and creamy goat cheese for the best taste. Don’t hesitate to mix it up with seasonal fruits or different dressings. This salad is simple yet elegant, perfect for any meal. Enjoy it fresh and share it with others!

Millionaire Peach Salad Fresh and Flavorful Delight

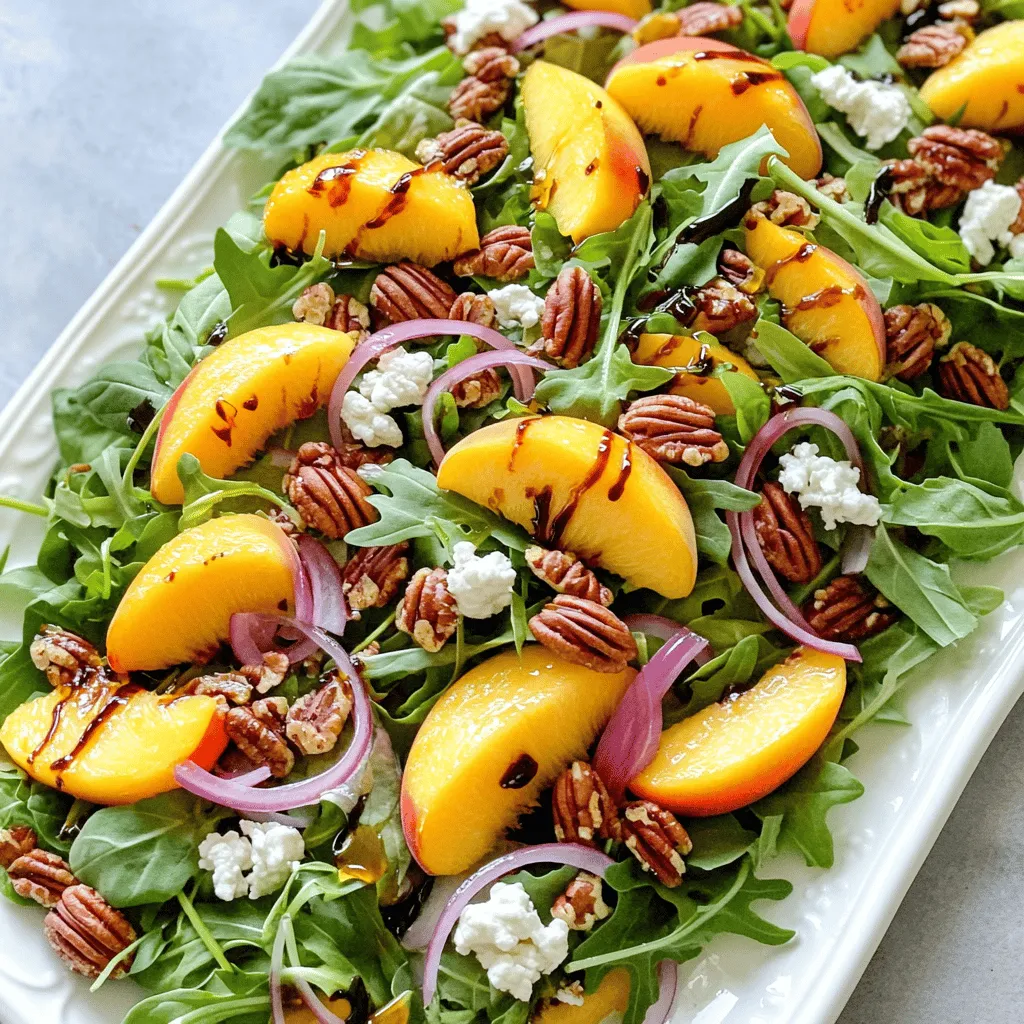
Welcome to my kitchen, where I’m excited to share one of my favorite recipes: Millionaire Peach Salad! This dish combines

The heart of Southern tomato pie is ripe tomatoes. You want large, juicy tomatoes. They bring bright flavor and moisture. Look for tomatoes that feel heavy for their size. Their taste makes the pie shine. Next, cheese is key. I use sharp cheddar and mozzarella. Sharp cheddar adds a bold taste, while mozzarella gives a creamy texture. Together, they melt beautifully. This mix makes every bite rich and tasty. For the crust, you have options. You can buy a pre-made pie crust for ease. Or, if you feel adventurous, make your own from scratch. A homemade crust can add a special touch. Choose what works best for you. Now, let’s talk seasonings. Salt, black pepper, and garlic powder are must-haves. Salt brings out the tomato's flavor. Black pepper adds a slight kick. Garlic powder gives a warm depth. Together, they lift the dish. Dried oregano is another key player. It adds a hint of earthiness and a touch of herb flavor. This makes your pie feel more balanced. Don't skip this spice! Mayonnaise and Dijon mustard play a big role, too. Mayonnaise keeps the filling creamy. It also adds a rich taste. Dijon mustard gives a subtle tang that brightens everything. This combo is what makes the pie so flavorful. For the full recipe, check the details above. To make Southern Tomato Pie, start by preparing your tomatoes. Draining excess moisture is very important. If you skip this step, your pie can become soggy. To drain, sprinkle salt on sliced tomatoes and let them sit in a colander for about 15 minutes. This helps remove extra liquid. When slicing tomatoes, aim for uniform pieces. Use a sharp knife for clean cuts. Each slice should be about a quarter-inch thick. This helps the tomatoes cook evenly and gives a nice look to the pie. Next, let’s make the mayonnaise mixture. In a mixing bowl, combine mayonnaise, Dijon mustard, black pepper, garlic powder, and dried oregano. Stir until smooth. This mixture adds a creamy texture and rich flavor. For layering, start with a layer of the drained tomato slices in the pre-baked pie crust. Spread half of the mayonnaise mixture over the tomatoes. Then, sprinkle half of your cheddar and mozzarella cheese on top. Repeat the layering with the remaining tomatoes, mayonnaise mixture, and cheeses. This method builds great flavor and texture. Before baking, pre-bake the crust for about 10 minutes. This step helps keep the crust crispy. Look for a slightly golden color. After pre-baking, let it cool slightly. Now, place your layered pie in a preheated oven at 375°F (190°C). Bake for 30 to 35 minutes. The cheese should be bubbly and golden brown. This indicates the pie is ready. After baking, let the pie cool for around 10 minutes before slicing. This waiting time helps the layers set and makes slicing easier. To get the best taste from your Southern Tomato Pie, tweak the seasonings. You can add a pinch of cayenne pepper for some heat. If you like a tangy flavor, mix in a splash of lemon juice. Fresh herbs like thyme or dill can make a big difference too. Just chop them up and sprinkle them on before baking. They will add brightness to every bite. To keep your crust crisp, pre-bake it for about 10 minutes. This step helps prevent sogginess. After you take the pie out of the oven, let it rest for 10 minutes before slicing. This cooling time allows the layers to set. If you cut too soon, the filling may spill out. Enjoy the layers staying intact for that perfect slice. For the full recipe, check [Full Recipe]. {{image_2}} You can make Southern Tomato Pie meat-free easily. For a vegetarian dish, skip any meat and focus on fresh ingredients. Use a mix of spices to add flavor. If you want vegan options, swap the cheese for dairy-free cheese. Brands like Daiya or Almond Breeze work great. Ensure your mayonnaise is also vegan. You can find many great options at the store. Want to boost flavor? Add layers of cooked bacon or ham. The salty taste pairs well with the tomatoes. You can also add other veggies. Spinach, zucchini, or bell peppers add color and taste. Consider roasting these vegetables first for extra depth. Experiment with these ideas to create your perfect Southern Tomato Pie. For the full recipe, check the recipe section above. To keep your Southern Tomato Pie fresh, refrigerate it in an airtight container. Cover it tightly with plastic wrap or foil. This helps keep the flavors intact. You can store it in the fridge for about 3 to 4 days. If you want to freeze the pie, slice it first. Place the slices in a freezer-safe container or wrap them in plastic wrap. This way, you can enjoy a piece whenever you want. Frozen pie can last for about 2 to 3 months. When it's time to reheat, use the oven. Preheat it to 350°F (175°C). Place the pie on a baking sheet and cover it loosely with foil. Heat for about 20 minutes. This keeps the crust crispy and the cheese melty. Fresh tomatoes can last about a week on your counter. Store them in a cool place but not in the fridge. Cold air can ruin their taste and texture. Cheeses like cheddar and mozzarella can last longer. An opened package can stay good for about 1 to 2 weeks in the fridge. Make sure to keep them sealed well. For pre-made pie crusts, check the package. They often last for several months in the freezer. Once opened, use them within a week for the best taste. With these tips, you can make sure your Southern Tomato Pie stays delicious. Follow the Full Recipe for best results! Southern Tomato Pie is a classic dish from the South. It features layers of ripe, juicy tomatoes, cheese, and a creamy mixture. This pie has roots in Southern cooking, where fresh produce shines. The dish celebrates summer tomatoes at their best, often served warm or at room temperature. It’s a comfort food that brings people together, perfect for family gatherings or potlucks. Yes, you can prepare this pie ahead of time! First, assemble the pie as directed. Then, cover it tightly and refrigerate for up to 24 hours. You can also freeze it. To freeze, wrap the pie well and store it for up to three months. Just remember to bake it straight from the freezer; it may need extra time in the oven. To avoid a watery pie, start by draining the tomatoes. Sprinkle the sliced tomatoes with salt and let them sit in a colander for about 15 minutes. This step helps remove excess moisture. Also, don’t skip the pre-baking of the pie crust. This keeps it crisp. Lastly, using the right amount of cheese and sauce will help maintain the texture. Enjoy a slice of pie that is firm, not soggy! This guide covered all you need for a tasty Southern Tomato Pie. You learned about key ingredients like ripe tomatoes, sharp cheddar, and options for pie crust. We walked through each step, from preparing tomatoes to baking the pie just right. Tips helped enhance flavor and avoid a soggy crust. You even explored variations for different diets and learned to store leftovers properly. Now, it’s time to try making this dish and enjoy it with loved ones. This recipe brings comfort and joy to the table. Happy cooking!

Southern Tomato Pie Delicious Comfort Food Recipe

Looking for a comforting dish that captures the essence of Southern cooking? Southern Tomato Pie is just what you need!

To make a delicious Easy Zucchini Jack Casserole, gather these simple ingredients: - 3 medium zucchinis, thinly sliced - 1 cup corn kernels (fresh, frozen, or canned) - 1 cup cherry tomatoes, halved - 1 cup shredded cheddar cheese - 1 cup shredded jack cheese - 1 cup cooked quinoa or rice (optional for added texture) - 1 medium onion, diced - 2 cloves garlic, minced - 3 large eggs - 1 cup milk (dairy or non-dairy) - 1 teaspoon dried oregano - 1 teaspoon paprika - Salt and pepper to taste - Olive oil for greasing These ingredients create a tasty and healthy dish. Zucchini is the star, and it adds great flavor. The corn and tomatoes give it a nice pop. The cheese brings it all together with that creamy goodness. You can use quinoa or rice for extra texture, but it’s not a must. Each ingredient adds its own touch, making this casserole a fun and vibrant meal. For the full recipe, check out the instructions that follow. - Preheat the oven and prepare the casserole dish: Start by setting your oven to 375°F (190°C). Grease a 9x13 inch casserole dish with olive oil. This helps prevent sticking. - Sauté the onion and garlic: In a large skillet, heat a tablespoon of olive oil over medium heat. Add diced onion and minced garlic. Cook until the onion is soft and clear, about 5 minutes. - Combine vegetables and seasonings: In a big mixing bowl, mix sliced zucchini, corn, halved cherry tomatoes, and the sautéed onion and garlic. If you want, add cooked quinoa or rice for extra texture. Sprinkle in oregano, paprika, salt, and pepper. Stir until everything is well blended. - Prepare the egg and cheese mixture: In another bowl, whisk together the eggs and milk until smooth. Stir in half the cheddar and jack cheese. This will give your casserole a creamy texture. - Layer the mixture into the casserole dish: Pour half of the vegetable mix into the prepared dish. Then, add half of the egg and cheese mixture over it. Repeat this with the rest of the veggies and finish with the remaining egg mix. - Add cheese topping: Sprinkle the remaining cheddar and jack cheese on top of the casserole. This will create a delicious, melted cheese layer. - Bake until golden: Place the casserole in the hot oven. Bake for 35-40 minutes, or until the top is golden and the casserole is set. - Allow to cool before serving: After baking, take the casserole out and let it cool for about 5-10 minutes. This helps it firm up and makes serving easier. - Recommended garnishes: Serve warm and add fresh herbs like basil or parsley for a nice touch. Pair it with a side salad for some extra crunch. For the complete recipe, check out the Easy Zucchini Jack Casserole. - Swapping ingredients for customization: You can swap zucchini for other veggies, like bell peppers or spinach. If you like spice, add jalapeños or red pepper flakes. This makes the dish fit your taste. - Adjusting seasoning to taste: Taste your mix before baking. If it needs more salt or herbs, add them. A dash of hot sauce can add a kick if you like heat. - Tips for slicing zucchini: Cut the zucchini into thin, even slices. This helps them cook well and blend into the dish. A mandoline slicer can make this fast and easy. - Cooking quinoa or rice: If you choose to add quinoa or rice, cook it first. This keeps the casserole from becoming too wet. Use vegetable broth for extra flavor. - Prepping ingredients ahead of time: Chop veggies the night before. Store them in the fridge. This cuts down prep time on the day you cook. - Easy cleanup tips: Use non-stick spray or olive oil on your dishes. This makes cleanup simple. Also, line baking dishes with parchment paper for less mess. For the full recipe, check out the Easy Zucchini Jack Casserole. {{image_2}} You can easily make this dish dairy-free. Use almond milk or coconut milk instead of regular milk. Swap the cheddar and jack cheese for dairy-free cheese. This keeps the taste while making it safe for those who avoid dairy. Want to add some protein? Try mixing in cooked chicken or turkey. This adds flavor and makes the dish heartier. You can use shredded rotisserie chicken for a quick option. Herbs and spices can change the whole dish. Try adding fresh basil, thyme, or even some chili powder. This gives the casserole a unique twist that keeps it exciting. Cheese lovers can have fun here. Instead of cheddar or jack, try mozzarella or feta. Each cheese brings its own taste to the casserole. Don’t be afraid to mix them up! You can serve this casserole in two ways. For individual servings, use small ramekins. This makes it fun and easy for guests to enjoy. Family-style is great for sharing. Just serve the casserole in a large dish. This encourages everyone to dig in and enjoy together. Either way is tasty and fun! For the full recipe, click [Full Recipe]. After enjoying your Easy Zucchini Jack Casserole, store leftovers in an airtight container. Make sure to cool the casserole to room temperature first. This helps keep it fresh and tasty. In the fridge, it lasts about three to four days. If you want to enjoy it later, freezing is a great option. To reheat your casserole, the oven is best. Preheat it to 350°F (175°C). Place the casserole in an oven-safe dish. Cover it with foil to keep it moist. Heat for about 20-25 minutes, or until warm. You can use a microwave too, but it may not keep the same flavor. If you choose the microwave, heat in short bursts, stirring in between. Freezing your casserole is simple. Cut it into serving pieces and place them in freezer-safe bags. Squeeze out the air to prevent freezer burn. It can stay frozen for about three months. When you're ready to eat, thaw it in the fridge overnight. Reheat in the oven or microwave as mentioned before. Enjoy your tasty meal whenever you like! For the full recipe, check out the recipe section above. Yes, you can prepare this casserole in advance. To do this, follow these tips: - Prep the Veggies: Slice the zucchini and chop the onion and garlic. Store them in the fridge. - Mix the Ingredients: Combine all the veggies and seasonings, but don’t add the eggs and milk yet. - Assemble Later: When ready to cook, mix the egg and milk, layer everything, and bake. This method saves time and keeps flavors fresh. This casserole pairs well with many sides. Consider these suggestions: - Side Salad: A simple green salad adds freshness. - Garlic Bread: Toasted bread gives a nice crunch. - Roasted Vegetables: Extra veggies always complement a hearty dish. These sides balance the meal and offer more flavors. Yes, you can easily make this recipe gluten-free. Here are some options: - Check the Cheese: Ensure the cheddar and jack cheeses are gluten-free. - Use Gluten-Free Grains: Swap quinoa or rice for a gluten-free grain. - Avoid Processed Ingredients: Always check labels to be safe. These tips help you enjoy the dish without gluten. For the full recipe, check out the Easy Zucchini Jack Casserole recipe above. This blog post covered a tasty Zucchini Jack Casserole. We listed the key ingredients, from zucchini to cheese. I shared step-by-step instructions for prep, layering, and baking. You learned tips to boost flavor and save time. We also explored fun variations and how to store your leftovers. In closing, this dish is easy and versatile. You can mix it up to fit your taste. Enjoy creating this casserole and making it your own!

Easy Zucchini Jack Casserole Tasty and Healthy Dish

Are you looking for a quick, tasty, and healthy dish? Try my Easy Zucchini Jack Casserole! Packed with fresh zucchini,

Older posts
Newer posts
← Previous Page1 … Page8 Page9 Page10 … Page49 Next →

dsad

© 2025 savorystride • Built with GeneratePress

Our Policies

  • Copyright Policy
  • Cookie Policy
  • GDPR Policy
  • Privacy Policy
  • Disclaimer
  • Terms Of Use

More Information

  • Home
  • About
  • Contact
  • Appetizers
  • Dessert
  • Dinner
  • Drinks
©2025, savorystride About Back To Top