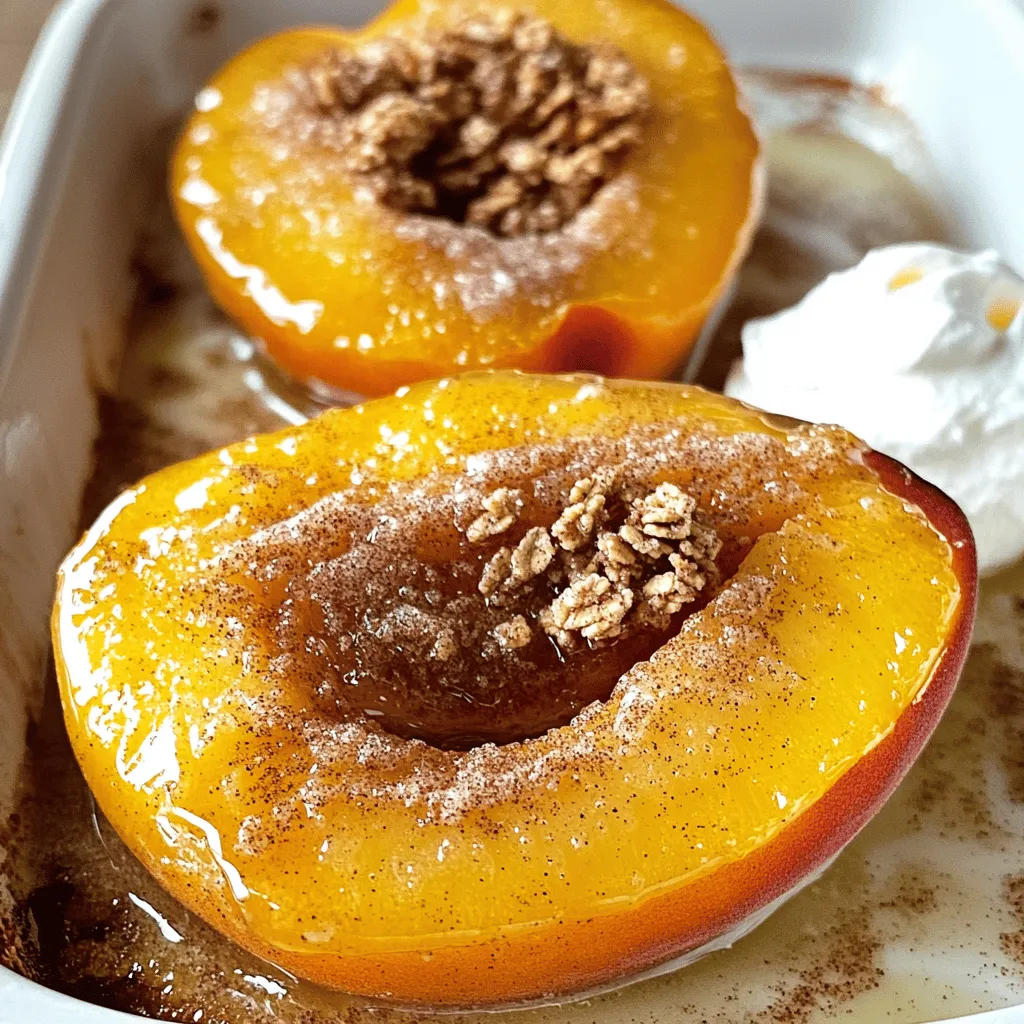
Cinnamon Sugar Baked Peaches Delightful Dessert Recipe
Are you ready to indulge in a delicious dessert? Cinnamon Sugar Baked Peaches are easy to make and incredibly satisfying.
Are you ready to indulge in a delicious dessert? Cinnamon Sugar Baked Peaches are easy to make and incredibly satisfying.
![- 2 cups grated zucchini - 1 cup granulated sugar - 1/2 cup brown sugar - 3 large eggs - 1/2 cup vegetable oil - 1 teaspoon vanilla extract - 2 cups all-purpose flour - 1 teaspoon baking soda - 1/2 teaspoon baking powder - 1 teaspoon ground cinnamon - 1/2 teaspoon ground nutmeg - 1/2 teaspoon salt - Optional: 1/2 cup chopped walnuts or pecans - Optional: 1/2 cup chocolate chips This recipe uses fresh zucchini to keep the bread moist. Grating the zucchini releases water, which adds moisture. Use about two medium zucchinis for the two cups needed. The sugars create a sweet base. They also help with browning. Eggs provide structure and richness. The oil keeps the bread soft and tender. - Mixing bowls - Measuring cups and spoons - Whisk and spatula - 9x5 inch loaf pan Gather these tools before you start. Mixing bowls help combine wet and dry items. Accurate measuring is key to good results. A whisk mixes the ingredients well, while a spatula is perfect for scraping the bowl clean. The loaf pan shapes the bread as it bakes. - Dried fruits (e.g., raisins or cranberries) - Spices (e.g., allspice or ginger) These add-ins can enhance your bread. Dried fruits give sweetness and chewiness. Spices add warmth and depth. Try different combinations to find your favorite. You can mix them in with the dry ingredients for even distribution. For the full recipe, you can refer to the Best Moist Zucchini Bread section. - Preheat your oven to 350°F (175°C). - Grease and flour a 9x5 inch loaf pan or line it with parchment paper. - In a large bowl, combine 2 cups of grated zucchini, 1 cup of granulated sugar, and 1/2 cup of brown sugar. - Stir in 3 large eggs, 1/2 cup of vegetable oil, and 1 teaspoon of vanilla extract until everything mixes well. - In a separate bowl, whisk together 2 cups of all-purpose flour, 1 teaspoon of baking soda, 1/2 teaspoon of baking powder, 1 teaspoon of ground cinnamon, 1/2 teaspoon of ground nutmeg, and 1/2 teaspoon of salt. - Gradually add the dry mix to the wet mix. Stir gently until just combined. - If you like, fold in 1/2 cup of chopped walnuts or pecans, and 1/2 cup of chocolate chips for extra flavor. - Pour the batter into the prepared loaf pan. Spread it evenly. - Bake for 50-60 minutes. Check with a toothpick in the center; it should come out clean. The top should look golden brown. - Let the bread cool in the pan for about 10 minutes. - Then, transfer it to a wire rack to cool completely. - For a nice touch, serve warm slices with cream cheese or butter. A sprinkle of cinnamon adds color and taste. Enjoy with tea or coffee! For the full recipe, click [Full Recipe]. To make zucchini bread moist, you need the right ingredient ratios. Using too much flour can make your bread dry. The right amount of zucchini is key. Grate two medium zucchinis, which will give you about two cups. This adds moisture and flavor. Mixing too much can also hurt the texture. After combining wet and dry ingredients, mix until just blended. Lumps are fine! This keeps the bread light and fluffy. You can boost the flavor of your zucchini bread easily. Adding spices like cinnamon or nutmeg makes it warm and inviting. A teaspoon of vanilla extract enhances the sweetness. Consider incorporating nuts or chocolate chips for crunch and richness. Use half a cup of walnuts or chocolate chips for a fun twist. You can also try dried fruits like raisins for a sweet bite. If your bread comes out dense or dry, check your measurements. Too much flour or not enough zucchini can cause this. Use a kitchen scale for accuracy. To check if your bread is done, insert a toothpick in the center. If it comes out clean, it’s ready! The top should be golden brown and springy to the touch. If not, bake a few more minutes. For more tips, check out the Full Recipe for the best ways to enjoy your baking! {{image_2}} I love making my zucchini bread healthier. One simple swap is using whole wheat flour. Whole wheat flour adds more fiber. It also gives the bread a nutty taste. You can use half whole wheat and half all-purpose flour for a great balance. Another option is to substitute applesauce for oil. This swap cuts fat and adds natural sweetness. Use a 1:1 ratio when replacing oil with applesauce. Your bread stays moist and tasty, plus it’s a bit lighter! Seasonal flavors can add fun twists to zucchini bread. You can add pumpkin or apple for a sweet touch. These flavors work well in the fall. Just replace some of the zucchini with pumpkin puree or apple chunks. This change gives your bread a unique taste! For a savory option, try adding fresh herbs. Chopped basil or rosemary can bring a new flavor. Just remember to use herbs sparingly so they don’t overpower the bread. If you need a gluten-free option, many flour blends work well. Look for a blend made from rice flour, almond flour, or oat flour. These blends often taste great and mimic all-purpose flour. When you use gluten-free flour, you may need to adjust your baking time. Gluten-free bread can take longer to cook. Check for doneness by using a toothpick. The bread should feel firm and a toothpick should come out clean. For the full recipe, check the Best Moist Zucchini Bread section above. Store your zucchini bread at room temperature if you plan to eat it within a few days. Keep it in a cool, dry place, wrapped in plastic wrap or stored in an airtight container. This method keeps the bread soft and moist. If you want to keep it longer, refrigerate it. This slows down spoilage but may dry it out a bit. Just be sure to wrap it well to keep the moisture in. To freeze zucchini bread, let it cool completely first. Wrap it tightly in plastic wrap or aluminum foil. Then, place it in a freezer bag or an airtight container. This helps prevent freezer burn. You can freeze it for up to three months. When you are ready to eat it, take it out and let it thaw at room temperature. If you want it warm, you can slice it and pop it in the toaster or microwave for a few seconds. Zucchini bread lasts about 3 to 5 days at room temperature. If you store it in the fridge, it can last about a week. When frozen, it keeps well for about three months. Always check for signs of spoilage, like mold or an off smell, before enjoying a slice. This helps ensure that your bread remains safe and tasty! I recommend using medium-sized zucchinis. They have the right amount of moisture. Look for zucchinis that are firm and shiny. Avoid large zucchinis, as they can be watery and have larger seeds. Varieties like Green Zucchini or Yellow Zucchini work well. They both add great flavor to your bread. Yes, you can use frozen zucchini. First, thaw it completely before using it in your recipe. Squeeze out any extra water with a clean towel. This helps keep your bread moist without being soggy. Measure the thawed zucchini just like fresh zucchini for the best result. To make zucchini bread vegan, swap the eggs for flaxseed meal or applesauce. Use 1 tablespoon of flaxseed meal mixed with 2.5 tablespoons of water for each egg. Replace regular milk with almond or oat milk. You can also choose vegetable oil instead of butter for added moisture. Check for doneness by inserting a toothpick into the center. If it comes out clean, your bread is ready. The top should be golden brown and feel firm to the touch. You can also gently press the top. If it springs back, it is done. Zucchini bread pairs well with cream cheese or butter. Spread a thin layer on a warm slice for added flavor. For drinks, serve it with tea or coffee. You can also enjoy it with a glass of cold milk. These options enhance the taste of your delicious bread. You now have all the tools to make delicious zucchini bread. From the right ingredients to optional add-ins, your recipe is set. Remember to mix carefully and consider variations to suit your taste. Check your bread for doneness, and know how to store or freeze it for later. Embrace creativity with flavors and enjoy sharing this tasty treat. Happy baking!](https://savorystride.com/wp-content/uploads/2025/07/23cc4b6d-2826-4eab-9b75-9b85687d5ec8.webp)
Are you ready to enjoy a slice of pure deliciousness? This Moist Zucchini Bread Recipe is both tasty and simple.
![The right ingredients make a great frittata. Here’s what you need to gather. - Eggs and Dairy Options - 6 large eggs - 1/2 cup milk (use plant-based milk if you prefer) - Vegetables and Add-ins - 1 cup bell peppers, diced (try red, yellow, and green) - 1 cup baby spinach, chopped - 1/2 cup cherry tomatoes, halved - 1/4 cup red onion, finely chopped - 1/2 cup feta cheese, crumbled (or any cheese you like) - Seasonings and Garnishes - 1 tablespoon olive oil - Salt and pepper to taste - Fresh herbs for garnish (like basil or parsley) These ingredients create a veggie-packed frittata. Feel free to swap out any veggies or cheese. This recipe is flexible and fun. You can personalize it to suit your taste. Check out the [Full Recipe] for all the details! Preheating the Oven First, preheat your oven to 375°F (190°C). This step is key to getting a perfect frittata. You want it hot from the start to cook evenly. Whisking the Egg Mixture Next, grab a large bowl. Add 6 large eggs and 1/2 cup of milk. You can use plant-based milk if you prefer. Whisk these together well. Add salt and pepper to taste. Mix until everything is smooth and frothy. Sautéing Vegetables In a 9-inch oven-safe skillet, heat 1 tablespoon of olive oil over medium heat. Once hot, toss in 1/4 cup of finely chopped red onion. Cook for about 2-3 minutes until it softens. Then, add 1 cup of diced bell peppers. Cook them for another 2-3 minutes, stirring often. Finally, mix in 1 cup of chopped baby spinach and 1/2 cup of halved cherry tomatoes. Keep cooking until the spinach wilts, about 1-2 minutes. Pouring the Egg Mixture Now, it's time to pour your egg mixture over the vegetables in the skillet. Use a spatula to lift the veggies gently, so they mix well with the eggs. This helps to spread the flavors evenly. Initial Cooking on the Stove Let the frittata cook on the stove for about 2-3 minutes. You’ll see the edges start to set up. This gives it a nice base before baking. Baking in the Oven Carefully transfer the skillet to your preheated oven. Bake for 15-20 minutes, or until the frittata is puffed and the center is set. When it’s done, take it out and let it cool slightly. Cut into wedges and serve warm. For a nice touch, add fresh herbs for garnish. Enjoy your delicious creation! Achieving the Right Texture To get a fluffy frittata, whisk the eggs well. Mix in the milk until it’s smooth. This adds air and helps with fluffiness. Cook it slowly on low heat. This way, the eggs set gently without becoming rubbery. Recommended Cookware Use a 9-inch oven-safe skillet for the best results. Cast iron works great, but non-stick also does well. Make sure to grease the pan well with olive oil. This helps your frittata slide out easily. Flavor Enhancements You can add herbs for more flavor. Fresh basil, parsley, or chives work well. A pinch of red pepper flakes adds heat. For a twist, sprinkle some cheese on top before baking. This gives a lovely, rich taste. Complementary Side Dishes Serve your frittata with a light salad. A fresh green salad or a fruit salad pairs well. You can also add toast for crunch. It makes the meal feel complete and satisfying. Ideal Presentation Tips Cut the frittata into wedges for serving. Place them on a nice plate. Garnish with fresh herbs on top. This makes the dish look colorful and inviting. Storing and Reheating Leftovers Store leftovers in an airtight container. Keep them in the fridge for up to four days. To reheat, use a microwave or an oven. Heat it until warm, not too long, to keep it soft. {{image_2}} You can change the vegetables in your frittata. Use what you have on hand. Try zucchini, mushrooms, or even broccoli. Each veggie adds its own flavor. This keeps the dish fresh and exciting. Feta cheese is great, but other cheeses work too. Try goat cheese for a tangy twist. Cheddar adds a rich, sharp taste. You can even skip cheese for a lighter meal. Fresh herbs like basil or parsley make great additions. You can try thyme or oregano for a different taste. If you like heat, add red pepper flakes. These small changes can give your frittata a new life. You can make a vegan frittata with chickpea flour. Mix it with water to create a batter. Add your favorite veggies and spices for flavor. Bake just like the egg version. Most frittata recipes are gluten-free. Just stick to fresh veggies and eggs. If you add any packaged ingredients, check for gluten-free labels. For a low-carb frittata, focus on non-starchy veggies. Spinach, zucchini, and bell peppers are perfect choices. Skip the cheese if you want to cut carbs even more. By exploring these variations, you can create a frittata that suits your taste and diet. Try these swaps to make your meal even better. Check out the Full Recipe for a classic version to start with! To keep your frittata fresh, store it properly. First, let it cool to room temperature. Then, wrap it tightly in plastic wrap or put it in an airtight container. - Refrigeration Guidelines: Store your frittata in the fridge for up to four days. Make sure the container is sealed well to prevent drying. - Freezing Instructions: You can freeze the frittata for up to three months. Cut it into slices, then wrap each piece in foil. Place them in a freezer bag to save space. - Best Practices for Reheating: To reheat, thaw in the fridge overnight if frozen. Use an oven or a skillet to heat it gently. Avoid microwaving, as it can make the frittata rubbery. Knowing how long your frittata lasts is key. - How Long It Lasts in the Fridge: When stored correctly, a frittata lasts about four days in the fridge. - Signs of Spoilage: Check for any off smell, discoloration, or mold. If you see any of these, it’s best to toss it. - Safe to Eat Recommendations: Always trust your senses. If it looks or smells bad, don’t eat it. When in doubt, throw it out! What is the difference between a frittata and an omelette? A frittata is cooked slowly and often finished in the oven. It mixes ingredients into the eggs. An omelette cooks quickly and is folded over fillings. Frittatas are thicker and can include more ingredients. They are perfect for using up veggies or leftovers. Can I make a frittata ahead of time? Yes, you can make a frittata ahead of time. It stores well in the fridge for up to three days. Just reheat it gently in the oven or microwave. This makes it a great option for meal prep. How can I customize my frittata for different diets? You can easily adjust a frittata to fit many diets: - For vegan, swap eggs for a chickpea flour mixture. - For gluten-free, avoid any bread or grains. - For low-carb, focus on veggies and omit starchy foods. What to do if my frittata is too dry? If your frittata turns out dry, it may have cooked too long. Next time, check it earlier. You can also add more milk or cheese for creaminess. A side of salsa or sauce can help add moisture. How to fix an undercooked frittata? If your frittata is undercooked in the middle, return it to the oven. Bake at 375°F for a few more minutes. You can cover it with foil to prevent the top from browning too much. Tips for preventing sticking in the pan. To prevent sticking, use a non-stick skillet or a well-seasoned cast iron pan. Always grease the pan with olive oil before adding ingredients. You can also run a spatula around the edges while cooking. This helps loosen it from the sides. In this blog post, we explored how to make a delicious frittata. We covered key ingredients, from eggs and dairy to fresh veggies. I shared step-by-step instructions, tips for perfecting texture, and ways to customize your dish. You can adapt your frittata to fit different diets and learn storage tips for leftovers too. A frittata is a fun dish to try. With many variations, it can fit any meal. Enjoy experimenting with flavors and ingredients!](https://savorystride.com/wp-content/uploads/2025/07/0ef80464-d503-45c9-87e4-dffa079ba59d.webp)
Looking for a quick and flavorful meal idea? This Easy Frittata Recipe has you covered! With simple ingredients and easy

Looking for a dish that bursts with fresh flavors? Look no further! Fresh Tomato Pie offers a mouthwatering blend of
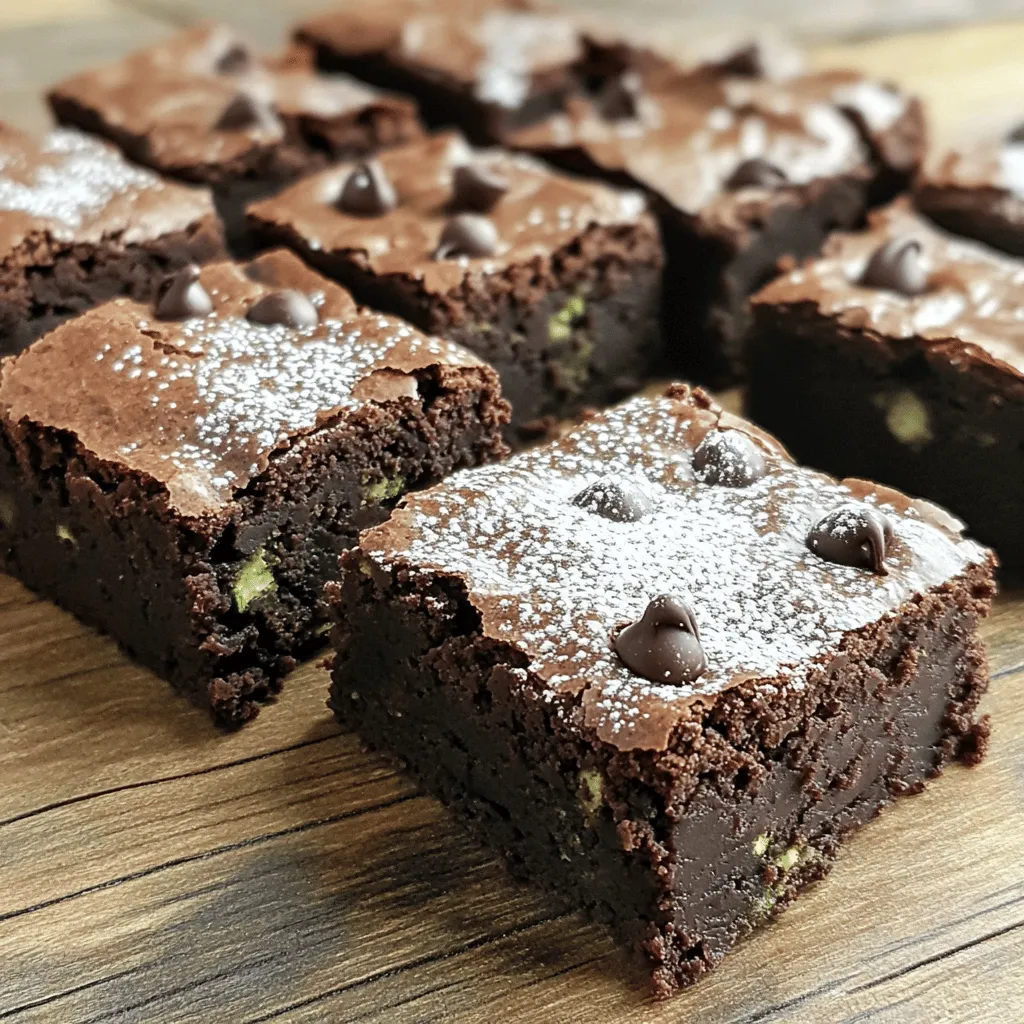
Looking for a sweet treat that’s hidden with a healthy twist? These Zucchini Brownies check all the boxes! With rich
![- 1 cup finely grated zucchini (about 1 medium) - 1 cup all-purpose flour - 1/2 cup cocoa powder - 1/2 cup granulated sugar - 1/2 cup brown sugar, packed - 1/2 teaspoon baking powder - 1/2 teaspoon baking soda - 1/4 teaspoon salt - 1/2 teaspoon cinnamon - 1/3 cup vegetable oil - 1/4 cup unsweetened applesauce - 2 large eggs - 1 teaspoon vanilla extract - 1/2 cup chocolate chips (dark or semi-sweet) These ingredients form the base of your Minute Chocolate Zucchini Bars. The finely grated zucchini adds moisture and nutrition. The dry ingredients, like flour and cocoa powder, give structure and rich flavor. The wet ingredients, including vegetable oil and applesauce, help create a soft texture. - Chocolate chips (dark or semi-sweet) - Nuts or seeds for texture - Flavored extracts for variety Adding optional ingredients can take your bars to the next level. Chocolate chips add extra sweetness and a burst of rich chocolate. Nuts or seeds give a nice crunch and boost nutrition. You can also try flavored extracts, like almond or mint, for a fun twist. For the full recipe, check out the [Full Recipe]. 1. Start by preheating your oven to 350°F (175°C). This ensures even baking. 2. Grease a 9x9-inch baking pan or line it with parchment paper. This helps with easy removal. 3. In a large mixing bowl, add 1 cup of finely grated zucchini. 4. Next, mix in 1/3 cup of vegetable oil, 1/4 cup of unsweetened applesauce, 2 large eggs, and 1 teaspoon of vanilla extract. Combine these wet ingredients well until smooth. 1. In a separate bowl, whisk together the dry ingredients. Combine 1 cup of all-purpose flour, 1/2 cup of cocoa powder, 1/2 cup of granulated sugar, 1/2 cup of brown sugar, 1/2 teaspoon of baking powder, 1/2 teaspoon of baking soda, 1/4 teaspoon of salt, and 1/2 teaspoon of cinnamon. Mix thoroughly. 2. Gradually add the dry ingredients to the wet mixture. Stir gently until just combined. Overmixing can make the bars tough, so be careful. 3. Now, fold in 1/2 cup of chocolate chips. Ensure the chips spread evenly in the batter. 1. Pour the batter into your prepared baking pan. Spread it out evenly with a spatula. 2. Bake for 25-30 minutes. Keep an eye out for doneness. 3. To check, insert a toothpick in the center. It should come out clean, with only a few moist crumbs. 4. Once baked, let the bars cool in the pan for about 10 minutes. Then, transfer them to a wire rack to cool completely. These steps lead to a delightful treat. For the complete recipe, check the Full Recipe section. To make your Minute Chocolate Zucchini Bars moist, avoid overmixing. Mixing too much can make the bars tough. Gently stir until the dry and wet ingredients just combine. This keeps them soft and tender. For zucchini, use finely grated pieces. This helps the zucchini blend into the batter well. I recommend using medium-sized zucchini. Remove excess water by squeezing it lightly with a paper towel. This step ensures your bars won’t be too wet. To boost flavor, add spices like cinnamon or nutmeg. A pinch of nutmeg can create a nice warmth in the bars. Vanilla extract is also a must; it adds a sweet aroma. When choosing chocolate, opt for dark or semi-sweet chips. Dark chocolate gives a rich taste. Semi-sweet chocolate is sweeter, which balances the cocoa. You can even mix both for more depth in flavor. These bars are delicious warm or chilled. If you enjoy them warm, serve them straight from the oven. This makes the chocolate chips melt a bit more. For a chilled option, let them cool completely. Pair your bars with a scoop of ice cream or a glass of milk. The creaminess of ice cream complements the chocolate perfectly. Milk adds a nice touch, too, especially if you love dunking! For more details, check the Full Recipe. {{image_2}} You can make Minute Chocolate Zucchini Bars even better for you. Here are two easy swaps: - Using whole wheat flour: This gives your bars more fiber and nutrients. It adds a nutty flavor too. Just replace all-purpose flour with whole wheat flour in the same amount. - Substituting sugars with natural sweeteners: You can use honey, maple syrup, or stevia. These sweeteners can lower the calorie count and add unique flavors. Adjust the amount based on your taste. Want to change up the taste? Here are some fun ideas: - Adding fruits like bananas or apples: Mash one banana or add one cup of finely chopped apples. This adds moisture and a sweet kick. - Incorporating different types of cocoa: Try dark cocoa for a richer taste or white cocoa for a milder flavor. Each type offers a new twist on your bars. Need to meet special diets? Here are some easy swaps: - Vegan options for eggs and dairy: Use flax eggs or applesauce instead of eggs. For dairy, almond milk or coconut yogurt works great. - Gluten-free alternatives: Substitute all-purpose flour with gluten-free flour blends. Make sure your baking powder is gluten-free too. These variations let you be creative while keeping your chocolate zucchini bars delicious. Check out the Full Recipe for all the details! To keep your minute chocolate zucchini bars fresh, use airtight containers. These containers keep moisture in and air out. I recommend placing a piece of parchment paper between layers if you stack them. This way, the bars won’t stick together. Store them in the fridge for the best flavor. They stay fresh for about 5 to 7 days when stored this way. If you leave them at room temperature, they last about 3 to 4 days. If you want to save some for later, freezing is a great option. First, cut the bars into pieces. Then, wrap each piece in plastic wrap. After that, place them in a freezer-safe bag or container. This protects them from freezer burn. They can stay frozen for up to three months. When you're ready to eat, take them out and let them thaw in the fridge overnight. For a quick treat, you can also microwave them for about 20 seconds. This warming brings back their soft texture and delicious flavor. Minute chocolate zucchini bars last about 3 to 5 days at room temperature. Store them in an airtight container. If kept in the fridge, they can last up to a week. Make sure they are cooled completely before storing to avoid sogginess. Yes, you can make these bars ahead of time. They taste great after a day or two. Preparing them in advance makes for an easy snack or dessert. Just store them properly to keep them fresh. You can substitute eggs with applesauce or mashed bananas. Use 1/4 cup of applesauce or half a mashed banana for each egg. This keeps the bars moist and delicious while being egg-free. Yes, you can use frozen zucchini. Thaw and drain it well before use. This helps prevent excess moisture in the bars. Frozen zucchini works well and still gives you that great flavor and texture. In this blog post, we explored how to make delicious Minute Chocolate Zucchini Bars. We covered essential ingredients like zucchini, flour, cocoa powder, and optional add-ins such as chocolate chips and nuts. You learned the steps for mixing and baking for perfect bars. I shared tips to keep them moist and flavorful. Remember, you can customize these bars to fit your taste and diet. With the right storage, they can last for days. Enjoy making these tasty treats!](https://savorystride.com/wp-content/uploads/2025/07/e566fa48-ee53-4549-88bf-2bcee66e46ce.webp)
Looking for a quick and tasty treat? These Minute Chocolate Zucchini Bars are the answer! With just a handful of

Looking for a healthy and tasty summer dish? My Savory Summer Zucchini Quinoa Casserole is just what you need! This
![- 4 medium zucchinis, sliced into thin rounds - 1 cup marinara sauce - 1 cup mozzarella cheese, shredded - 1/2 cup pepperoni slices (or your preferred toppings) - 1/2 cup bell peppers, diced (any color) - 1/4 cup red onion, finely chopped - 2 teaspoons Italian seasoning - 1 teaspoon garlic powder - Salt and pepper to taste - Fresh basil leaves for garnish This casserole brings together simple, fresh ingredients. The zucchinis form a tasty base. They add flavor and a nice texture. Marinara sauce gives it a classic pizza taste. The mozzarella cheese melts perfectly, creating that gooey goodness we all love. You can spice things up with optional toppings. I often add pepperoni for a savory kick. Bell peppers add color and crunch. Red onion gives a mild sweetness. You can mix these toppings based on your taste. For seasoning, Italian herbs and garlic powder work wonders. They boost the flavor without extra effort. Don’t forget to add salt and pepper to taste. Fresh basil leaves make a great garnish. They give your dish a pop of color and fresh aroma. For the complete recipe, check out the [Full Recipe]. - Preheat your oven to 375°F (190°C). - Grease a 9x13-inch baking dish. - Combine sliced zucchinis, marinara sauce, Italian seasoning, and garlic powder in a bowl. - Mix well to ensure even coating of the zucchini slices. - Layer half of the zucchini mixture in the greased baking dish. - Add mozzarella cheese, pepperoni slices, bell peppers, and onions on top. - Cover the dish with foil and bake for 25 minutes. - Remove the foil and bake for an additional 15 minutes until golden brown. This recipe is simple and quick, making it a great choice for busy days. You can find the full recipe to guide you through every step. - Use fresh zucchinis for best results. Fresh veggies taste better and hold shape. - Optional: Pat dry the zucchini slices to reduce moisture. This step helps keep the casserole from becoming soggy. - Experiment with different cheeses or pizza toppings. Try adding feta, parmesan, or even goat cheese for unique flavors. - Add a pinch of red pepper flakes for heat. This little touch can bring your dish to life. - Serve with a side salad for a complete meal. A crisp salad balances the warm, cheesy casserole. - Pair with garlic bread for a comforting dinner experience. The rich flavors of garlic bread go well with the casserole. For the full recipe, check out the Zesty Zucchini Pizza Casserole. {{image_2}} To make a vegetarian version, swap out the pepperoni. You can add mushrooms, spinach, or artichokes instead. These choices add great flavor and nutrients. Mushrooms give a nice umami taste. Spinach adds vibrant color and vitamins. Artichokes provide a unique texture. Feel free to mix and match based on your taste. For a low-carb option, consider using cauliflower rice instead of zucchini. This change cuts down on carbs. You can also remove unnecessary toppings. Focus on the core ingredients to keep it light. The casserole will still taste delicious while being low in carbs. To make this casserole gluten-free, check your marinara sauce. Ensure it does not contain gluten. Also, review all other ingredients. Most items are naturally gluten-free, but it’s good to double-check. This way, everyone can enjoy the dish without worry. Store leftovers in an airtight container for up to 3-4 days. This keeps the flavors fresh. When you’re ready to eat, just open the container and enjoy. You can freeze the casserole, either unbaked or baked. Make sure it’s well-wrapped to avoid freezer burn. For best results, thaw it in the fridge overnight before reheating. This way, it warms evenly. For the best texture, reheat in the oven. This keeps the cheese nice and gooey. If you’re in a hurry, use the microwave for quick reheating. Just be careful not to overheat it, or the zucchini may become mushy. Yes, you can add vegetables like mushrooms, onions, or spinach for added nutrition. These veggies boost flavor and keep the dish fresh. Feel free to mix in what you love. Just chop them small so they cook well. Replace cheese with a dairy-free cheese alternative or nutritional yeast. Both options give great flavor. Nutritional yeast adds a cheesy taste without dairy. This change makes the dish friendly for those with lactose issues. Yes, it's lower in carbs and calories than traditional pizza, and packed with nutrients. Zucchini is rich in vitamins and minerals. This casserole lets you enjoy pizza flavors while sticking to a healthier diet. Add more garlic, crushed red pepper flakes, or jalapeños for heat. Spice levels are easy to adjust. Start with a little and add more until it fits your taste. Enjoy the kick! This zucchini pizza casserole is easy and fun to make. We covered the key ingredients, including fresh zucchini, marinara sauce, and mozzarella. You learned to layer and bake the casserole to get that golden crust. We also explored tasty variations, storage tips, and answers to common questions. Enjoy this dish as a healthy and delicious meal option. With simple tweaks, you can make it your own. Whether you're a veggie lover or just want a new recipe, this casserole delivers.](https://savorystride.com/wp-content/uploads/2025/07/d69cbbd7-3028-41ab-95ee-0bee9b046901.webp)
Looking for a quick and healthy dinner option? Try my Quick Zucchini Pizza Casserole! Packed with fresh zucchini, rich marinara
Are you ready to indulge in a creamy and delightful treat? Today, I’m sharing my favorite Peach Cobbler Cheesecake Salad
![To make Easy Paleo Peach Bites, you need fresh and simple ingredients. Here’s what you’ll need: - 4 ripe peaches, halved and pitted - 1 cup almond flour - 1/2 cup chopped walnuts - 2 tablespoons coconut oil, melted - 1 tablespoon honey (optional for sweetness) - 1 teaspoon cinnamon - Pinch of sea salt - Fresh mint leaves for garnish These ingredients come together to create a delightful dessert. Ripe peaches add natural sweetness and juiciness. Almond flour gives a nice texture, while walnuts add crunch. Coconut oil helps bind the mix and adds flavor. Cinnamon enhances the dish's warmth, and a pinch of sea salt balances sweetness. Using fresh mint leaves as a garnish adds a pop of color and a burst of freshness. This simple list of ingredients makes it easy for anyone to whip up this tasty dessert. You can find the Full Recipe to guide you through the steps. - Preheat your oven to 350°F (175°C). - Prepare the peaches by halving and pitting them. To start, I love to preheat my oven. It gets the kitchen warm and ready. Halving the peaches is easy; just slice them down the middle and twist. Remove the pit and set the peach halves aside. Fresh peaches give the best taste and texture. - Combine almond flour, chopped walnuts, melted coconut oil, honey (if using), cinnamon, and sea salt. Now, grab a bowl. In it, mix the almond flour with chopped walnuts. I like to add melted coconut oil for a rich flavor. If you want some sweetness, add honey. A sprinkle of cinnamon gives it warmth, and don't forget a pinch of sea salt. Mix until the texture is crumbly. - Place peach halves cut side up on a baking sheet. - Spoon the almond-walnut mixture over each peach half. Next, take your baking sheet. Lay the peach halves cut side up. This helps the topping stick. Spoon the almond-walnut mix over each peach half. Press it down a bit so it sticks. - Bake for 15-20 minutes until peaches are tender and topping is golden. - Let cool slightly before garnishing with mint. Time to bake! Place the baking sheet in the oven and set the timer for 15-20 minutes. You want the peaches to be soft and the topping to turn golden. When they are done, let them cool for a few minutes. Garnish with fresh mint leaves before serving. Enjoy your Easy Paleo Peach Bites! For the complete recipe, check out the [Full Recipe]. - Use ripe peaches for the best flavor. - Look for firm peaches with a slight give when squeezed. Picking the right peaches is key to making these bites tasty. Ripe peaches have a sweet, juicy taste that makes each bite a delight. When you squeeze a peach gently, it should feel firm but yield just a bit. This means it is ripe and ready to eat. If you pick hard peaches, they won’t taste as good in your dessert. - Add vanilla extract for extra flavor. - Consider substituting walnuts with pecans or almonds. To make your peach bites even better, think about adding vanilla extract. A splash of this can bring out the natural sweetness of the peaches. You can also play with the nuts. If walnuts aren’t your favorite, try pecans or almonds instead. Both options add great taste and texture. - Serve warm or chilled. - Pair with a dollop of coconut yogurt for added creaminess. You can enjoy these peach bites warm or chilled, depending on what you like. Serving them warm makes the topping all the more inviting. If you want something creamy, add a dollop of coconut yogurt on top. This touch makes every bite feel luxurious. For the full recipe, check out the details above. {{image_2}} You can easily add a twist to your peach bites. Incorporate chocolate chips for a treat that feels extra special. The chocolate melts and mixes with the warm peach, making each bite delightful. If you want more sweetness, drizzle maple syrup on top. It adds a rich flavor that pairs well with the peaches. You can also try some savory options for a unique taste. Add crumbled feta cheese to the peach bites. This cheese gives a nice salty contrast to the sweet peach. For a spicy kick, sprinkle a bit of cayenne pepper. This adds heat that surprises your taste buds and can make the dish even more exciting. If you need a nut-free version, use sunflower seed flour instead of almond flour. This keeps the recipe safe for those with nut allergies. You can also swap nuts for different kinds. Try hazelnuts or macadamia nuts for a new flavor. Each nut brings its own taste, making the recipe fun to customize. For more details on the recipe, check the Full Recipe. Keep your Easy Paleo Peach Bites in an airtight container. They stay fresh in the refrigerator for up to 3 days. This way, you can enjoy them later without losing flavor. You can freeze unbaked peach bites for up to 3 months. Just place them in a freezer-safe container. When you're ready to bake, take them out and bake directly from the freezer. Just add some extra time to ensure they cook through. To reheat, preheat your oven to 350°F. Place the peach bites in the oven for 5-10 minutes. This keeps them crisp and delicious. Enjoy them warm for the best taste! Yes, replace honey with maple syrup or agave nectar. This change keeps the bites sweet and plant-based. It’s a great option for those who follow vegan diets. The maple syrup adds a nice flavor and complements the peaches well. Peaches should be tender and the topping should be lightly golden. This means they are ready to eat. Use a fork to check if the peaches are soft. The golden topping shows they have baked long enough for a crunchy texture. Fresh peaches are recommended for best texture, but canned can be used if well-drained. Canned peaches may be softer, so adjust your baking time. Drain them well to avoid excess moisture. Pair with a side of fresh fruit or a light salad for a balanced snack. A simple green salad can add crunch and freshness. You can also serve them with a dollop of coconut yogurt for creaminess. Check out the Full Recipe for more ideas! These Easy Paleo Peach Bites delight with fresh peaches and a crunchy topping. You learned how to select ripe peaches, mix ingredients, and bake them to perfection. Remember, you can customize your bites with sweet or savory twists. Store leftovers in the fridge or freeze them for later. Enjoy your tasty creation as a snack or dessert. These bites are simple and fun for everyone!](https://savorystride.com/wp-content/uploads/2025/07/c2a5c310-ac46-4c9e-8c83-2c75f2d9ea49.webp)
Looking for a sweet treat that fits your Paleo lifestyle? These Easy Paleo Peach Bites are just what you need!
