Skip to content
DisclaimerTerms Of UseGDPR PolicyCookie Policy

savorystride

  • Home
  • Drinks
  • Appetizers
  • Dinner
  • Dessert
  • About
  • Contact
  • Privacy Policy
DisclaimerTerms Of UseGDPR PolicyCookie Policy

Hazel

- 4 large dill pickles - 1 cup all-purpose flour - 2 large eggs - 1 cup breadcrumbs (preferably panko) - 1/2 cup ranch dressing - 1 tablespoon hot sauce - 1 teaspoon minced fresh dill - Garlic powder - Onion powder - Paprika - Cayenne pepper Gather these ingredients before you start. The key to crispy dill pickle fries lies in the freshness of your pickles and the quality of your breadcrumbs. I always recommend using panko for extra crunch. The spice mix you choose can also elevate the flavor. Feel free to play with the optional seasonings. Garlic powder and paprika add warmth, while cayenne brings heat. Adjust these to your taste. For the spicy ranch, you can use any brand of ranch dressing you love. Mixing in hot sauce and fresh dill gives it a kick and fresh flavor. This easy dip complements the fries perfectly. That’s it! With these ingredients ready, you can create the crispy dill pickle fries from the Full Recipe. Enjoy the process and let your kitchen fill with delightful scents! First, grab your dill pickles. You will want to pat dry the pickle slices with paper towels. This step is key because it removes excess moisture. Less moisture means crispier fries! Next, slice the pickles into fry shapes. Aim for even thickness so they cook at the same rate. You want them about a half-inch thick for the best bite. Now, let’s set up our breading station. In a shallow bowl, mix the flour, garlic powder, onion powder, paprika, and cayenne pepper. This mix adds flavor and a little heat. In another bowl, beat the eggs until they are smooth. In a third bowl, place the breadcrumbs. I recommend using panko breadcrumbs for a crunchier texture. Time to bread those pickles! Start by dipping each pickle fry into the flour mixture. Make sure the fry is well-coated. Then, dip it into the beaten eggs. Finally, coat it with the breadcrumbs. Press gently to ensure the fry is evenly covered. This process is what gives you that amazing crunch when frying. Now, let's fry the pickles! Heat about 1 inch of vegetable oil in a deep skillet over medium-high heat. You want the oil to reach 350°F (175°C). To test the heat, drop a small piece of bread into the oil. If it sizzles, you’re ready. Carefully add the breaded pickle fries in batches. Fry them for about 2-3 minutes on each side until they are golden brown. Use a slotted spoon to remove them and drain the excess oil on paper towels. For the full recipe, check out the details above! To make your pickle fries extra crispy, start by drying the pickles. Pat them with paper towels to remove moisture. This step is key. If the pickles are wet, they won’t get crispy when frying. Next, use panko breadcrumbs. They give a great crunch. Regular breadcrumbs can work, but panko is best for that perfect fry. The right oil temperature is vital for great frying. Heat the oil to about 350°F (175°C). You can test this by dropping in a small piece of bread. If it sizzles and bubbles right away, your oil is ready. While frying, look for a golden brown color. This shows the pickles are done. If they turn dark too fast, your oil may be too hot. Present your crispy dill pickle fries with the spicy ranch for dipping. The creamy ranch pairs well with the crunchy pickles. For a nice touch, garnish with fresh dill. This not only adds flavor but also makes the dish look more appealing. A rustic basket with parchment paper adds style and makes sharing easy. For the best experience, serve hot and fresh! {{image_2}} You can make crispy dill pickle fries even more exciting. Consider adding different spices to the breading. For instance, try adding cumin for a warm flavor or chili powder for a kick. You can also mix in some dried herbs, like oregano or thyme. Each spice will change the taste and give you a new experience. Experimenting with different hot sauces can also bring a new twist. You could use a smoky chipotle sauce for depth or a tangy buffalo sauce for a classic flavor. Each sauce adds its own unique heat, making your dipping experience even more fun. While spicy ranch is fantastic, you might want to try other ranch variations. Add some lemon zest for brightness, or mix in some avocado for creaminess. You can also blend in roasted garlic for a richer taste. Each variation can change the whole vibe of your dish. Swapping ranch for other dressings can open up a world of flavors. Try blue cheese for a bold choice or a sweet chili sauce for a sweet and spicy dip. These alternatives can make your crispy dill pickle fries a whole new dish. If you prefer baking, you can still enjoy crispy dill pickle fries. To make the oven-baked version, begin by preheating your oven to 425°F (220°C). Then, line a baking sheet with parchment paper. After breading your pickle fries, arrange them on the baking sheet in a single layer. For extra crunch, lightly spray them with cooking oil. Bake for 15-20 minutes, flipping halfway through. This method gives you that great crunch without frying. Just keep an eye on them to avoid burning. For the best results, the pickles should be well-dried before coating. This helps them crisp up nicely in the oven. Enjoy these variations for a fun twist on a classic snack! Check out the Full Recipe for more details on making these tasty treats. To keep your crispy dill pickle fries fresh, store them in the fridge. Place the fries in an airtight container. This helps to prevent them from getting soggy. You can also use a sealed plastic bag if you prefer. Remember to let them cool to room temperature before sealing. When you want to enjoy your leftover fries, keeping them crispy is key. The best way to reheat them is in the oven. Preheat the oven to 375°F (190°C). Spread the fries on a baking sheet and heat for about 10 minutes. This method helps restore their crunch. Avoid the microwave, as it makes them soft and chewy. You can freeze crispy dill pickle fries, but timing matters. Freeze them before frying for best results. Lay the breaded pickles on a baking sheet and freeze them until solid. Then, transfer them to a freezer bag. When you're ready to fry, just take them out and fry directly from frozen. If you freeze after frying, let them cool first and place them in a freezer-safe container. To thaw, just leave them in the fridge overnight before reheating. Crispy Dill Pickle Fries taste best when fresh. They stay good for about 1 day in the fridge. Store them in an airtight container to keep them from getting soggy. Reheat them in the oven for a crispy texture. Yes, you can easily make this recipe gluten-free! Use gluten-free flour and gluten-free breadcrumbs. This change keeps the crunch while making it safe for those avoiding gluten. If you don't have breadcrumbs, try crushed cornflakes or crushed rice cereal. Both options add a nice crunch. You can also use ground nuts for a different flavor and texture. Absolutely! Use a plant-based ranch dressing for a vegan version. Add vegan mayonnaise and your choice of hot sauce. Fresh dill is still a great addition for flavor. To reduce saltiness, soak the pickles in water for about 30 minutes. This simple step helps draw out some salt. Pat them dry before breading to make them crispy. For the full recipe, check out the details above! Crispy dill pickle fries are easy to make with simple ingredients. You just need pickles, flour, eggs, and breadcrumbs. Follow the steps to prepare, bread, and fry them for a perfect snack. Add some spicy ranch for a delicious touch. Remember to experiment with flavors and storage tips for best results. Enjoy your crunchy bites warm or cold, and share with friends! This snack will please everyone and keep them coming back for more.

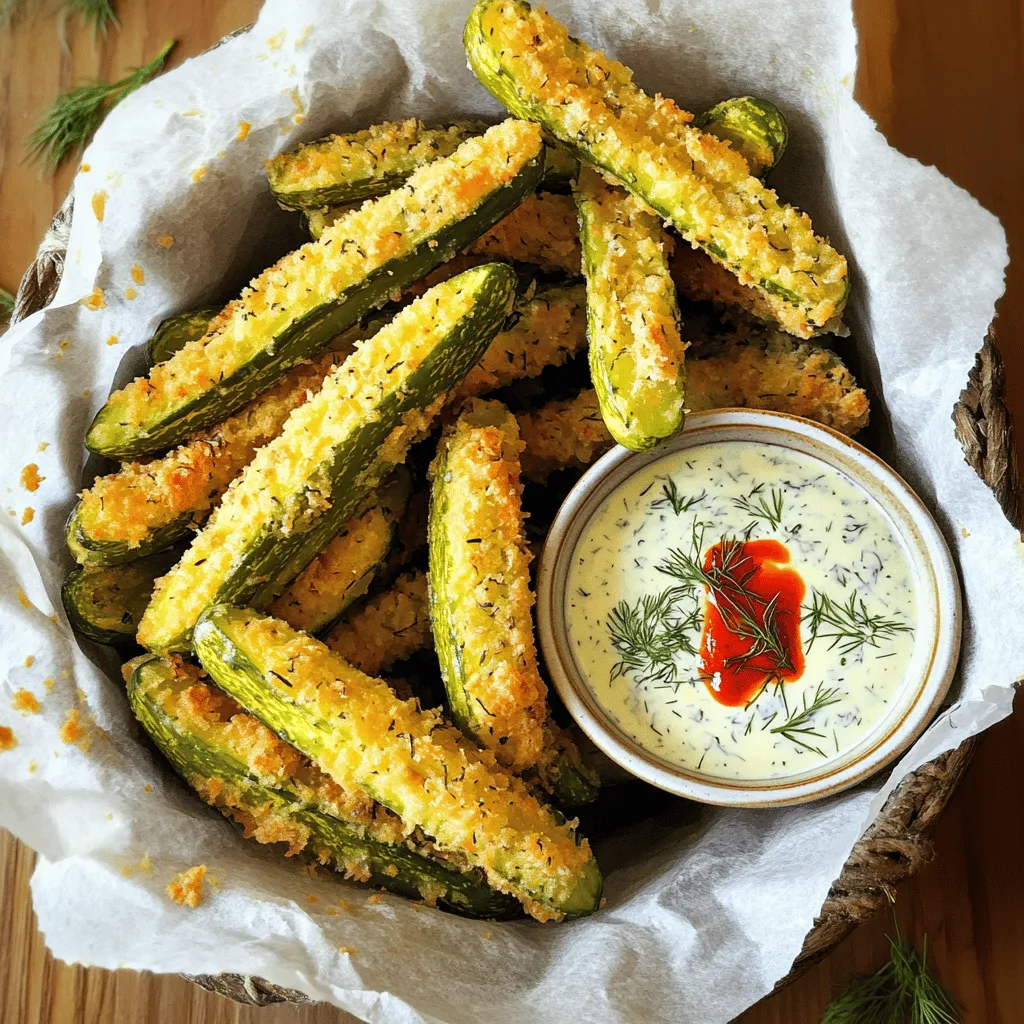
Crispy Dill Pickle Fries with Spicy Ranch Delight

Are you ready to take your snacking game to the next level? With my Crispy Dill Pickle Fries and Spicy

- 2 ripe peaches, halved and pitted - 8 ounces burrata cheese - 4 cups arugula - 1/4 cup toasted almonds, chopped - 1/4 cup fresh basil, roughly torn - 2 tablespoons honey - 2 tablespoons apple cider vinegar - 1 teaspoon Dijon mustard - 1/2 teaspoon red pepper flakes - 3 tablespoons olive oil - Salt and pepper to taste For this recipe, I love using ripe peaches. They give the salad a sweet and juicy touch. Burrata cheese adds creaminess and pairs well with the grill flavors. Arugula gives the salad a fresh peppery note. The toasted almonds add crunch, and fresh basil brings a bright herb taste. For the hot honey vinaigrette, I mix honey and apple cider vinegar. This blend creates a sweet and tangy dressing. The Dijon mustard adds a touch of spice. The red pepper flakes bring warmth to the vinaigrette. Don’t forget to season with salt and pepper for balance. You can find the full recipe here, which includes all ingredients and steps to make this delicious dish. First, preheat your grill to medium heat. Brush the peach halves with olive oil. This helps them grill nicely. Sprinkle a bit of salt and pepper on top for flavor. Place the peaches cut-side down on the grill. Grill them for about 3-4 minutes. You want to see nice grill marks. Once done, remove them from the grill. Let them cool slightly before using. In a bowl, whisk together the honey, apple cider vinegar, Dijon mustard, and red pepper flakes. This mix creates a sweet and spicy flavor. Slowly add in the olive oil while whisking. This helps blend it all together. Season with salt and pepper to taste. Make sure you adjust it to your liking. In a large bowl, combine the arugula, grilled peaches, chopped almonds, and torn basil. This mix gives the salad a fresh look. Drizzle the hot honey vinaigrette over the salad. Toss everything gently to coat. Finally, tear the burrata cheese into pieces. Place it on top of the salad for a stunning finish. For the full recipe, check below. - The right grill temperature for perfect peaches: Aim for medium heat when grilling peaches. This heat gives you the best grill marks and a lovely char without burning. Preheat your grill for about 10 minutes before placing the peaches on it. - Avoiding overcooking the fruit: Grill the peach halves for only 3-4 minutes on each side. You want them soft, but not mushy. Check them often to avoid overcooking. If they start to look too soft, it’s time to take them off the grill. - Presentation tips for an attractive salad: Serve your salad on a large, colorful platter. Layer the arugula first, then add the grilled peaches, burrata, and nuts. Drizzle the hot honey vinaigrette on top for a beautiful finish. Add some extra almond pieces and basil leaves for color. - Pairing suggestions for a complete meal: This salad pairs well with grilled chicken or fish. You can also add crusty bread or a light soup for a complete meal. - Alternatives to burrata cheese: If you can’t find burrata, try fresh mozzarella or goat cheese. Both have a creamy texture and will work well in this salad. - Different nuts or greens for varied flavors: Swap out almonds for walnuts or pecans. You can also replace arugula with spinach or mixed greens for a different taste and texture. For the complete recipe, check out the [Full Recipe]. {{image_2}} You can make this salad even better. To add more colors and textures, try these vegetables: - Cherry tomatoes for sweetness. - Grilled zucchini for a smoky flavor. - Roasted red peppers for a pop of color. If you want a vegan twist, swap burrata with these options: - Cashew cheese for creaminess. - Tofu for a protein boost. - Avocado for healthy fats. Want more heat? Add spicy ingredients like: - Jalapeños for a fresh crunch. - Sriracha drizzled on top for extra kick. You can also switch up the vinegar for unique tastes: - Balsamic vinegar for a rich, sweet flavor. - Red wine vinegar for a tangy bite. Fruits change with seasons. For summer, use juicy peaches. In fall, try: - Grilled apples for a sweet crunch. - Pears for a softer texture. In winter, consider: - Roasted citrus fruits for brightness. - Pomegranate seeds for a festive touch. These variations keep your salad fresh and exciting. For the full recipe, check out the detailed steps above. To keep your Grilled Peach Burrata Salad fresh, store it in an airtight container. Place it in the fridge right after serving. This salad stays fresh for about 2 days. However, the peaches may soften, and the burrata can lose its creamy texture. Can you freeze hot honey vinaigrette? Yes, you can freeze it! Pour the vinaigrette into a freezer-safe container. It can last for up to 3 months in the freezer. When ready to use, thaw it in the fridge overnight. After thawing, give it a good shake or stir before serving. To reheat grilled peaches, use the stovetop or microwave. For the stovetop, warm them in a pan on low heat for a few minutes. If using a microwave, heat them in short intervals to avoid cooking them too much. This helps keep the flavors intact while reheating. Enjoy this dish with the full recipe for the best results! When choosing peaches, look for ones that feel slightly soft. A ripe peach should have a sweet smell. Check for a vibrant color, usually yellow or orange. Avoid peaches with blemishes or green spots. The best peaches are firm yet yield a little when you press gently. Yes, you can prep parts of the salad ahead. Grill the peaches early and store them in the fridge. You can also wash and dry the arugula. Keep the vinaigrette in a sealed jar until you need it. Assemble the salad just before serving for the best taste and freshness. This salad pairs well with grilled chicken or fish. Consider serving crusty bread or a light soup as sides. A chilled white wine or sparkling water adds a nice touch to your meal. These options complement the flavors without overpowering them. To make a milder vinaigrette, skip the red pepper flakes. Use honey, apple cider vinegar, and Dijon mustard. Whisk together with olive oil, salt, and pepper. This version will still taste great but won’t have the heat. You can always add spices later if desired. For the full recipe, click here: [Full Recipe]. In this blog post, I shared a tasty grilled peach burrata salad recipe. You learned how to select ripe peaches, prepare a hot honey vinaigrette, and assemble a colorful dish. Remember to try different variations and ingredient swaps for fun twists. This salad is fresh, bright, and perfect for any meal. With my tips on storage and serving, you can enjoy it anytime. Get ready to impress your family and friends with this easy recipe. Enjoy your cooking and happy eating!

Grilled Peach Burrata Salad with Hot Honey Vinaigrette

Summer is the perfect time for a bright and tasty dish like Grilled Peach Burrata Salad with Hot Honey Vinaigrette.

- Cucumber: 1 medium, peeled and diced - Watermelon: 2 cups, cubed and seeds removed - Green Apple: 1, cored and chopped - Fresh Mint: 1 tablespoon - Lime Juice: 1 tablespoon - Honey (optional): 1 tablespoon - Cold Water: 2 cups The key to a great Cucumber Melon Detox Glow Juice lies in the freshness of your ingredients. Each item brings its own benefits and flavors, making this drink both tasty and healthy. Cucumber adds hydration and crispness. It helps cool you down on hot days. Choose a medium cucumber, peel it, and dice it into small pieces. Watermelon is sweet and juicy. It is rich in vitamins A and C. Use about two cups, cut into cubes, and be sure to remove the seeds. Green Apple brings a tart flavor that balances the sweetness of watermelon. One cored and chopped apple will do the trick. Fresh Mint adds a refreshing touch. Just a tablespoon of mint leaves will brighten the juice. Lime Juice adds a zesty kick. It also helps bring out the flavors of the other fruits. A tablespoon is all you need. Honey is optional. If you like your juice sweeter, add a tablespoon. Cold Water helps blend everything smoothly. Use two cups for the best texture. Gather these ingredients and prepare for a refreshing health boost with the full recipe. - Peel and dice the cucumber. - Cube the watermelon and remove seeds. - Core and chop the green apple. Getting your ingredients ready is key. Start by peeling your cucumber. Then, dice it into small pieces. Next, take the watermelon and cut it into cubes, making sure to remove any seeds. Finally, core the green apple and chop it into chunks. This prep work makes blending easy. - Combine ingredients in the blender. - Add cold water and blend until smooth. Now, it’s time for the fun part! Toss the diced cucumber, watermelon cubes, and apple chunks into your blender. Add the fresh mint leaves for a burst of flavor. Pour in two cups of cold water. Blend everything on high until it becomes smooth. This should take about 30 seconds. If you want it sweeter, add honey and blend for a few more seconds. - Use a fine mesh sieve or cheesecloth. - Press down on pulp to extract maximum juice. After blending, place a fine mesh sieve or a cheesecloth over a large bowl. Carefully pour the juice mixture into it. This step helps you get rid of any solids. Use a spatula or a spoon to press down on the pulp. This action helps extract all that tasty juice. You can either discard the pulp or save it for smoothies or salads. Now you have your Cucumber Melon Detox Glow Juice. Enjoy this refreshing drink! For the detailed recipe, you can check the Full Recipe section. You can mix things up with other fruits. Try using cantaloupe or honeydew instead of watermelon. For a sweeter taste, consider using ripe peaches or strawberries. If you want a natural sweetener, maple syrup works well too. Always choose organic fruits if you can. They have fewer chemicals and taste better. Look for local farms or markets that sell organic produce. If you want a sweeter juice, add more honey or use agave syrup. Start with a teaspoon and taste as you go. For a fresh twist, add herbs like basil or cilantro. These can give your juice a unique flavor. You can also try a pinch of ginger for a spicy kick. Garnishing can elevate your drink. Add a mint sprig or a cucumber slice on the rim. You can also use edible flowers for a fun touch. Serve the juice in clear glasses to show off the bright color. This drink is great for parties or sunny days. Try it at brunch or as a refreshing afternoon pick-me-up. For the full recipe, check the earlier section. {{image_2}} You can mix fruits to make your juice unique. Try adding honeydew or cantaloupe for more melon flavor. Berries like strawberries or blueberries can give your juice a sweet twist. Their colors also look nice! Adding citrus fruits, like oranges or lemons, brightens the taste and adds zest. Just a splash of lemon juice can make a big difference. Want to make your juice even better? Consider adding superfoods. Chia seeds or flaxseeds can give you extra fiber and healthy fats. They blend well and don’t change the taste much. Protein powder is another great choice. It adds protein and keeps you full longer. Just one scoop can boost your drink's nutrition. Using seasonal fruits makes your juice fresh and tasty. In summer, add fresh berries or peaches. In winter, consider apples or pears for a cozy flavor. Always adjust your recipe based on what’s in season. This keeps your juice exciting and supports local farmers. Enjoy the variety that each season brings! For the Full Recipe, check out the main section of this article. To keep your Cucumber Melon Detox Glow Juice fresh, pour it into a clean glass jar. Make sure to leave some space at the top. Seal it tightly with a lid. Store it in the fridge. This juice tastes best when consumed within 2 days. The flavors stay bright, and the nutrients remain intact. If you have extra juice, freezing is a great option. Pour the juice into ice cube trays. Once frozen, transfer the cubes to a freezer bag. This method helps save space. Use the cubes in smoothies or drinks later. They keep well for up to 3 months. Don't throw away the leftover pulp! It’s full of flavor and nutrients. You can mix it into smoothies for added fiber. Try adding it to salads for some crunch. You can also use it in baked goods like muffins. This way, you get the most from your ingredients. Cucumber Melon Detox Glow Juice lasts up to three days in the fridge. To keep it fresh, store it in an airtight container. This helps prevent oxidation and keeps flavors bright. Always check for any off smells or changes in color before drinking. Cucumber and watermelon are great for detox. Cucumber hydrates and flushes out toxins. It also has vitamins that help your skin glow. Watermelon is rich in antioxidants. It helps reduce inflammation and keeps you feeling fresh. Together, they support digestion and boost hydration levels. Yes, you can make this juice without a blender. Use a juicer for a smooth drink. If you don’t have a juicer, simply grate the cucumber and watermelon. Then, squeeze out the juice using a fine cloth. You can also mash the fruits and strain them for a refreshing drink. This juice recipe is simple and refreshing. You blend easy ingredients like cucumber, watermelon, and green apple. I shared tips for flavor and how to store your juice. The variations can keep things exciting all year. Enjoying healthy drinks boosts your wellness. Try different fruits and use the pulp wisely. Keep experimenting, and you will discover your favorite blends that support your health and taste.

Cucumber Melon Detox Glow Juice Refreshing Health Boost

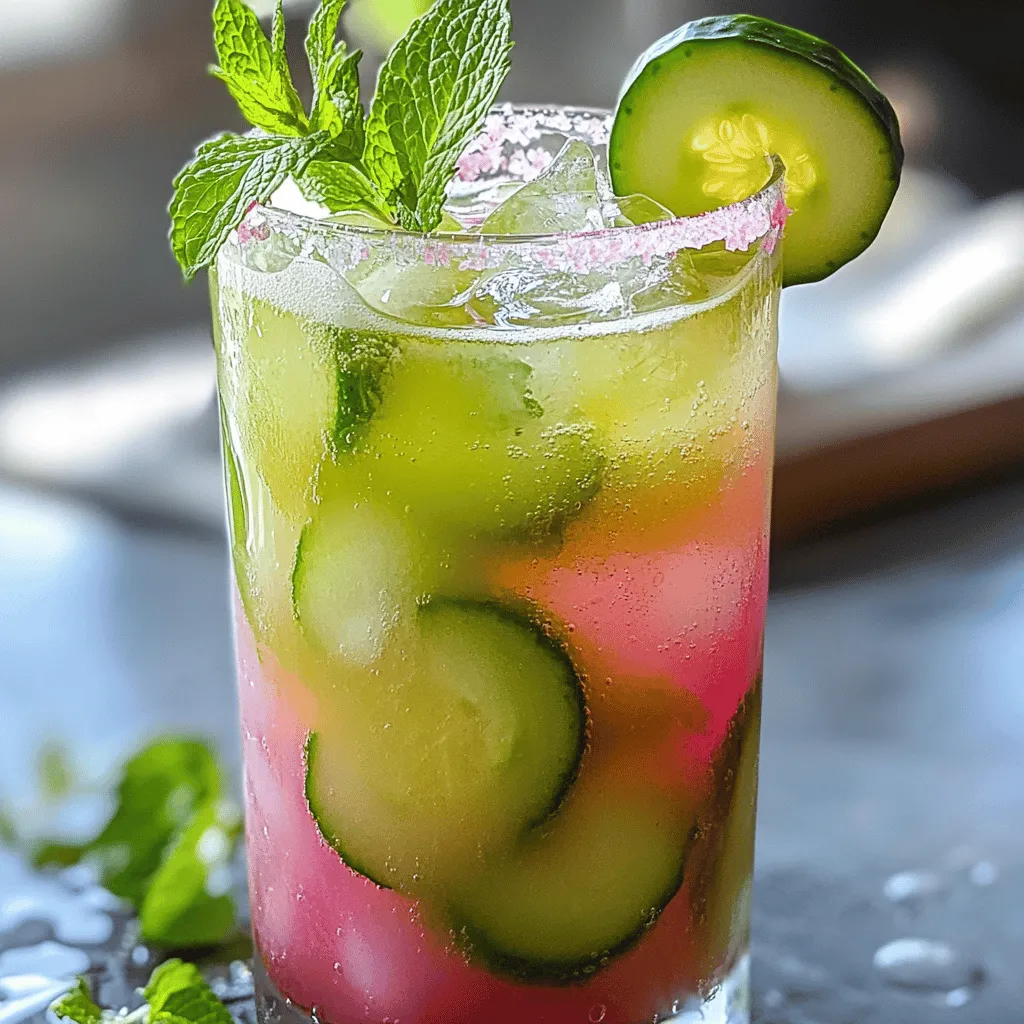
Looking for a refreshing and healthy drink? The Cucumber Melon Detox Glow Juice is your solution! Packed with hydrating ingredients

- 2 cups Greek yogurt (plain or flavored) - 1/4 cup honey or maple syrup - 1/2 teaspoon vanilla extract - 1/2 cup dark chocolate chips - 1/4 cup mixed berries (strawberries, blueberries, raspberries) - 2 tablespoons chopped nuts (almonds, walnuts, or pistachios) - Pinch of sea salt For this Frozen Yogurt Bark with Dark Chocolate Swirl, start with the main ingredients. You can choose plain or flavored Greek yogurt. I often use plain yogurt. It gives a nice balance to the sweet flavors. Add honey or maple syrup for sweetness. The vanilla extract brings a warm flavor that rounds out the mix. Next, we have the fun part: the additional ingredients. Dark chocolate chips add a rich taste. I love using a mix of berries. They add color and a burst of freshness. You can choose any nuts you like, too. Chopped almonds or walnuts work well. They bring crunch and texture to every bite. Don't forget the seasoning! A small pinch of sea salt enhances all the flavors. It brings out the sweetness of the chocolate and yogurt. I recommend reading the Full Recipe for a detailed guide on making this delicious treat. To start making this treat, grab a bowl. Combine 2 cups of Greek yogurt, 1/4 cup of honey or maple syrup, and 1/2 teaspoon of vanilla extract. Mix these together well. You want a smooth and creamy mixture. This will be the base of your frozen yogurt bark. Next, take a baking sheet and line it with parchment paper. This step helps the bark not to stick. Pour the yogurt mixture onto the lined baking sheet. Use a spatula to spread it evenly. Aim for about 1/4 inch thickness. Now, it’s time for the chocolate! Melt 1/2 cup of dark chocolate chips in a microwave-safe bowl. Do this in 30-second intervals. Stir in between until smooth. Once melted, drizzle the dark chocolate over your yogurt mixture. Use a skewer or a knife to create a swirl effect. Be gentle, so you don’t mix it all together. Finally, scatter 1/4 cup of mixed berries and 2 tablespoons of chopped nuts over the yogurt-chocolate mixture. This adds color and crunch. Sprinkle a pinch of sea salt for extra flavor. Now, place the baking sheet in the freezer. Freeze for at least 3-4 hours until it's set. For the full recipe, refer to the list above. Enjoy making your Frozen Yogurt Bark with Dark Chocolate Swirl! To create a beautiful swirl in your frozen yogurt bark, use a skewer or a knife. These tools help you mix the dark chocolate lightly into the yogurt. Be careful not to over-mix. You want to see those lovely swirls for a stunning look. You can adjust the sweetness by changing the honey or maple syrup. If you use flavored yogurt, you might need less sweetener. For those who prefer vegan options, maple syrup works great. It adds sweetness without any animal products. Serve your frozen yogurt bark on a decorative platter. This makes it look special. You can garnish it with whole berries or a drizzle of chocolate. These small touches add more visual appeal and make it even more fun to eat. {{image_2}} You can mix up the flavors in your frozen yogurt bark. Using different yogurt flavors can change the whole taste. Try using strawberry yogurt for a fruity twist. Vanilla yogurt gives a classic touch. You can even go bold with flavors like mango or coconut. For toppings, think beyond berries. Sprinkle some coconut flakes on top for a chewy texture. You can also add seeds like chia or hemp for a nutty crunch. These options let you create a bark that is truly your own. If dark chocolate isn't your thing, swap it out! White chocolate offers a sweet, creamy flavor that pairs well with tangy yogurt. Milk chocolate is another option that gives a smooth, rich taste. You can also explore nut butters instead of chocolate. Drizzling almond or peanut butter adds a unique flavor and extra protein. This will make your frozen yogurt bark both tasty and healthy. For those needing gluten-free or dairy-free options, this bark is easily adaptable. Use dairy-free yogurt to make it suitable for vegans. You can also replace honey with agave syrup for a vegan-friendly sweetener. If you want to boost the protein content, add a scoop of protein powder to the yogurt. This simple change makes it a great snack for active lifestyles. Just make sure to mix it well for a smooth texture. For the full recipe, check the link provided. To keep your frozen yogurt bark fresh, store it in a freezer-safe container. Make sure to cover it with a lid or wrap it tightly. This helps prevent freezer burn. You can keep it in the freezer for up to two months without losing its great taste and texture. When you're ready to enjoy your frozen yogurt bark, take it out of the freezer. Let it sit at room temperature for about 10 minutes. This will soften it just enough to break it into pieces easily. If you're in a hurry, you can microwave it for a few seconds. Just be careful not to melt it completely. Frozen yogurt bark is perfect as a snack or dessert. Pair it with fresh fruit like sliced bananas or a scoop of granola for extra crunch. It makes a great addition to parties, too! Serve it on a fancy platter with some fresh berries scattered around. This not only looks beautiful but also adds to the flavor. For the full recipe, check out the Frozen Yogurt Bark with Dark Chocolate Swirl. Making Frozen Yogurt Bark takes about 15 minutes to prep. After that, you need to freeze it for at least 3-4 hours. So, in total, it takes around 4 hours and 15 minutes from start to finish. This includes both prep time and freeze time. Yes, you can use non-dairy yogurt for this recipe. Almond, coconut, or soy yogurt works great. Just make sure to choose a plain or flavored option that you enjoy. This way, you can keep it dairy-free and still have a tasty treat. Some of the best toppings include: - Mixed berries (like strawberries, blueberries, and raspberries) - Chopped nuts (almonds, walnuts, or pistachios) - Coconut flakes - Mini chocolate chips - Granola for added crunch Feel free to mix and match these toppings. They add flavor and color to your yogurt bark. Absolutely! You can change the yogurt flavor to match your taste. Try strawberry or vanilla yogurt for a fun twist. You can also add or swap toppings based on your diet. If you're avoiding nuts, leave them out. Want more sweetness? Add extra honey or maple syrup. The options are endless! This blog post broke down how to make Frozen Yogurt Bark with Dark Chocolate Swirl. We covered the main and additional ingredients, step-by-step instructions, helpful tips, and variations. With just a few simple steps, you can enjoy a tasty treat that suits your tastes. Whether you use Greek yogurt or go dairy-free, this recipe is flexible. Try adding your favorite toppings or flavors. Remember, cooking should be fun and easy! Enjoy your homemade frozen yogurt bark today.

Frozen Yogurt Bark with Dark Chocolate Swirl Delight

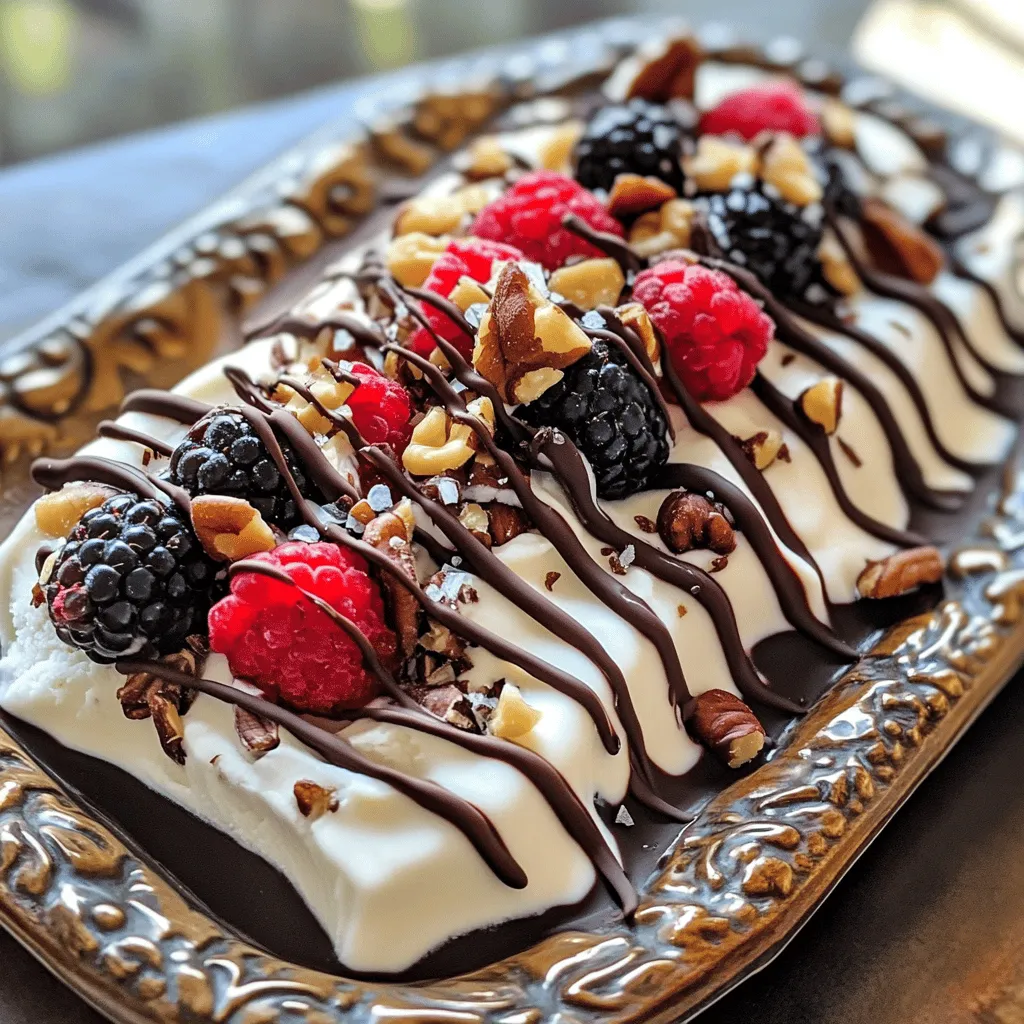
Are you ready to treat yourself to a delicious and healthy snack? This Frozen Yogurt Bark with Dark Chocolate Swirl

- 1 and 1/2 cups all-purpose flour - 1/2 cup crumbled feta cheese - 1/4 cup fresh basil leaves, finely chopped - 1/2 teaspoon salt - 1/4 teaspoon black pepper - 1/2 cup unsalted butter, chilled and cubed - 3 to 4 tablespoons ice water - 3 medium heirloom tomatoes, sliced - 1 tablespoon olive oil - 1 teaspoon balsamic vinegar - Fresh basil leaves for garnish - Salt to taste Using heirloom tomatoes is key here. They bring rich flavor and color. Choose ripe, firm tomatoes for the best taste. Fresh basil adds a great aroma and a garden-fresh taste. Feta cheese gives a nice tang. Use high-quality feta for the best results. The butter should be very cold. This helps create a flaky crust. If you can’t find heirloom tomatoes, any ripe tomatoes will work. For a dairy-free option, try a vegan cheese instead of feta. You can swap olive oil for avocado oil if needed. If you don’t have fresh basil, dried basil can be a quick substitute. Just use less, as dried herbs are stronger. For a gluten-free crust, use a gluten-free flour blend. This will change the texture but still taste great. This section provides a clear guide to the ingredients in the Heirloom Tomato Galette with Basil Feta Crust. For the complete recipe, check the Full Recipe link. To start, gather all your crust ingredients. You will need: - 1 and 1/2 cups all-purpose flour - 1/2 cup crumbled feta cheese - 1/4 cup fresh basil leaves, finely chopped - 1/2 teaspoon salt - 1/4 teaspoon black pepper - 1/2 cup unsalted butter, chilled and cubed - 3 to 4 tablespoons ice water In a large bowl, mix the flour, crumbled feta, chopped basil, salt, and pepper. Make sure to whisk them together well. This step combines the flavors and gives your crust a tasty base. Next, add the cubed, chilled butter. Use a pastry cutter or your fingers to blend it in. You want the mixture to look like coarse crumbs. This is important for a flaky crust. Gradually add the ice water, one tablespoon at a time. Mix gently until the dough forms. Be careful not to overwork it. Once it comes together, form it into a disk. Wrap it in plastic wrap and chill for at least 30 minutes. This helps firm it up for rolling. While your dough chills, prepare the tomatoes. You will need: - 3 medium heirloom tomatoes, sliced - 1 tablespoon olive oil - 1 teaspoon balsamic vinegar - Salt to taste In a bowl, toss the sliced heirloom tomatoes with olive oil, balsamic vinegar, and a pinch of salt. Let them sit for about 10 minutes. This marinating step brings out the tomatoes' natural sweetness and adds flavor. Now it’s time to bring it all together. Preheat your oven to 400°F (200°C). On a lightly floured surface, roll out the chilled dough into a 12-inch circle. Transfer it to a parchment-lined baking sheet. This will help with easy cleanup later. Arrange the marinated tomato slices in the center of the dough, leaving a 2-inch border. Fold the edges of the dough over the tomatoes. Overlap as needed to create that rustic look. Bake your galette in the preheated oven for 30-35 minutes. You want the crust to be golden brown and the tomatoes tender. Once baked, let it cool slightly. Garnish with fresh basil leaves for a pop of color. Slice and serve warm or at room temperature. Enjoy the delicious taste of your heirloom tomato galette! You can find the Full Recipe for more details. To get the best crust, keep everything cold. Use chilled butter and ice water. This helps the dough stay flaky. When mixing, don’t overwork the dough. You want it to be just combined. Once you form it into a disk, wrap it and chill it for at least 30 minutes. This rest time is key. It makes rolling much easier and improves texture. Marinating heirloom tomatoes adds flavor. Start by slicing them evenly. Toss the slices in olive oil, balsamic vinegar, and a pinch of salt. Let them sit for about 10 minutes. This short time allows the flavors to blend well. It also helps the tomatoes soften slightly. Don’t skip this step; it enhances the final dish. Serve the galette warm or at room temperature. It pairs well with a fresh green salad. You can also enjoy it with a glass of chilled white wine. For added flair, sprinkle extra basil leaves on top before serving. This not only looks nice but adds a burst of fresh flavor. You can find the Full Recipe to guide you through every step. {{image_2}} You can enhance your heirloom tomato galette by adding other veggies. Zucchini, bell peppers, or spinach work well. Slice them thinly and mix them with the tomatoes. This gives more color and taste. Try adding roasted red peppers for a smoky flavor. You can sauté vegetables first to bring out their sweetness. Just remember not to add too much moisture to keep the crust crisp. Feta is a great choice for flavor, but feel free to switch it up. Goat cheese adds a tangy touch. Mozzarella offers a creamy, mild taste. Cheddar gives a sharp kick. You might also blend cheeses for a unique taste. Just keep the total amount about half a cup to maintain a good texture. Experimenting with cheese can really change the dish. If you need a gluten-free option, use gluten-free flour. Almond flour or a blend of gluten-free flours can work well. Just check the ratios to get the right dough consistency. You might need a bit more ice water to get your dough to hold together. The taste might vary slightly, but it will still be delicious. You can enjoy this galette with no worries about gluten! For the full recipe, check the Heirloom Tomato Galette with Basil Feta Crust. To keep your leftover galette fresh, let it cool first. Wrap it in plastic wrap or foil. You can also place it in an airtight container. Store it in the fridge for up to three days. This helps keep the crust from getting too soggy. When you are ready to eat the galette again, preheat your oven to 350°F (175°C). Place the galette on a baking sheet. Heat it for about 10 to 15 minutes. This will warm it up and make the crust crisp again. Avoid using the microwave, as it can make the crust chewy. You can freeze the galette for later use. Wrap it tightly in plastic wrap and then in foil. This prevents freezer burn. It will stay good in the freezer for up to three months. To reheat, let it thaw in the fridge overnight. Then, follow the reheating instructions to enjoy a fresh-tasting galette again. For the full recipe, check out the detailed steps earlier. A galette is a free-form pie. It has a crust that wraps around filling. You can fill it with fruits or vegetables. The crust is flaky and tasty. It gives a rustic look that feels homey. Galettes are easy to make, so they are great for gatherings. You can serve them warm or cold. Yes, you can use regular tomatoes instead of heirloom. However, heirloom tomatoes offer unique flavors and colors. They tend to be juicier and more flavorful. If you use regular tomatoes, choose ripe ones for the best taste. Slice them thinly for even cooking. This will help your galette stay delicious and fresh. You can tell when the galette is done baking by checking the crust. It should be golden brown and firm. The tomatoes should be soft and slightly caramelized. You can insert a knife into the crust. If it comes out clean, the galette is ready. Let it cool for a few minutes before serving. This helps the filling set. Enjoy it warm or at room temperature. For the detailed recipe, check the Full Recipe section. This blog post explained how to make a delicious galette with fresh ingredients. You learned about the key ingredients, marinating tips, and step-by-step baking instructions. I shared variations so you can customize your dish and provided storage tips to keep it fresh. Now, you can impress friends and family with your new baking skills. Enjoy the process and feel free to experiment with your favorite flavors. Happy baking!

Heirloom Tomato Galette with Basil Feta Crust Delight

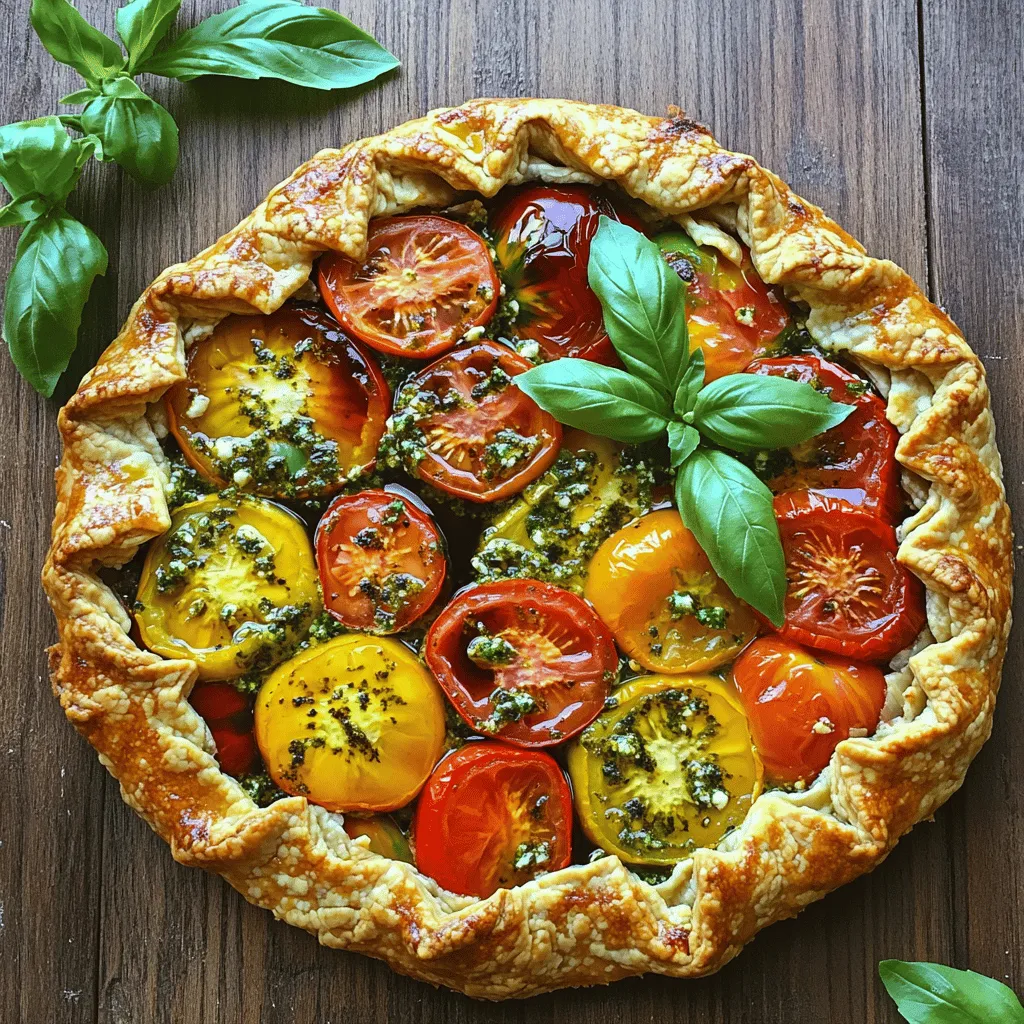
Are you ready to impress your taste buds with a Heirloom Tomato Galette? This delightful dish pairs juicy heirloom tomatoes

- 2 large zucchinis - 2 cups cooked chicken - 1 cup buffalo sauce - 1 cup shredded cheddar cheese - 1 cup cream cheese - 1/2 cup plain Greek yogurt - 1/2 teaspoon garlic powder - 1/2 teaspoon onion powder - 1/4 cup chopped green onions - Salt and pepper - Cooking spray or olive oil - Additional toppings (e.g., blue cheese crumbles) - Fresh herbs (e.g., parsley or cilantro) You can change the spice level by using different sauces. If you want a milder taste, go for a BBQ sauce. For a lighter dish, you can use low-fat cream cheese and yogurt. This keeps the dish creamy while cutting calories. Adjusting these ingredients helps you make this casserole fit your diet and taste. You can enjoy buffalo chicken zucchini casserole your way! Check the Full Recipe for more details on these substitutions. 1. First, preheat your oven to 350°F (175°C). This temperature helps the casserole cook evenly. 2. Grease a 9x13 inch baking dish with cooking spray or olive oil. This step prevents sticking. 3. In a large bowl, mix 2 cups of shredded chicken with 1 cup of buffalo sauce. Stir well to coat the chicken fully. 1. Start with the first layer by placing half of the zucchini slices in the baking dish. Overlap them slightly for even cooking. 2. Next, add half of the buffalo chicken mixture over the zucchini. Spread it evenly for a great taste in every bite. 3. Then, take half of the cream cheese mixture and spoon it over the chicken. Smooth it out to cover the chicken well. 4. Repeat the layers, starting with the remaining zucchini, then the buffalo chicken, and finishing with the remaining cream cheese mixture. 1. Cover the casserole with aluminum foil. This keeps moisture in during the first baking phase. 2. Bake in the preheated oven for 25 minutes. This softens the zucchini and warms the chicken. 3. Remove the foil and bake for an additional 10-15 minutes. This will make the cheese bubbly and light golden. 4. Once it’s done, let the casserole rest for 5-10 minutes. This helps the layers set before you serve. You can find the full recipe in the article to get all the details! To get the best out of your casserole, slice the zucchini thin. Aim for even rounds about 1/4 inch thick. This helps them cook evenly and blend well with the other flavors. When layering, place half of the zucchini on the bottom of the dish. This creates a nice base. Alternate layers with the buffalo chicken mixture and cream cheese mix. Repeat this until you use all your ingredients. Proper layering makes every bite delicious. Adjusting the spice level is easy. For a mild dish, use a milder buffalo sauce. Medium sauce adds a nice kick, and for heat lovers, hot sauce is the way to go. You can also spice it up with garlic powder or smoked paprika. A sprinkle of cayenne pepper can add extra heat. Always taste as you go to find the perfect balance. To save time, consider using rotisserie chicken. It’s already cooked and shredded, cutting down on prep time. You can also prep components ahead of time. Slice the zucchini and mix the chicken with buffalo sauce a day before. Keeping these items in the fridge makes it easy to assemble your casserole when you’re ready. This method also helps flavors meld together nicely. For the full recipe, check out the details above. {{image_2}} You can switch up the protein in this dish. Turkey or beef works great instead of chicken. Just make sure to cook it first. For a vegetarian option, use chickpeas or lentils. These options keep the dish hearty and tasty. Want to boost the flavor? Try adding spices like paprika or cumin. They give a warm kick. You can also mix in veggies like bell peppers or spinach. These add color and nutrition to your casserole. Pair this casserole with a fresh salad or crusty bread. These sides balance the meal and add crunch. For garnishing, sprinkle with chopped green onions or fresh herbs. This touch makes your dish more appealing and tasty. Check out the Full Recipe for more details! To keep your leftover Buffalo Chicken Zucchini Casserole fresh, first let it cool completely. Then, transfer it to an airtight container. This helps prevent moisture loss and keeps flavors intact. If you have a lot, you can divide it into smaller containers for easy portions. Glass or BPA-free plastic containers work great for storage. When reheating, the oven is the best choice. Preheat it to 350°F (175°C). Place your casserole in a baking dish and cover it with foil. This keeps moisture in. Bake for about 20 minutes or until heated through. If you use a microwave, warm it in 30-second intervals. Stir between each interval to avoid hot spots. Add a splash of water if it seems dry. To freeze before baking, assemble the casserole but don’t bake it. Cover it tightly with plastic wrap and then with foil. This helps prevent freezer burn. Label it with the date. When you’re ready to cook, thaw it in the fridge overnight. Bake it as usual, adding extra time if needed. Enjoy your delicious meal any day of the week! For full details, refer to the Full Recipe. How long can I store leftovers? You can store leftovers in the fridge for up to three days. Make sure to place them in an airtight container. If you want to keep them longer, consider freezing them. Can I make this casserole ahead of time? Yes, you can prepare this casserole a day in advance. Just assemble it, cover it, and store it in the fridge. When you're ready to bake, just add a few extra minutes to the cook time if it’s cold from the fridge. Can I use raw chicken for this recipe? I do not recommend using raw chicken. The recipe needs cooked, shredded chicken for the best flavor and texture. You can use rotisserie chicken for convenience. What if I can't find buffalo sauce? If you can't find buffalo sauce, you can make your own. Mix hot sauce with melted butter for a quick substitute. Adjust the heat to your liking. Is this recipe gluten-free? Yes, this recipe is gluten-free if you use gluten-free buffalo sauce. Always check the labels to be sure of your ingredients. Can I make it dairy-free? You can make this casserole dairy-free by using dairy-free cream cheese and yogurt. There are great options available in stores now. This blog post provided a complete guide to making a buffalo chicken casserole. You learned about key ingredients, step-by-step instructions, and helpful tips. I shared variations for protein and flavor, plus storage and reheating advice. Embrace this tasty dish, and feel free to customize it. Enjoy your cooking adventure, and make it your own!

Buffalo Chicken Zucchini Casserole Cozy Comfort Food

Looking for a delicious way to enjoy comfort food? My Buffalo Chicken Zucchini Casserole is here to save the day!

To make a great zucchini bread, gather these key items: - 2 medium zucchinis, grated - 1 cup all-purpose flour - 1/2 cup whole wheat flour - 3/4 cup granulated sugar - 1/4 cup brown sugar - 1/2 cup vegetable oil - 2 large eggs - 1 teaspoon vanilla extract These ingredients mix well to create a soft, moist bread. The zucchinis add natural sweetness and moisture. Using a mix of flours gives the bread a nice texture. The sugars balance the flavors perfectly. For a perfect rise and flavor, include these: - 1 teaspoon baking soda - 1/2 teaspoon baking powder - 1/2 teaspoon salt - 1 teaspoon ground cinnamon - 1/2 teaspoon ground nutmeg Baking soda and baking powder help the bread rise. Salt enhances the overall flavor. Spices like cinnamon and nutmeg add warmth and depth. These elements make each bite delightful. You can make your zucchini bread even more special with these: - 1/2 cup chopped walnuts - 1/2 cup chocolate chips These add-ins bring in extra flavor and texture. Walnuts add crunch, while chocolate chips sweeten the bread. Feel free to mix and match based on your taste. For the full recipe, check out the Zesty Zucchini Bread Delight. It guides you through each step to create this tasty treat. - Preheat your oven to 350°F (175°C). - Grease a 9x5 inch loaf pan with a little oil or butter. Getting the oven ready is key. This step helps the bread bake evenly. Greasing the pan helps the bread come out easily after baking. - Combine grated zucchini, oil, sugars, eggs, and vanilla. - Whisk together flours, baking soda, baking powder, salt, and spices. In a bowl, mix the grated zucchini with oil and sugars. Add the eggs and vanilla. Make sure it is well mixed. In another bowl, mix the flours with baking soda, baking powder, salt, cinnamon, and nutmeg. This helps add flavor and lift to the bread. - Gradually mix dry ingredients into wet ingredients. - Fold in optional add-ins. - Pour batter into prepared pan and bake. Slowly add the dry mix to the wet mix. Stir gently to keep it light. If you like, fold in walnuts or chocolate chips. Pour the batter into the pan. Bake for 50 to 60 minutes. A toothpick should come out clean when it's done. This recipe is full of flavor and easy to follow. For more details, check the Full Recipe. How to prevent overmixing: Overmixing can make your zucchini bread tough. Mix the wet and dry ingredients until just combined. A few lumps are okay. This keeps the bread light and fluffy. Ensuring proper baking temperature: Always preheat your oven to 350°F (175°C). An oven that is too hot can burn the outside. If it’s too cold, the bread may not rise well. Use an oven thermometer for accuracy. Tips on choosing the right zucchini: Look for firm, small zucchinis. They have more flavor and less moisture. If the zucchini is large, it may be watery and less tasty. Grate the zucchini and squeeze out excess moisture with a clean towel before mixing it in. Alternatives for oil: You can use applesauce or Greek yogurt instead of oil. These options add moisture and cut down on fat. They will change the flavor slightly but keep the bread moist. Best ways to serve zucchini bread: Slice the bread warm or at room temperature. It is great plain or with a spread. Serve it as a breakfast item or a snack. Suggested toppings and accompaniments: Top with butter, cream cheese, or a sprinkle of cinnamon. You can also enjoy it with a cup of tea or coffee. Add some fresh fruit on the side for a colorful plate. {{image_2}} Zucchini bread is fun to make and easy to change. You can add different flavors and ingredients to make it your own. Here are some great ideas to try. You can switch up the taste of your zucchini bread in many ways. One option is to make a savory zucchini bread. Just add herbs and cheese. This gives your bread a rich and tasty flavor. Another fun idea is to make a spiced zucchini bread. Use pumpkin spice to add warmth. This is perfect for fall and gives a cozy feeling with every bite. If you want a gluten-free option, you can use gluten-free flour. There are many types available. Just check the label to ensure it's suitable for baking. For a healthier choice, think about sugar substitutes. You can use honey or maple syrup instead of sugar. These natural options add sweetness without the extra calories. Don’t stop at bread! You can turn the recipe into zucchini muffins. Just pour the batter into muffin tins instead of a loaf pan. This is great for snacks or breakfast on the go. You can also make zucchini bread puddings and desserts. Just cube your bread and mix it with eggs and milk. Bake it until it’s golden and delicious. This is a great way to use leftover zucchini bread. For the full recipe, check the Zesty Zucchini Bread Delight section! To keep your zucchini bread fresh, store it at room temperature. Wrap it in plastic wrap or foil. This helps keep it moist. Place it in an airtight container for added protection. If you want to refrigerate it, know that it can dry out. Wrap it well, but try to eat it within a week. The fridge can extend its life, but it may lose some flavor. Freezing zucchini bread is a great way to save it for later. First, let the bread cool completely. Then, wrap it tightly in plastic wrap. Use a layer of foil on top for extra protection. This helps prevent freezer burn. To thaw, place the wrapped bread in the fridge overnight. If you’re in a hurry, you can thaw it at room temperature for a few hours. For the best texture, avoid microwaving it. Zucchini bread lasts about 3 to 4 days at room temperature. In the fridge, it can last up to a week. When frozen, it can stay good for about 3 months. Watch for signs of spoilage. If you see mold or smell a sour odor, it’s time to toss it. Always trust your senses to keep your zucchini bread delightful and safe to eat. Yes, you can use yellow squash. They have similar moisture and texture. You might notice a slight change in taste, but it will still be delicious. Grate the yellow squash just like you would zucchini. It will work great in the recipe for Zesty Zucchini Bread Delight. Dense zucchini bread can be a letdown. Common causes include too much flour or overmixing the batter. Be careful when measuring flour; scoop it lightly and level it off. Overmixing can lead to a tough texture. Mix until just combined for the best outcome. If using larger zucchinis, they may hold more water. Squeeze out excess moisture before adding it to your batter. Absolutely! If you want to skip the eggs, there are great substitutes. You can use 1/4 cup of unsweetened applesauce for each egg. Mashed bananas or silken tofu also work well. Just remember that these swaps can change the flavor a bit. Experiment to find what you like best. In this blog post, we explored the key ingredients, step-by-step instructions, and tips for delicious zucchini bread. You learned how to mix dry and wet ingredients and avoid common mistakes. We also discussed creative variations and storage tips to keep your bread fresh. Zucchini bread is easy to make and full of flavor. Try it with your favorite add-ins to make it your own. Enjoy baking and sharing this tasty treat!

Ingredient Zucchini Bread Delightful and Simple Recipe

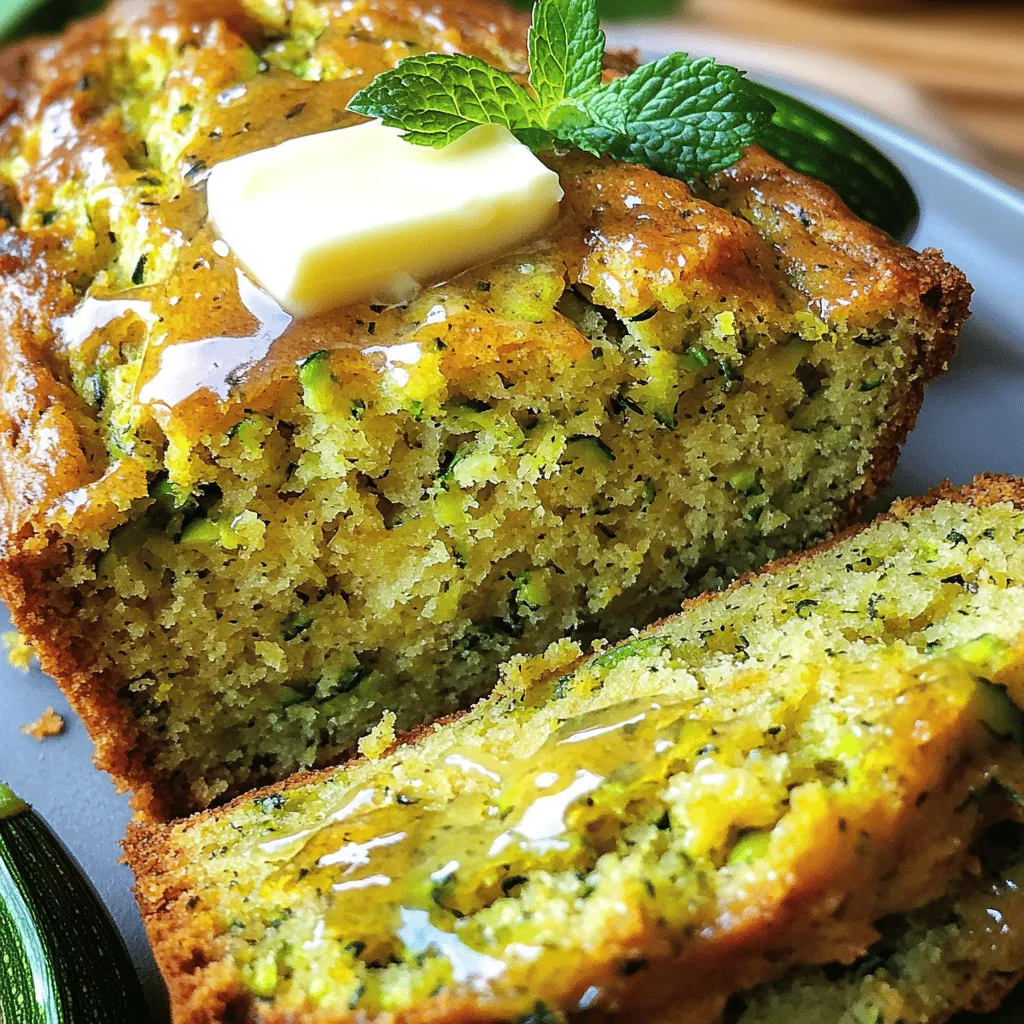
Do you want a simple, tasty treat that’s also healthy? Look no further than my delightful zucchini bread recipe! Packed

To make delicious Zucchini Lime Bread, gather these simple ingredients: - 2 cups grated zucchini - 1 cup all-purpose flour - 1 cup whole wheat flour - 1 teaspoon baking soda - 1/2 teaspoon baking powder - 1/2 teaspoon salt - 1 teaspoon ground cinnamon - 1/2 teaspoon ground nutmeg - 1 cup granulated sugar - 1/2 cup packed brown sugar - 1/2 cup vegetable oil - 3 large eggs - Zest of 2 limes - 2 tablespoons fresh lime juice - 1 teaspoon vanilla extract - 1/2 cup chopped walnuts or pecans (optional) These ingredients combine to create a moist and zesty bread. The zucchini adds moisture and nutrients. The lime zest and juice give it a refreshing flavor. You can adjust the sugars for sweetness, based on your taste. I love adding nuts for crunch, but it's not a must. Check the Full Recipe for detailed steps on how to mix and bake. Enjoy the process! - Preheat your oven to 350°F (175°C). Grease a 9x5 inch loaf pan. - Grate 2 medium zucchinis. Mix the grated zucchini with a pinch of salt. Let it sit for 10 minutes to release moisture. Squeeze out any extra liquid. - In a large bowl, mix all-purpose flour, whole wheat flour, baking soda, baking powder, salt, cinnamon, and nutmeg. Whisk until well combined. - In another bowl, combine granulated sugar, brown sugar, and vegetable oil. Mix until blended. Add eggs, lime zest, lime juice, and vanilla extract. Beat until smooth. - Carefully fold the dry mixture into the wet mixture. Mix until just combined. It’s okay if it’s lumpy. - Gently fold in the grated zucchini and chopped nuts, if using. Pour the batter into the prepared loaf pan. - Bake for 55-65 minutes. Check doneness by inserting a toothpick. If it comes out clean, it's done. - Remove from the oven and cool in the pan for 10 minutes. Then, transfer to a wire rack to cool completely. For a full recipe, check the details above. - Ensuring uniform baking: Start by preheating the oven to 350°F. Greasing your loaf pan helps the bread release easily. To promote even baking, place the pan in the center of the oven. - Evaluating doneness: To check if your bread is done, insert a toothpick into the center. If it comes out clean, your bread is ready. If it has batter on it, bake for a few more minutes. - Adding lime glaze: A lime glaze adds a sweet and tangy finish. Mix powdered sugar with fresh lime juice until smooth. Drizzle it over the cooled bread for a zesty kick. - Including spices or nuts: You can add spices like ginger or cardamom for extra warmth. Chopped walnuts or pecans add a nice crunch and nutty flavor. - Best serving methods: Slice the bread and serve it on a wooden cutting board. It tastes great warm or toasted. - Pairings with beverages: Enjoy your zucchini lime bread with tea or coffee. It also pairs well with a fresh glass of lemonade for a bright flavor contrast. {{image_2}} You can make this zucchini lime bread even more fun. Try adding chocolate chips for a sweet twist. Just fold in 1 cup of semi-sweet or dark chocolate chips before baking. They melt and create pockets of gooey goodness. You can also mix in fruits like blueberries. Blueberries add a burst of flavor and color. Use 1 cup of fresh or frozen blueberries. Just toss them in a little flour before adding them to the batter. This helps them stay suspended in the bread. Want a gluten-free zucchini lime bread? You can easily swap the flour. Use a gluten-free all-purpose flour blend instead. Make sure it has xanthan gum for the best texture. Baking time might change, so keep an eye on it. Start checking for doneness a few minutes early. You want the toothpick to come out clean. If you prefer a vegan zucchini lime bread, replace eggs with flax eggs. Mix 1 tablespoon of ground flaxseed with 2.5 tablespoons of water for each egg. Let it sit for a few minutes to thicken. For oils, consider using coconut oil or applesauce. Coconut oil gives a rich flavor, while applesauce adds moisture and sweetness. Choose what suits your taste best. Room temperature storage Store zucchini lime bread in an airtight container at room temperature. This keeps it fresh for up to three days. Make sure to keep it away from sunlight and heat. Refrigeration tips If you want to keep it longer, place the bread in the fridge. Wrap it tightly in plastic wrap or foil. It will stay fresh for about a week this way. Just remember to let it come to room temperature before serving. Freezing recommendations You can freeze zucchini lime bread for up to three months. Wrap it in plastic wrap or foil, then place it in a freezer bag. This prevents freezer burn and keeps it safe. Thawing methods To thaw, take it out of the freezer and leave it in the fridge overnight. If you need it fast, you can use the microwave on low power. Just be careful not to overheat it. Enjoy your delicious bread later with ease! To keep zucchini bread moist, follow these tips: - Use fresh, grated zucchini. - Squeeze out excess water before mixing. - Add oil for richness. - Avoid over-mixing the batter. These steps help retain moisture and create a tender loaf. The oil and zucchini work together to give you that soft texture. Remember, fresh ingredients are key! Yes, you can use frozen zucchini! Just follow these steps: - Thaw the zucchini first. - Squeeze out any extra water. - Mix it into your batter as you would fresh zucchini. Frozen zucchini maintains its flavor and nutrients. It’s a great way to use leftover zucchini from your garden or store. You can easily make zucchini bread healthier with these swaps: - Replace all-purpose flour with whole wheat flour. - Use less sugar or substitute with honey. - Add nuts or seeds for extra fiber. - Use applesauce instead of some oil. These changes keep the bread tasty while boosting its nutrition. You can enjoy a slice without guilt! Zucchini Lime Bread pairs well with: - Fresh fruit like berries or citrus. - A dollop of yogurt for creaminess. - A light salad for a refreshing bite. - A splash of herbal tea or coffee. These options match the bread’s zesty flavor. They add balance to your meal or snack time. Check out the Full Recipe for more tips! In this blog post, we explored how to make delicious Zucchini Lime Bread. We covered all the key ingredients and shared step-by-step instructions for mixing and baking. You learned tips for perfect baking, serving suggestions, and variations to try. Zucchini Lime Bread is versatile and can fit many diets. Whether you want it moist or gluten-free, there are options for you. With these recipes and tips, you can enjoy a tasty treat that’s both healthy and fun to make. Happy baking!

Zucchini Lime Bread Delightful and Simple Recipe

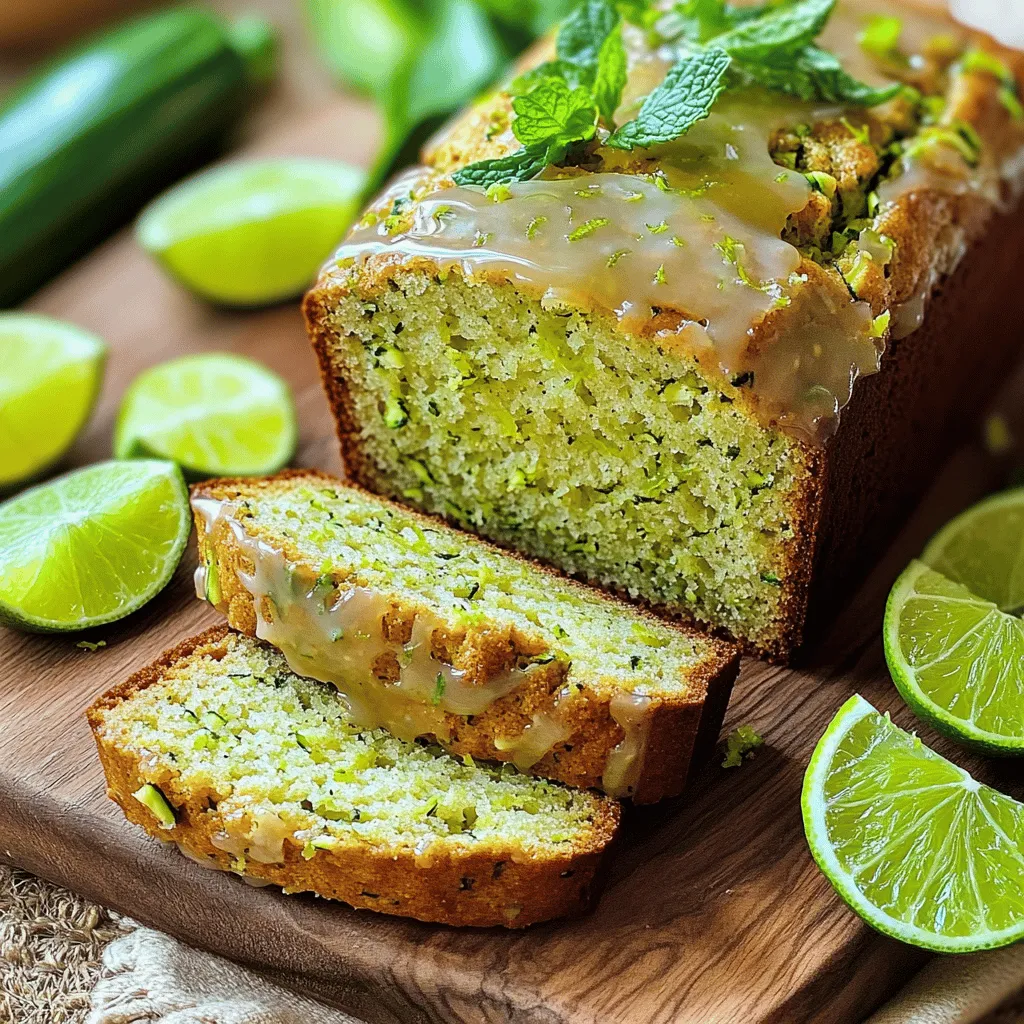
Welcome to my kitchen! Today, we’re diving into a delightful and simple recipe for Zucchini Lime Bread. This tasty treat

- 1 cup grated zucchini (about 1 medium zucchini) - 1 cup canned pumpkin puree - 1/2 cup vegetable oil - 1 cup brown sugar, packed - 1/2 cup granulated sugar - 3 large eggs The main ingredients set the stage for this bread. Grated zucchini gives moisture and texture. Canned pumpkin puree adds a rich flavor and a beautiful color. The oils and sugars create a sweet and tender crumb, while the eggs bind everything together. - 2 cups all-purpose flour - 1 teaspoon baking powder - 1 teaspoon baking soda - 1 teaspoon ground cinnamon - 1/2 teaspoon ground nutmeg - 1/2 teaspoon ground ginger - 1/2 teaspoon salt The dry ingredients balance the wet ones. All-purpose flour gives structure. Baking powder and baking soda help the bread rise. The spices add warmth and depth, making each bite feel cozy and comforting. - 1 cup chopped walnuts or pecans (optional) - 1/2 cup chocolate chips (optional for sweetness) Optional add-ins let you customize this bread to your taste. Nuts add crunch and richness. Chocolate chips bring sweetness and a fun twist. You can mix and match these to create your perfect loaf. For the full recipe, check out the complete guide. - Preheating the Oven Start by preheating your oven to 350°F (175°C). This ensures even baking. - Greasing or Lining the Loaf Pan Next, get a 9x5 inch loaf pan. Grease it with butter or cooking spray. You can also line it with parchment paper for easy removal later. - Combining Zucchini, Pumpkin, Oil, and Sugars In a large bowl, mix 1 cup of grated zucchini and 1 cup of canned pumpkin puree. Add 1/2 cup of vegetable oil, 1 cup of brown sugar, and 1/2 cup of granulated sugar. Stir until everything is mixed well. - Adding Eggs Crack 3 large eggs into the bowl. Add them one at a time, mixing well after each egg. This makes the batter smooth and creamy. - Sifting and Combining with Wet Mixture In another bowl, sift together 2 cups of all-purpose flour, 1 teaspoon of baking powder, 1 teaspoon of baking soda, 1 teaspoon of ground cinnamon, 1/2 teaspoon of ground nutmeg, 1/2 teaspoon of ground ginger, and 1/2 teaspoon of salt. Gradually add this mix to the wet ingredients. Stir gently until just combined. - Folding in Optional Add-ins If you want, fold in 1 cup of chopped walnuts or pecans and 1/2 cup of chocolate chips. These add extra flavor and crunch. - Pouring the Batter into the Pan Now, pour your batter into the prepared loaf pan. Smooth the top with a spatula for an even bake. - Baking Time and Testing for Doneness Place the pan in the oven and bake for 55-65 minutes. To check if it’s done, insert a toothpick in the center. If it comes out clean, your bread is ready. For the full recipe, check the detailed instructions included. Avoiding Overmixing Mix the batter gently. Overmixing can make the bread tough. Stir just until you see no dry flour. It's okay if there are a few lumps. This keeps the bread soft and fluffy. Ensuring Proper Oven Temperature Always preheat your oven to 350°F (175°C). An accurate temperature ensures even baking. Use an oven thermometer to check. If your oven runs hot, adjust the time. A well-baked loaf has a golden top and a firm center. Recommended Spices for Extra Flavor Add spices to boost the taste. Ground cinnamon gives warmth. Nutmeg adds depth. Ginger brings a little zing. You can also try cardamom for a unique twist. A mix of these spices can change the bread from good to amazing. Ideas for Additional Mix-ins Consider adding extras for fun flavors. Chopped walnuts or pecans add crunch. Chocolate chips make it sweeter. Dried cranberries or raisins can add a fruity note. Mix in one or two of these for a tasty surprise. Serving Ideas: Warm or Room Temperature Serve the bread warm for the best taste. It can also be good at room temperature. Slice it thick or thin, based on your preference. Each slice can show off the soft texture. Garnishing Options Top your slices with a light dusting of powdered sugar. For a richer taste, add cream cheese spread. A sprinkle of chopped nuts can add color and texture. These small touches can make your bread look gourmet. {{image_2}} You can change the flour for a healthier bread. Whole wheat flour adds fiber. Almond flour gives a nutty taste and is gluten-free. Both options work well in the recipe. Just keep the same amount as the all-purpose flour. Adding spices can change the flavor of your bread. Try allspice or cardamom for a warm twist. A dash of cloves also adds depth. You can also mix in dried fruits like raisins or cranberries. These add sweetness and chewiness. For gluten-free bread, use a gluten-free flour mix. Look for one that measures cup for cup like all-purpose flour. If you want a vegan version, replace eggs with flaxseed meal. Mix 1 tablespoon of flaxseed with 3 tablespoons of water. Let it sit for a few minutes until it gels. This will bind your ingredients well. Each of these options helps everyone enjoy pumpkin zucchini bread. For the full recipe, check the main section. To keep your pumpkin zucchini bread fresh, wrap it tightly in plastic wrap. Store it at room temperature for up to three days. This way, you can enjoy it daily without losing flavor. If you want, place it in an airtight container. This helps keep the bread moist and tasty. Always check for any signs of mold before eating. For longer storage, freezing is your best option. Slice the bread first, then wrap each slice in plastic wrap. Place the wrapped slices in a freezer bag. This method preserves the flavor and texture well. You can freeze the bread for up to three months. When you want to enjoy it again, just thaw it in the fridge overnight. Reheating pumpkin zucchini bread is easy. You can use the oven or microwave. If you prefer the oven, set it to 350°F (175°C). Heat the slices for about 10 minutes. This warms the bread and revives its texture. If you use the microwave, heat each slice for about 15-20 seconds. Enjoy your bread warm, possibly with butter or cream cheese. For more details on making this treat, check the Full Recipe. You can test if the bread is done by using a toothpick. Insert the toothpick into the center of the bread. If it comes out clean, the bread is ready. If it has wet batter, it needs more time. I usually check around the 55-minute mark. Baking times can vary, so keep an eye on it. Yes, you can use fresh zucchini, but there are some differences. Grated zucchini blends well into the batter. Fresh zucchini may add more moisture. If you use fresh, make sure to shred it finely. You can also squeeze out some liquid before adding it to the mix. You can enjoy this bread with many tasty options. Here are some great pairings: - Cream cheese spread - Honey or maple syrup - Butter or margarine - A sprinkle of powdered sugar These spreads add flavor and make your meal special. You can also serve it with a warm drink, like coffee or tea. For more ideas, check out the Full Recipe. This article covered how to make delicious pumpkin zucchini bread. We explored key ingredients, from zucchini and pumpkin to sugars and eggs. Then, I shared step-by-step instructions that guide you through mixing, baking, and perfecting your loaf. You learned tips for flavor and texture, as well as variations to fit your taste. Don’t forget storage info to keep it fresh. Enjoy baking and sharing this delightful bread with family and friends!

Pumpkin Zucchini Bread Flavorful and Simple Recipe

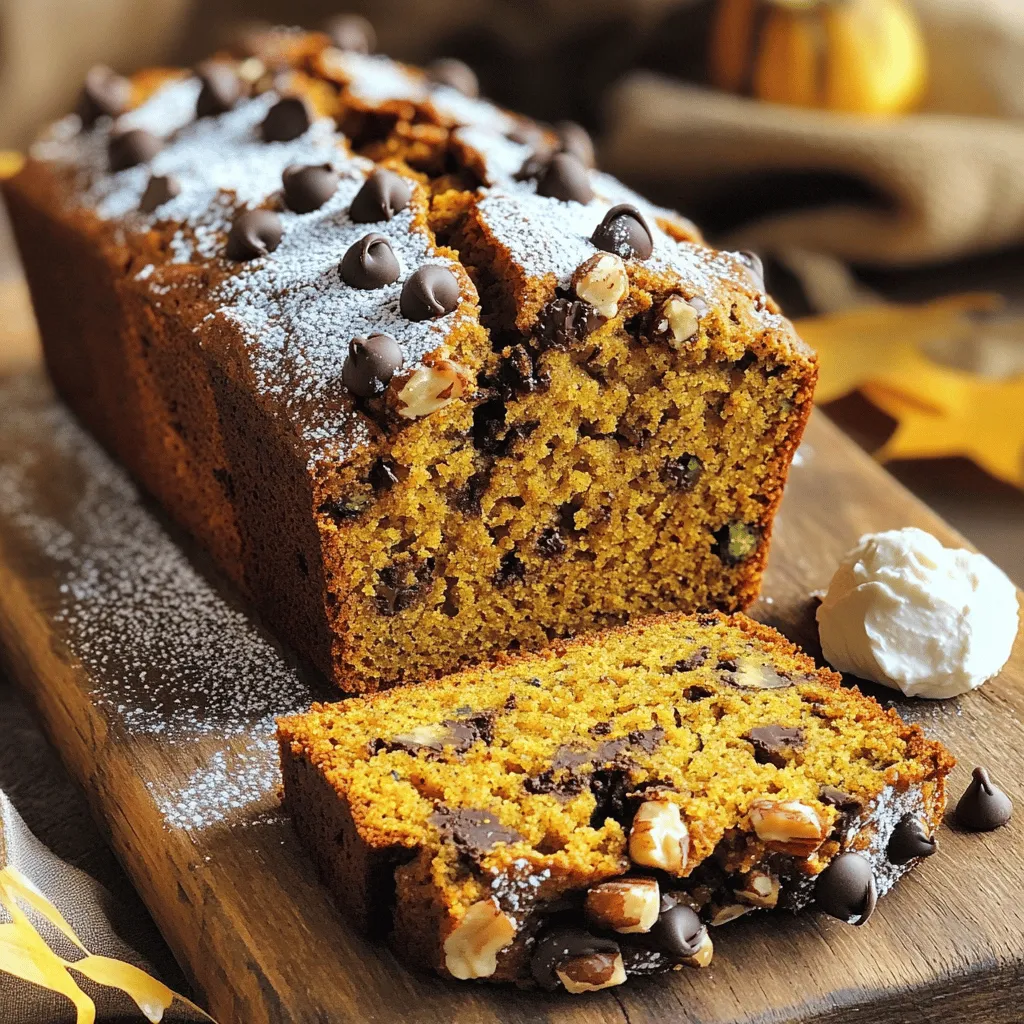
Get ready to elevate your baking game with my Pumpkin Zucchini Bread recipe! This vibrant loaf combines the warm flavors

- 4 medium yellow squash - 1 cup quinoa, rinsed - 2 cups vegetable broth - 1 cup cherry tomatoes, halved - 1 cup black beans, rinsed and drained - 1 cup corn kernels (fresh or frozen) - 1 teaspoon cumin - 1 teaspoon smoked paprika - ½ teaspoon garlic powder - ½ teaspoon onion powder - ½ cup shredded cheese (cheddar or Monterey Jack) - 2 tablespoons olive oil - Salt and pepper to taste - Fresh cilantro, chopped, for garnish Each ingredient plays a key role in making the stuffed yellow squash both tasty and healthy. Yellow squash brings a lovely texture. Quinoa offers protein and fiber, making this dish hearty. Cherry tomatoes add a burst of flavor, while black beans provide more protein. Corn gives sweetness and crunch. Spices like cumin and smoked paprika add warmth. Garlic and onion powders boost flavor without overpowering. Cheese adds creaminess and richness. Olive oil helps in cooking and adds healthy fats. Finally, fresh cilantro garnishes the dish, adding color and freshness. - Baking dish - Medium saucepan - Large mixing bowl - Spoon for scooping Using the right tools makes cooking easier. A baking dish is essential for holding the squash. A medium saucepan cooks the quinoa well. A large bowl mixes all the filling ingredients easily. A spoon helps scoop out the squash and fill it up. You can find most of these tools in any kitchen. They help you make this dish quick and fun! For a full guide, check the Full Recipe. 1. Preheat your oven to 375°F (190°C). This helps the squash cook evenly. 2. Slice the yellow squash in half lengthwise. Use a spoon to scoop out the seeds. This creates little boats. Place them cut side up in a baking dish. 3. In a medium saucepan, add 1 cup of rinsed quinoa and 2 cups of vegetable broth. Bring this mixture to a boil. Then, lower the heat to low and cover it. Cook for about 15 minutes. The quinoa should be fluffy and the broth should be absorbed. 1. In a large bowl, mix the cooked quinoa, halved cherry tomatoes, rinsed black beans, corn, cumin, smoked paprika, garlic powder, onion powder, and half of the shredded cheese. 2. Season this mixture with salt and pepper to taste. 3. Spoon this tasty filling into the hollowed-out yellow squash halves. Make sure to pack it well and mound it slightly on top. 4. Drizzle olive oil over the stuffed squash. Cover the baking dish with foil. Bake for 25 minutes. 5. After that, remove the foil. Sprinkle the remaining shredded cheese on top of the squash. Bake for an additional 10 minutes. The cheese should melt and the squash should be tender. 1. Remove the stuffed squash from the oven and let it cool slightly. 2. Garnish with chopped fresh cilantro before serving. This adds a nice touch and flavor. - Perfectly cook quinoa: Rinse your quinoa well to remove any bitter taste. Use two cups of vegetable broth for each cup of quinoa. Bring it to a boil, then lower the heat and cover. Cook for about 15 minutes until fluffy. Fluff it with a fork for the best texture. - Tips for cutting squash: Use a sharp knife to cut the squash. Slice it in half lengthwise. Scoop out the seeds gently with a spoon. This creates a nice boat for your filling. Always cut on a stable surface to prevent slips. - Suggestions for spices and seasonings: For a punch of flavor, use cumin and smoked paprika. Garlic and onion powder add depth too. Feel free to adjust the spices to your liking. If you want more heat, add chili powder or red pepper flakes. - Adding protein options: You can add cooked ground turkey, chicken, or beef for extra protein. If you want a vegetarian option, try adding lentils or tofu. These choices make the dish heartier and more filling. - What to serve with stuffed squash: Stuffed yellow squash pairs well with a fresh salad. A side of rice or quinoa also works great. Think about adding a dollop of yogurt or sour cream for creaminess. - Ideal accompaniments for a well-rounded meal: Consider serving a light soup, like tomato basil. Grilled vegetables or crusty bread can also round out your plate. These sides will balance the meal and add more flavors. {{image_2}} You can easily adapt stuffed yellow squash to fit your diet. For a gluten-free version, skip any gluten-containing ingredients. The recipe mostly uses quinoa, which is naturally gluten-free. You can also use gluten-free breadcrumbs if you want some crunch. If you follow a vegan diet, swap cheese for a plant-based alternative. Nutritional yeast can add a cheesy flavor without dairy. Use vegetable broth to cook the quinoa and ensure all filling ingredients are vegan-friendly. Feel free to change up the filling ingredients. Instead of black beans, try chickpeas or lentils for a new texture. You can also use other veggies, like zucchini or bell peppers. They add color and flavor, making your dish unique. When it comes to cheese, cheddar or Monterey Jack works well. But you can also use feta or goat cheese for a tangy twist. Each cheese brings its own flavor, so don’t be afraid to experiment! Preparing stuffed yellow squash in advance can save you time. You can cook the quinoa and mix the filling a day ahead. Just keep it in the fridge until you are ready to stuff the squash. If you want to freeze stuffed squash, let it cool completely. Wrap each piece tightly in plastic wrap, then place them in a freezer bag. When you're ready, thaw them overnight in the fridge before baking. This way, you have a quick meal ready to go! After enjoying stuffed yellow squash, you might have some leftovers. To keep them fresh, store them in an airtight container in the fridge. Make sure the squash is completely cool before sealing. This helps prevent moisture buildup. When you want to reheat, place it in the microwave or oven. If using the oven, cover it with foil to avoid drying out. If you want to save stuffed squash for later, freezing is a great option. First, let the squash cool completely. Wrap each piece tightly in plastic wrap or foil. Then, place them in a freezer-safe bag or container. This will help keep them fresh for about three months. To thaw, move the squash to the fridge overnight. Reheat it in the oven until warmed through, about 20 minutes at 350°F (175°C). Stuffed yellow squash lasts about 4 to 5 days in the fridge. Always check for signs of spoilage before eating. Look for any strange smells or changes in color. If the texture seems off or slimy, it’s best to toss it. Remember, safe food storage helps you enjoy every bite of your delicious meal! How do I prevent the squash from becoming mushy? To keep your squash firm, don’t overcook it. First, bake it just until tender. You can also scoop out less flesh when making the boats. This helps prevent excess moisture. Can I prepare stuffed squash ahead of time? Yes, you can prepare the stuffed squash ahead. Just stuff the squash and cover it in the fridge. Bake it when you’re ready to eat. This makes for a quick meal! What are the nutritional benefits of stuffed yellow squash? Stuffed yellow squash is low in calories and high in fiber. It’s rich in vitamins A and C. The quinoa adds protein, while beans boost fiber. This dish is healthy and filling. How many calories are in a serving? Each serving has about 250 calories, depending on your cheese choice. This makes it a great option for a light meal or side dish. Can I grill stuffed yellow squash instead of baking? Yes, grilling stuffed squash adds a nice smoky flavor. Just wrap them in foil to keep the filling moist. Grill them over medium heat for about 15-20 minutes. How can I make stuffed squash more flavorful? To enhance flavor, try adding fresh herbs like basil or parsley. You can also mix in some spices, like chili powder or oregano, for an extra kick. Experiment to find your favorite! This blog post covers an easy and tasty recipe for stuffed yellow squash. You learned about fresh ingredients like quinoa, black beans, and spices. I shared clear steps for preparing and baking your dish. Plus, you discovered tips for storing leftovers and meal prep options. In closing, this dish is fun to make and adaptable. You can swap ingredients for your needs. Enjoy cooking and sharing this healthy, colorful meal with friends and family!

Stuffed Yellow Squash Savory and Easy Recipe

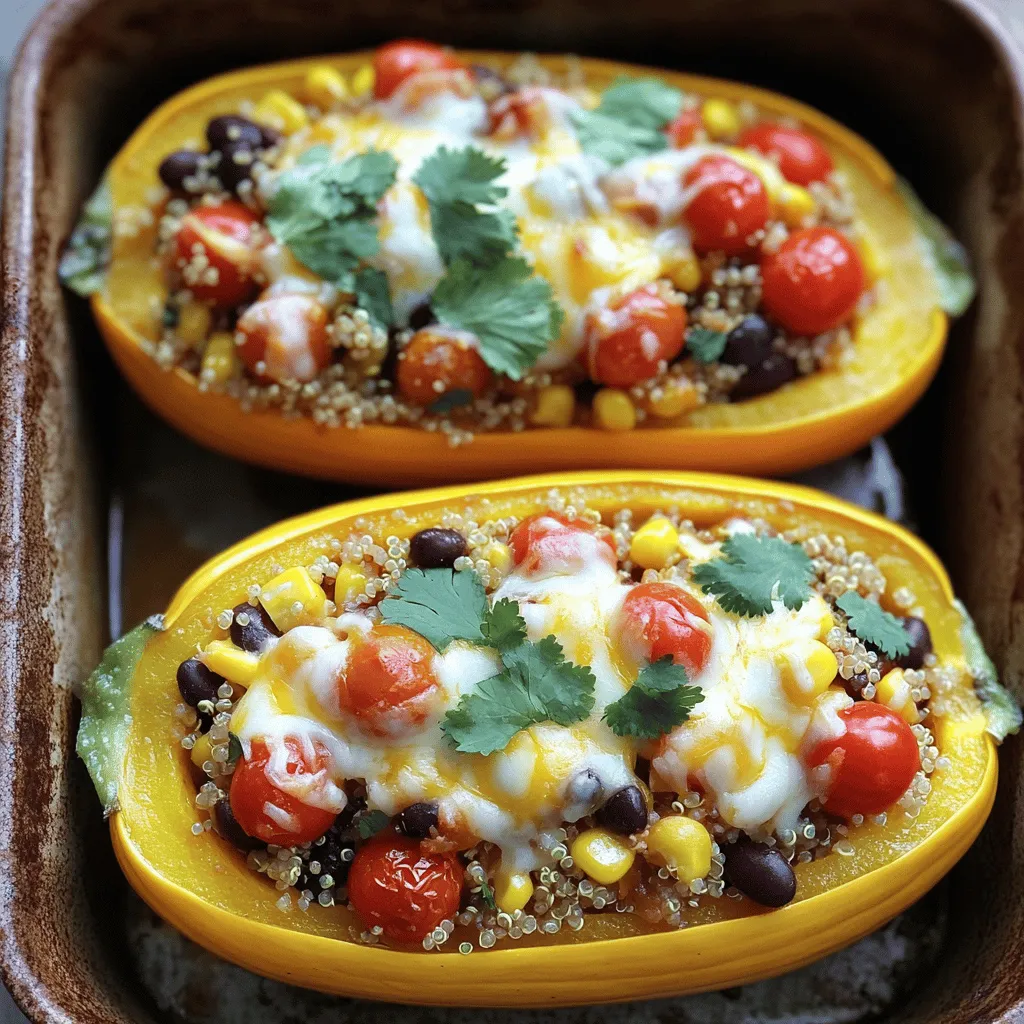
Do you want a simple yet delicious way to enjoy summer squash? This Stuffed Yellow Squash recipe is packed with

Older posts
Newer posts
← Previous Page1 … Page6 Page7 Page8 … Page49 Next →

dsad

© 2025 savorystride • Built with GeneratePress

Our Policies

  • Copyright Policy
  • Cookie Policy
  • GDPR Policy
  • Privacy Policy
  • Disclaimer
  • Terms Of Use

More Information

  • Home
  • About
  • Contact
  • Appetizers
  • Dessert
  • Dinner
  • Drinks
©2025, savorystride About Back To Top