Skip to content
DisclaimerTerms Of UseGDPR PolicyCookie Policy

savorystride

  • Home
  • Drinks
  • Appetizers
  • Dinner
  • Dessert
  • About
  • Contact
  • Privacy Policy
DisclaimerTerms Of UseGDPR PolicyCookie Policy

Hazel

To create these creamy shrimp enchiladas, gather the following key ingredients: - 1 pound medium shrimp, peeled and deveined - 8 small corn tortillas - 1 cup cream cheese, softened - 1 cup shredded cheddar cheese, plus extra for topping - 1 cup sour cream - 1 cup salsa verde - 1 teaspoon cumin - 1 teaspoon garlic powder - 1 tablespoon olive oil These ingredients bring great flavor and texture to your dish. You can enhance your meal with these optional garnishes and sides: - Fresh cilantro, chopped (for garnish) - 1 lime, cut into wedges (for serving) These add freshness and a zing to your enchiladas. If you need to make swaps, here are some ideas: - Use cooked chicken or black beans instead of shrimp for a different protein. - Swap cream cheese for Greek yogurt for a lighter option. - Try a different cheese like Monterey Jack for a unique flavor. These substitutions keep your meal exciting and adaptable. For the full recipe, refer to the earlier section. Start by heating olive oil in a skillet over medium heat. Add 1 pound of medium shrimp that you have peeled and deveined. Season the shrimp with 1 teaspoon of cumin, 1 teaspoon of garlic powder, salt, and pepper. Cook until the shrimp turn pink, which takes about 3-4 minutes. Once done, remove them from heat and let them cool slightly. In a mixing bowl, combine 1 cup of softened cream cheese, 1 cup of sour cream, and 1 cup of shredded cheddar cheese. Mix well until it is smooth and creamy. Gently fold the cooked shrimp into this cheese mixture. Make sure it is well combined for a rich filling. Take an 8 small corn tortillas. For each tortilla, place a generous spoonful of the shrimp mixture in the center. Roll the tortilla tightly and place it seam-side down in a greased baking dish. Repeat this until all tortillas are filled and arranged nicely in the dish. After you have placed all the enchiladas in the dish, pour 1 cup of salsa verde evenly over the top. For an extra cheesy crust, sprinkle additional shredded cheddar cheese on top. Now, preheat your oven to 375°F (190°C). Bake the enchiladas in the oven for 20-25 minutes. You will know they are ready when the cheese is melted and bubbly on top. Once you take them out of the oven, let them cool for a few minutes. For a beautiful presentation, garnish with fresh cilantro. Serve with lime wedges on the side for a zesty touch. Enjoy your creamy shrimp enchiladas! For the full recipe, check the section above. To make great enchiladas, keep a few tips in mind. First, cook your shrimp just until pink. Overcooked shrimp can be tough. Use fresh ingredients for the best taste. Warm your tortillas before filling them. This makes them easier to roll. Avoid tearing by gently heating them in a pan. You can take your enchiladas to the next level. Add extra spices like smoked paprika or chili powder for heat. Try mixing in some black beans or corn for added texture. A squeeze of lime juice brightens the flavor. Fresh cilantro adds a nice touch at the end. One common mistake is overfilling your tortillas. This can make rolling difficult. Aim for a generous spoonful, but don’t go overboard. Another mistake is skipping the cheese on top. This creates a delicious, melty crust. Lastly, don’t forget to preheat your oven. This ensures even cooking. For a detailed guide, check the full recipe for creamy shrimp enchiladas. {{image_2}} If you want a vegetarian twist, swap shrimp for black beans or sautéed veggies. Use bell peppers, zucchini, or spinach to add flavor and color. You can keep the creamy sauce by using cream cheese and sour cream, just like in the original recipe. This way, you still get a rich and tasty meal without the seafood. For a lighter version, use low-fat cream cheese and reduced-fat sour cream. You can also replace the cheese with a dairy-free option. Choose corn tortillas for a lower-calorie wrapper. Load up on fresh veggies like diced tomatoes or corn to boost flavor without adding too many calories. This keeps your meal healthy while still being delicious. To add a kick to your enchiladas, mix in some diced jalapeños or use spicy salsa verde. You can also sprinkle chili powder into the shrimp mixture for extra heat. If you love bold flavors, try adding a dash of hot sauce to the cream mixture. Serve with extra lime for a zesty finish that will wake up your taste buds. For the full recipe, check out the Creamy Shrimp Enchiladas section above. To store leftover enchiladas, let them cool first. Place them in an airtight container. You can keep them in the fridge for up to three days. If you want to save them longer, freezing is a good option. To reheat your enchiladas, preheat your oven to 350°F (175°C). Cover the dish with foil to keep them moist. Heat for about 20 minutes. You can also use the microwave. Just warm them for 2-3 minutes, checking often. For freezing, wrap each enchilada tightly in plastic wrap. Then place them in a freezer-safe bag. They can last up to three months in the freezer. When you're ready to eat, thaw them overnight in the fridge. Reheat them as mentioned above for best results. You can find the full recipe for creamy shrimp enchiladas here. Enjoy! If you want to swap shrimp, try chicken or black beans. Both work well in this recipe. For chicken, use cooked, shredded chicken. For black beans, rinse and drain a can before adding. These options give you tasty and filling enchiladas. Yes, you can prepare these enchiladas earlier. Just make them up to the baking step. Cover them well with plastic wrap and place them in the fridge. When you’re ready to bake, take them out and pour on the salsa verde. Bake as directed. This saves time on busy nights. To add spice, use spicy salsa verde or add chopped jalapeños. Another great option is to mix in cayenne pepper or chili powder. Just a pinch can really heat things up. You control the spice level, so make it as hot as you like! Creamy shrimp enchiladas combine tasty shrimp and a rich sauce. You can tweak ingredients or try veggies for a twist. Follow my steps for perfect assembly. Keep our tips in mind to avoid common mistakes. Store leftovers and enjoy later for quick meals. With these ideas, you can make this dish your own. Dive into your kitchen and create a dish that everyone will love!

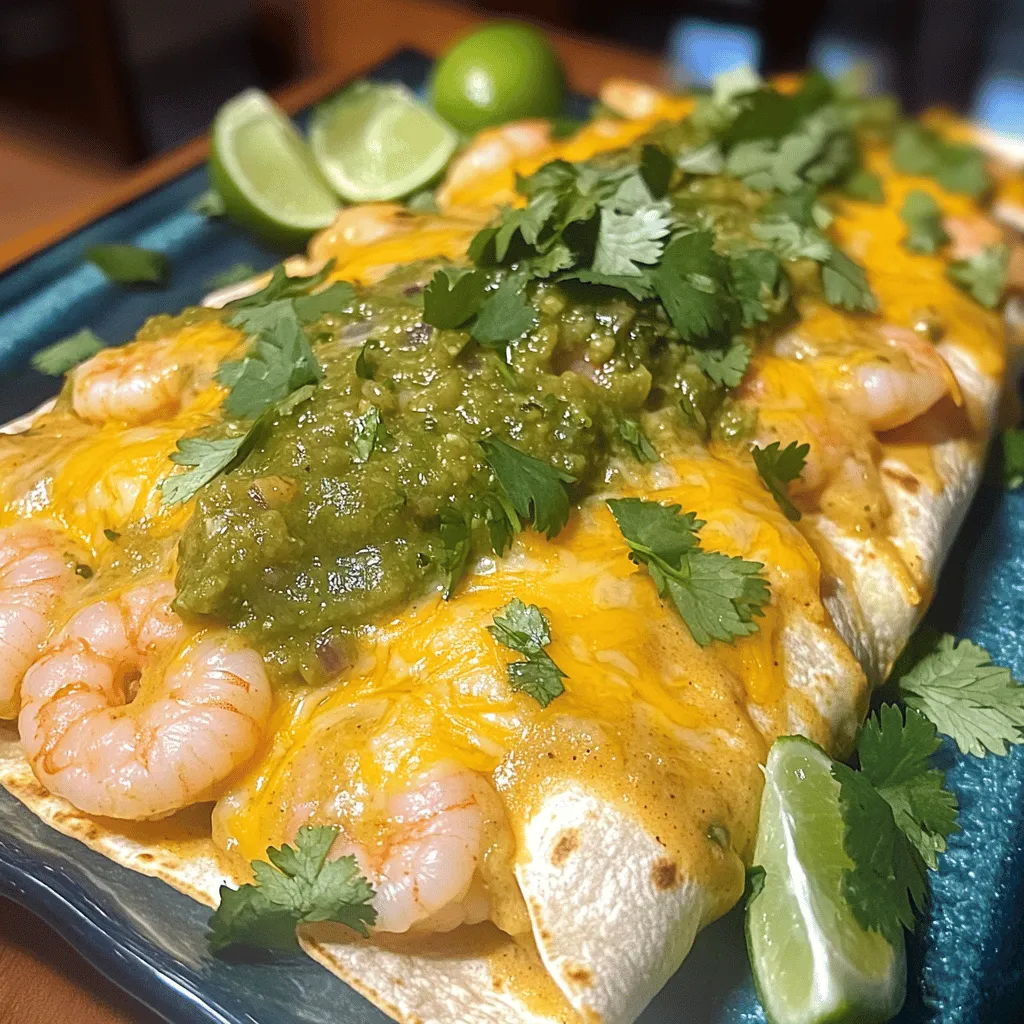
Creamy Shrimp Enchiladas in 40 Minutes Delight

Are you ready to spice up your dinner with a delicious dish? My Creamy Shrimp Enchiladas will delight your taste

To make a great Green Lentil Dal, you need: - 1 cup green lentils, rinsed - 1 medium onion, finely chopped - 2 cloves garlic, minced - 1-inch piece of ginger, grated - 1 green chili, slit (adjust spice level to taste) - 1 teaspoon ground turmeric - 1 teaspoon ground cumin - 1 teaspoon coriander powder - 1 tomato, diced - 3 cups vegetable broth (or water) - 2 tablespoons coconut oil (or ghee) - Salt to taste - Fresh cilantro for garnish - Lemon wedges for serving You can swap some ingredients to fit your taste. If you want a milder dal, skip the green chili. Instead, use a pinch of red chili powder. Want fewer carbs? Try using cauliflower rice instead of lentils. If you don’t have vegetable broth, water works just fine. For a richer flavor, use ghee instead of coconut oil. You can also add spinach or kale for extra greens. Green lentils are not just tasty; they’re also packed with nutrients. They are high in protein and fiber, making them great for a filling meal. Here are some key benefits: - Protein: Offers a great plant-based protein source. - Fiber: Aids digestion and keeps you feeling full. - Iron: Supports healthy blood flow and energy levels. - Vitamins: Rich in B vitamins, which help your body use energy. - Low in fat: A heart-healthy choice. Green lentils also help you stay full longer, making them a great option for hearty meals. Enjoy this perfect blend of taste and nutrition in your Green Lentil Dal! For the complete recipe, check out the Full Recipe. To start, gather your ingredients. Here’s what you need: - 1 cup green lentils, rinsed - 1 medium onion, finely chopped - 2 cloves garlic, minced - 1-inch piece of ginger, grated - 1 green chili, slit (adjust spice level to taste) - 1 teaspoon ground turmeric - 1 teaspoon ground cumin - 1 teaspoon coriander powder - 1 tomato, diced - 3 cups vegetable broth (or water) - 2 tablespoons coconut oil (or ghee) - Salt to taste - Fresh cilantro for garnish - Lemon wedges for serving Next, rinse the lentils in cold water. This removes dust and helps them cook evenly. Chop the onion, garlic, and ginger. Slit the green chili carefully to let its flavor infuse. In a large pot, heat the coconut oil over medium heat. Add the chopped onions and sauté until they become soft and clear, about 5 minutes. Then, stir in the minced garlic, grated ginger, and green chili. Cook for 2 more minutes until the aroma fills the air. Next, add the ground turmeric, cumin, and coriander powder. Stir well to coat the onions. Toast the spices for a minute. Now, add the diced tomato. Cook until it softens, about 3 minutes. Pour in the rinsed green lentils and the vegetable broth. Bring the mixture to a boil. Once it's bubbling, reduce the heat to low. Cover the pot and let it simmer for 25-30 minutes until the lentils are soft. Stir occasionally to keep them from sticking. After cooking, taste and add salt as needed. If the dal is too thick, a splash of broth or water can help. Remove from heat and let it rest for a few minutes. Garnish with fresh cilantro and serve with lemon wedges. For the best texture, keep an eye on the lentils while they cook. Stir them often and check for doneness. If they seem too firm, add a little more broth. If they are too mushy, reduce the cooking time next time. Using fresh ingredients also boosts flavor and texture. Opt for high-quality spices and fresh herbs. This will make your green lentil dal taste even better! Check out the Full Recipe for more details and tips. When making green lentil dal, it's easy to make a few common mistakes. Here are some to watch for: - Not rinsing lentils: Always rinse your lentils before cooking. This helps remove dirt and debris. - Skipping the sauté: Sautéing the onion and spices adds depth. Don't rush this step. - Overcooking: Keep an eye on the cooking time. Overcooked lentils can turn mushy. - Not seasoning enough: Taste as you go. Adding salt at the end can leave your dal bland. You can boost the flavor of your green lentil dal with a few easy tricks: - Fresh herbs: Add fresh cilantro or mint for a vibrant touch. - Acid: A dash of lemon juice brightens the dish. Try adding it just before serving. - Spices: Experiment with spices like smoked paprika or garam masala for extra depth. - Coconut milk: For a creamy texture, stir in coconut milk near the end of cooking. Green lentil dal is a versatile dish. Here are some tasty serving ideas: - With rice: Serve it over basmati rice for a filling meal. - With bread: Pair it with naan or pita for a hearty experience. - With veggies: Add a side of roasted or steamed vegetables for balance. - As a soup: Thin it out with more broth for a cozy soup option. For the full recipe, check the Savory Green Lentil Dal section. {{image_2}} You can make Green Lentil Dal even better by adding vegetables. Carrots, spinach, and bell peppers work well. These veggies add flavor and nutrients. Just chop them up and add them when you mix in the tomatoes. Let them cook until tender. This adds color and makes your meal more filling. Not everyone likes the same spice level. If you want it mild, skip the green chili. For more heat, use two or three chilies. You can also add chili powder for extra kick. Adjusting spices can make your dal perfect for your taste. Remember, start small and add more as needed. You can cook Green Lentil Dal on the stovetop or in an Instant Pot. On the stovetop, it takes about 30 minutes to cook. This method allows you to stir and keep an eye on it. If you use an Instant Pot, it cooks faster, around 15 minutes. Just make sure to add enough liquid. Both methods result in a hearty meal, so choose what works for you! For the complete recipe, check out the Full Recipe section. To keep your green lentil dal fresh, store it in an airtight container. Let it cool completely before sealing. This helps prevent moisture build-up. It’s best to refrigerate it within two hours of cooking. Proper storage keeps it tasty and safe to eat. If you follow these steps, your dal can last for about 4 to 5 days in the fridge. Freezing is a great option if you want to save some dal for later. First, cool the dal completely before freezing. Then, pour it into freezer-safe bags. Flatten the bags for easy stacking. Label the bags with the date. You can freeze green lentil dal for up to 3 months. When you’re ready, just thaw it in the fridge overnight. To reheat, pour the dal into a pot. Heat it over low to medium heat, stirring often. Add a splash of water or broth if it seems too thick. Alternatively, you can use a microwave. Place the dal in a microwave-safe bowl and cover it. Heat in short bursts, stirring in between. This will keep it warm and flavorful. For a tasty touch, add fresh cilantro or a squeeze of lemon before serving. Green Lentil Dal is a tasty dish made from green lentils. It is popular in Indian cuisine. Lentils are cooked with spices, onions, and tomatoes. This dish is rich in protein and fiber. You can enjoy it as a main course or a side. I love how it warms me up on chilly days. Green Lentil Dal can last about 4 to 5 days in the fridge. Make sure to store it in an airtight container. The dal might thicken as it sits, so add water when reheating. This helps bring back the creamy texture. Yes, you can easily make Green Lentil Dal vegan. Just replace the coconut oil or ghee with any vegetable oil. Use vegetable broth instead of chicken broth for more flavor. The recipe remains delicious and satisfying without animal products. You can serve Green Lentil Dal with rice or naan. It pairs well with yogurt, pickles, or a fresh salad. I enjoy it with lemon wedges for a zesty touch. You can also add a simple cucumber salad for a refreshing side. To make Green Lentil Dal spicier, add more green chilies. You can also use red chili powder for extra heat. If you want a smoky flavor, try adding smoked paprika. Just remember to adjust the spice level to your taste. For the full recipe, check the section above. This article covered key ingredients for making green lentil dal, including substitutions and health benefits. I shared detailed steps for preparing and cooking the dish to ensure the best texture. Tips on avoiding common mistakes and enhancing flavor were also provided. Green lentil dal can be varied with veggies and spices for unique flavors. Proper storage and reheating tips help maximize freshness. I hope these insights inspire you to cook and enjoy this nutritious dish!

Green Lentil Dal Hearty and Flavorful Meal Option

Green Lentil Dal is a hearty and flavorful meal option that packs a nutritional punch. You can easily make this

- 4 large bell peppers (any color) - 1 cup cooked brown rice - 1 cup black beans, drained and rinsed - 1 cup corn kernels (fresh, frozen, or canned) - 1 small zucchini, diced - 1 small red onion, finely chopped - 2 cloves garlic, minced - 1 teaspoon cumin powder - 1 teaspoon smoked paprika - ½ teaspoon chili powder - Salt and pepper to taste - Fresh cilantro or parsley, for garnish When I make stuffed bell peppers, I focus on fresh and colorful ingredients. Bell peppers offer a sweet crunch and vibrant colors. You can choose any color you like—red, yellow, or green. The rice serves as a hearty base. I prefer brown rice for its nutty flavor and health benefits. Black beans add protein and a rich taste. They also help keep the filling moist. Corn kernels add sweetness and a nice texture. Zucchini is great for adding moisture and nutrition. It cooks down well and blends nicely with other veggies. Red onion and garlic give the dish depth and aroma. For spices, cumin powder adds warmth. Smoked paprika brings a nice smokiness. Chili powder gives a bit of heat, but you can adjust it to your taste. Salt and pepper help enhance all the flavors. Finally, fresh herbs like cilantro or parsley brighten the dish. They add a fresh pop when served. This mix of ingredients makes a delicious filling. It’s easy to customize based on what you have at home. If you want the full recipe, check it out for all the details! - Preheat your oven to 375°F (190°C). - Prepare the bell peppers by cutting off the tops and removing seeds. Start by preheating your oven. This step is crucial as it ensures that your stuffed peppers cook evenly. While the oven heats, take each bell pepper and slice off the top. Be careful not to cut too much off. After that, scoop out the seeds and white membranes. This prepares the peppers for stuffing. - Sauté red onion and garlic until translucent. - Add diced zucchini, corn, black beans, rice, tomatoes, and spices to the skillet. Next, grab a skillet and heat a bit of oil over medium heat. Add the finely chopped red onion and minced garlic. Stir them until they turn translucent, which takes about 3 to 4 minutes. This will create a flavorful base. Then, toss in the diced zucchini, corn, black beans, cooked rice, and diced tomatoes. Don't forget the spices! This mix brings all the flavors together. Cook everything for about 5 to 7 minutes until warmed through and well mixed. - Mix in shredded cheese before stuffing the peppers. - Bake covered for 30 minutes, then uncovered for 10-15 minutes until cheese is bubbly. Once your filling is ready, remove the skillet from heat. Stir in half of the shredded cheese to the mixture. Now, it's time to stuff the peppers! Spoon the filling into each pepper, pressing it down a little to fit everything in. Arrange them in a baking dish. Cover the dish with aluminum foil and bake for 30 minutes. After that, take off the foil, add the remaining cheese on top, and bake for another 10 to 15 minutes. This will give you that bubbly, golden cheese layer that everyone loves. You can find the full recipe in the earlier sections. Enjoy your tasty stuffed bell peppers! - Use a variety of colorful bell peppers for visual appeal. The bright colors make the dish more inviting. - Taste and adjust seasonings before stuffing. This step ensures the flavors shine through. - Serve on a bed of mixed greens or with a fresh salad. This adds crunch and freshness to the meal. - Drizzle with olive oil or a squeeze of lime for extra flavor. A little zest lifts the whole dish. When you follow these tips, you create a meal that looks as good as it tastes. You can find the Full Recipe for more details on making these stuffed bell peppers. {{image_2}} You can easily boost your stuffed peppers with protein. Ground turkey or chicken works great. These meats mix well with the rice and veggies, making the dish heartier. If you prefer a gluten-free option, try using quinoa instead of rice. Quinoa adds a nutty flavor and is high in protein, perfect for a healthy meal. To spice things up, add chopped jalapeños. This will give your dish a nice kick. You can also play with different spices. Try adding oregano, thyme, or even some Italian seasoning. For cheese lovers, experiment with various cheese types like feta, goat cheese, or pepper jack. Each option will change the flavor and elevate your dish. You can find the full recipe at the beginning of the article. Enjoy the fun of mixing and matching! Store leftover stuffed peppers in an airtight container in the fridge for up to 3 days. This keeps them fresh and tasty. When you want to eat them, just reheat the peppers in the microwave or oven. They will taste almost as good as when they were fresh. Freeze unbaked stuffed peppers for up to 3 months. This is great for meal prep! Just place the stuffed peppers in a freezer-safe container or wrap them tightly in plastic wrap. When you are ready to enjoy them, you can bake them from frozen. Adjust the cooking time as necessary. They might need an extra 10-15 minutes in the oven. For best results, check that the filling is hot all the way through. You can find the full recipe details earlier in this article. Enjoy your stuffed peppers anytime! Yes, feel free to substitute with quinoa, couscous, or any preferred grain. Each grain brings its own texture and flavor. Quinoa adds a nutty taste, while couscous offers a light, fluffy finish. Experiment with what you have on hand. The key is to ensure the grain is cooked before mixing it into the filling. The total cooking time is approximately 55 minutes, including prep and baking. This time allows the peppers to soften, while the filling becomes deliciously hot. In just under an hour, you can serve a hearty meal that pleases everyone at the table. Yes, they can be healthy when made with whole ingredients and plenty of vegetables. Each pepper packs in fiber, vitamins, and minerals. Using brown rice, black beans, and fresh veggies boosts the nutrition. This dish can fit well into a balanced diet, making it a smart choice for any meal. Yes, you can prepare the filling in advance and stuff the peppers right before baking. This makes meal prep easy. Just store the filling in the fridge for up to 24 hours. When you're ready to cook, stuff the peppers and bake them for a fresh, hot dish. Reheat in the microwave or oven until warm throughout. If using the oven, heat them at 350°F (175°C) for about 15-20 minutes. This method helps the cheese to melt nicely again. Enjoy your leftovers and savor the flavors once more! For the complete recipe, check out the Full Recipe section. In this blog post, we explored making delicious stuffed bell peppers. We discussed the main ingredients, cooking steps, and ways to personalize your dish. These peppers are not just tasty; they are packed with nutrients. Remember to use fresh ingredients and feel free to adjust the seasonings. You can make them ahead or store leftovers easily. Enjoy experimenting with flavors or proteins to make this dish your own. Happy cooking!

Stuffed Bell Peppers with Rice & Veggies Delight

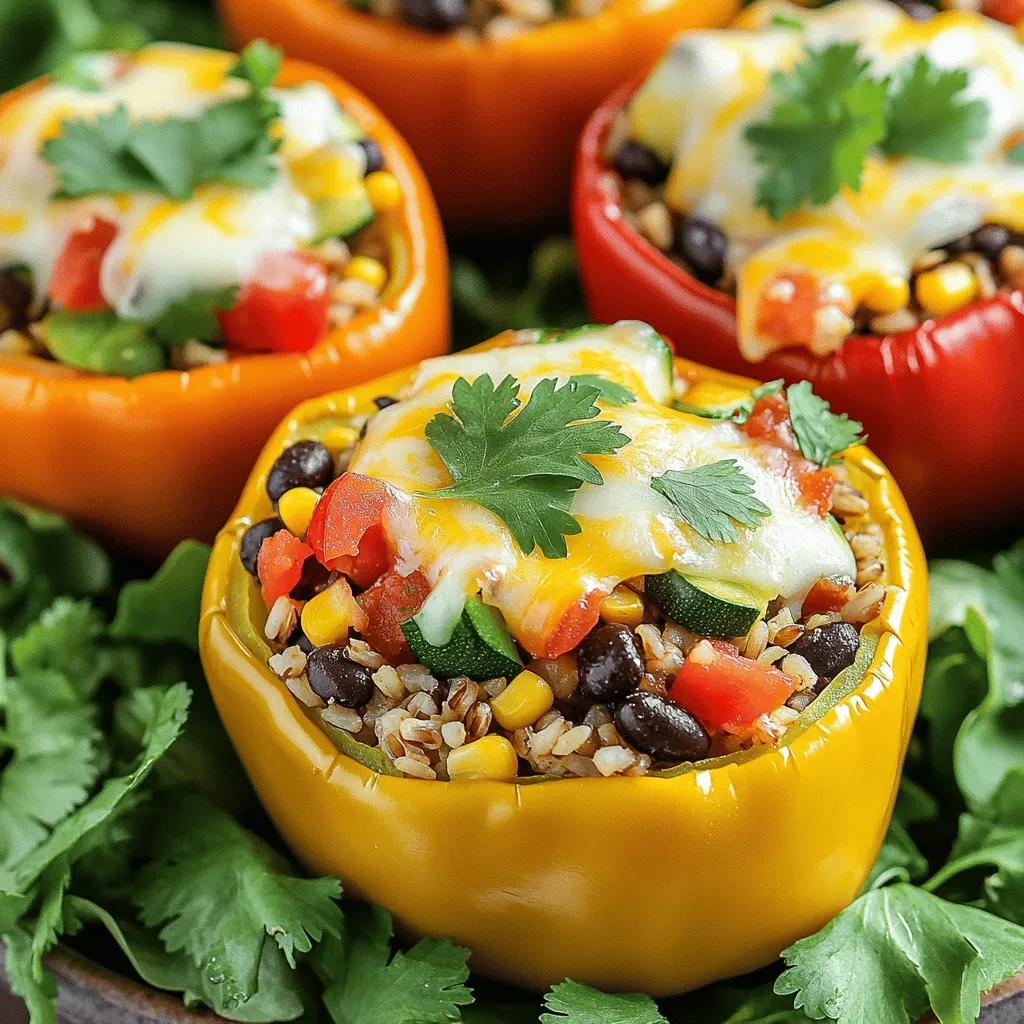
Are you ready to dive into a dish that’s as colorful as it is delicious? In Stuffed Bell Peppers with

- Pasta of your choice (8 oz) - Creamy hummus (1 cup) - Vegetable broth (3 cups) - Cherry tomatoes (1 cup, halved) - Spinach (1 cup, chopped) - Garlic cloves (2, minced) - Red pepper flakes (½ teaspoon) - Olive oil (1 tablespoon) - Fresh parsley and lemon wedges In this dish, the main ingredients create a rich and creamy base. I like to use any pasta I have on hand, such as fusilli or penne. The creamy hummus adds depth and flavor. Vegetable broth gives the pasta a nice, savory taste. Fresh additions bring color and nutrition. Cherry tomatoes burst with sweetness, while spinach adds a vibrant green. Garlic cloves add a savory kick. For seasoning, red pepper flakes give a little heat, while olive oil adds richness. Fresh parsley and lemon wedges are perfect for garnish. They make the dish look nice and add a zesty finish. You can find the Full Recipe for more details on this easy meal. To start, grab a large pot. Heat 1 tablespoon of olive oil over medium heat. Once hot, add 2 minced garlic cloves and ½ teaspoon of red pepper flakes. Sauté them for about 1-2 minutes. You want to smell that garlic! This step adds a nice kick to your dish. Next, pour in 3 cups of vegetable broth. Bring it to a gentle simmer. Once simmering, add 8 oz of your favorite pasta. Stir occasionally to prevent sticking. Cook the pasta according to the package instructions, which is usually about 8-10 minutes. You want it al dente, which means firm to the bite. Once your pasta is cooked, reduce the heat. Now, stir in 1 cup of creamy hummus. Mix well until the pasta is fully coated. If you find it too thick, add a splash of broth or water for creaminess. Then, fold in 1 cup of halved cherry tomatoes and 1 cup of chopped spinach. Cook for an additional 2-3 minutes. You want the spinach to wilt a bit and the tomatoes to soften. Season with salt and pepper to taste. Let it sit for a minute to thicken. Enjoy your creamy hummus pasta! For the full recipe, check out the Full Recipe section. To get the best creaminess in your One Pot Creamy Hummus Pasta, you can adjust the texture. If the pasta seems too thick, just add a little vegetable broth or water. Start with a splash and stir well. You want it to be creamy but not soupy. This simple trick makes a big difference in how it feels in your mouth. To boost the flavor, try adding some spices and herbs. A pinch of salt and pepper is a must. You can also mix in some Italian seasoning or even a touch of lemon zest. Fresh parsley makes a great garnish, adding color and taste. If you like heat, sprinkle more red pepper flakes on top. These small touches can really elevate the dish. To save time while cooking, prepare your ingredients ahead. Chop the spinach and halve the cherry tomatoes before you start. You can even measure out the hummus and broth. This way, everything is ready to go when you start cooking. It makes the process smoother and quicker. Enjoy your meal without the stress! {{image_2}} You can easily boost your One Pot Creamy Hummus Pasta by adding protein. Chicken is a great choice. Cook diced chicken in the pot before adding garlic and red pepper flakes. This adds flavor and makes it heartier. If you prefer a plant-based option, add chickpeas. They add protein and fiber. You can use canned chickpeas for quick prep. Just drain and rinse them before adding to the pot with the cherry tomatoes and spinach. Switching up the hummus can bring new life to this dish. Try different flavors like roasted red pepper or garlic hummus. Each will change the taste and make it special. You can also mix in other vegetables. Zucchini, bell peppers, or kale all work well. Just chop them up and add them with the spinach. This way, you can customize your dish to your liking. For those who need gluten-free options, use gluten-free pasta. There are many types that taste great and cook well. You can find lentil or chickpea pasta that works perfectly. If you want to make this dish vegan, make sure your hummus is dairy-free. Most store-bought hummus is vegan, but check the label to be sure. These simple swaps make this pasta dish enjoyable for everyone. You can find the Full Recipe to get started! To keep your One Pot Creamy Hummus Pasta fresh, start by letting it cool. This helps prevent steam from building up in your storage container. Place the pasta in a shallow dish to speed up cooling. Once cooled, transfer it to an airtight container. This method helps keep the pasta creamy and tasty. You can store this pasta in the fridge for up to three days. Make sure the container is sealed tightly. If you need to extend its life, consider freezing it. However, the texture may change slightly when thawed. When it's time to eat, reheat your pasta gently. The best method is to use a pan on low heat. Add a splash of water or broth to keep it creamy. Stir often to avoid sticking. You can also use the microwave, but cover the bowl with a lid to retain moisture. This keeps your One Pot Creamy Hummus Pasta delicious and enjoyable. Yes, you can make this dish vegan. Most store-bought hummus is vegan. Check the label for dairy. Use vegetable broth that is labeled vegan. This ensures no animal products are in your dish. To keep your pasta from sticking, stir it well while cooking. Use a pot that gives enough room for the pasta. Adding a bit of olive oil to the water can help too. Make sure to rinse the pasta under cold water after cooking if you want it less sticky. This creamy dish pairs well with fresh salads. A simple green salad with vinaigrette works great. Garlic bread is another tasty choice. You can also serve roasted vegetables on the side for added color and flavor. You can find the complete instructions in the Full Recipe section. This blog post covers how to make One Pot Creamy Hummus Pasta. We started with essential ingredients, like pasta, hummus, and vegetable broth. Then, we looked at fresh additions, seasoning, and tips for the best flavor. I shared steps for cooking and variations for protein and dietary needs. Make this dish your own with extra spices or toppings. Remember to store leftovers properly for a delicious meal later. Enjoy your cooking adventure!

One Pot Creamy Hummus Pasta Quick and Easy Meal

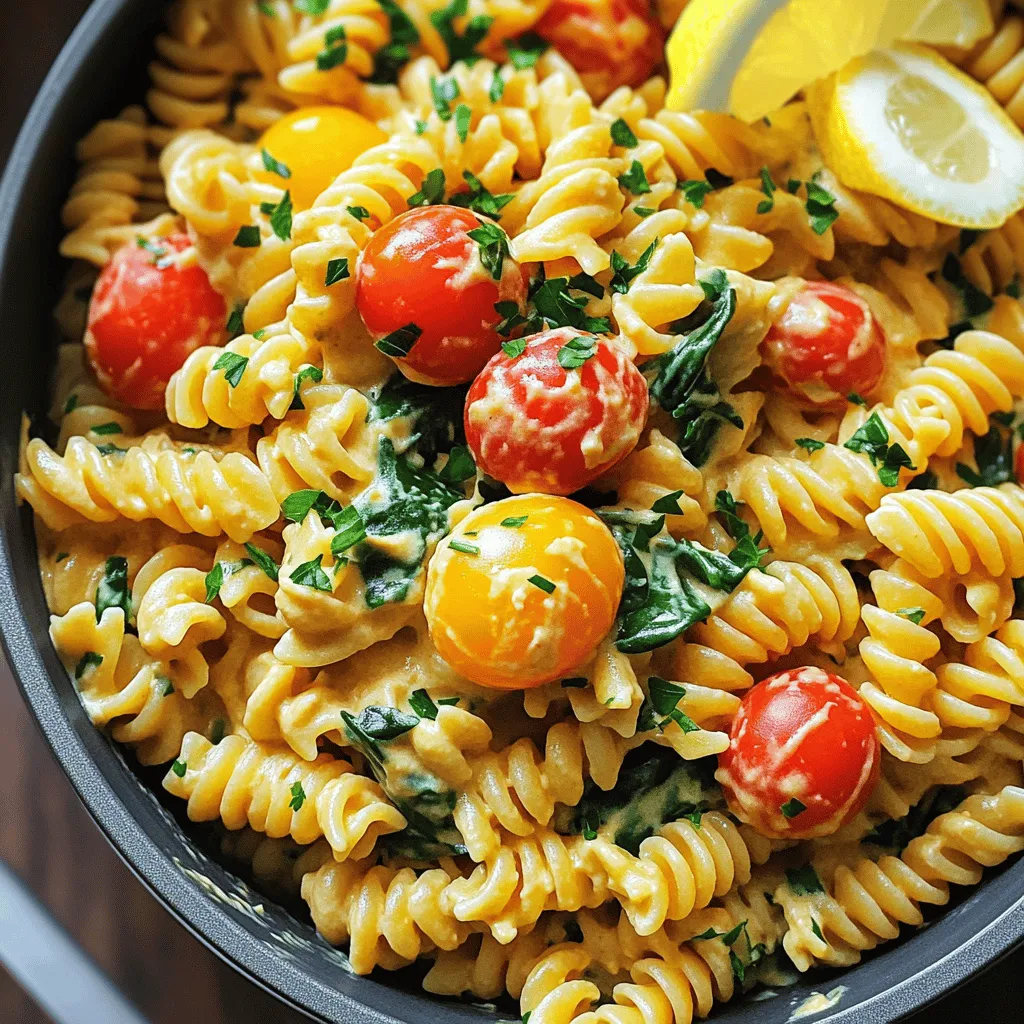
Looking for a fast and tasty meal? This One Pot Creamy Hummus Pasta is just for you! With just a

- 1 cup orzo pasta - 1 tablespoon olive oil - 1 medium onion, diced - 2 cloves garlic, minced - 2 carrots, diced - 2 celery stalks, diced - 1 teaspoon dried thyme - ½ teaspoon dried rosemary - 1 cup cooked chicken, shredded - 1 cup frozen peas - 4 cups chicken broth - 1 cup heavy cream - Salt and pepper to taste - ¼ cup fresh parsley, chopped for garnish The key to a great creamy chicken pot pie orzo lies in the ingredients. I love using fresh or quality ingredients to enhance the dish. Start with orzo pasta. This small pasta shape cooks quickly and absorbs flavors well. Next, olive oil adds richness. I prefer to sauté the onion in the oil. It builds a solid base for flavor. Diced onions soften quickly and add sweetness. Now comes the fun part—vegetables! Garlic, carrots, and celery create a lovely mix. I always use fresh garlic for its bold flavor. Diced carrots and celery add crunch and color. Herbs like thyme and rosemary bring an earthy touch. I recommend using dried herbs for this recipe, as they are easy to store and always ready. Don’t forget the chicken! Shredded, cooked chicken adds protein and makes this dish hearty. Frozen peas are a great addition. They cook fast and add a pop of color and sweetness. The broth is essential. I use chicken broth for depth of flavor. It ties all the ingredients together. Finally, we have the creamy elements. Heavy cream makes the dish rich and smooth. I always season with salt and pepper to taste. A sprinkle of fresh parsley at the end brightens the dish and adds a fresh note. For more detailed steps, check the Full Recipe. Bring 4 cups of chicken broth to a boil. This makes the orzo flavorful. Once the broth boils, add 1 cup of orzo. Cook it for about 8-10 minutes until it is al dente. Drain the orzo and set it aside for later. In a large skillet, heat 1 tablespoon of olive oil over medium heat. Add 1 medium diced onion and sauté it for about 3-4 minutes. The onion should become soft and translucent. Next, add 2 minced cloves of garlic, 2 diced carrots, and 2 diced celery stalks. Keep sautéing for another 5-6 minutes. The vegetables need to be tender but not mushy. After the vegetables are ready, stir in 1 cup of shredded cooked chicken and 1 cup of frozen peas. Cook this mixture for 2-3 minutes to heat it all through. Then, reduce the heat to low and pour in 1 cup of heavy cream. Mix well. This step creates a rich, creamy sauce. Season it with salt and pepper to your taste. Now, fold in the cooked orzo into the creamy mixture. Stir it well to combine everything. Let the dish simmer for a couple more minutes. This step helps the flavors blend together nicely. Remove from heat and garnish the dish with fresh parsley before serving. For the full recipe, check out the earlier sections. - Adjust seasoning to taste: Taste as you cook. Add salt and pepper slowly. This step helps you find the right balance. Everyone's palate is unique. - Fresh herbs vs. dried herbs: Use fresh herbs for bright flavors. Dried herbs work too, but use less. Fresh herbs can change the dish’s depth. I love adding fresh parsley at the end for color. - Avoid overcooking the orzo: Cook orzo until it's just right. It should be al dente, or firm when bitten. Overcooked orzo turns mushy. Keep an eye on the clock! - Using leftover chicken: Leftover chicken is perfect for this dish. It cuts prep time in half. Just shred it and mix it in. You’ll get a rich, homemade flavor with less effort. - Suggestions for garnishing: Garnish with fresh parsley or a sprinkle of black pepper. This adds a pop of color and flavor. A bright garnish makes the dish look more inviting. - Serving options: Serve the orzo in individual bowls. This makes it feel special. You can also add a slice of crusty bread on the side. It’s perfect for scooping up that creamy goodness. For the full recipe, check out [Full Recipe]. {{image_2}} You can easily switch up the protein in creamy chicken pot pie orzo. Using turkey instead of chicken adds a nice twist. Turkey has a mild flavor that pairs well with the creamy sauce. You can also use other meats, like ham or pork, for a different taste. If you're looking for a vegetarian option, try adding mushrooms. They add a rich, earthy flavor and have a great texture. Just sauté them until they’re tender, then mix them in with the other veggies. If you need a gluten-free dish, there are options. Look for gluten-free orzo made from rice or quinoa. These options cook similarly to regular orzo. You can also use other pasta shapes, like gluten-free penne or fusilli. Just adjust the cooking time according to the package instructions. This way, you can keep all the flavors while making it gluten-free. To take your creamy chicken pot pie orzo to the next level, think about adding cheese. A handful of shredded cheddar or Parmesan can add a nice creaminess. It also gives a tasty, cheesy flavor that kids love. If you want some heat, add a pinch of cayenne or paprika. These spices will give your dish a warm kick. Start with a small amount, then taste and adjust. You can always add more, but it’s hard to take it away! Check out the Full Recipe for more details. To store leftovers, put them in an airtight container. This keeps the dish fresh and tasty. In the fridge, creamy chicken pot pie orzo lasts about three to four days. Make sure it cools down before you seal it up. This helps it stay creamy and delicious. You can freeze creamy chicken pot pie orzo for later. First, let it cool completely. Then, place it in a freezer-safe container or bag. Squeeze out any extra air to prevent freezer burn. It will stay good in the freezer for about two to three months. When you're ready to eat, move it to the fridge to thaw overnight. To reheat, you can use a microwave or stovetop. If you use a microwave, heat it in short bursts. Stir between intervals to ensure even heating. On the stovetop, warm it slowly over low heat. Add a splash of chicken broth or cream to keep it creamy. Stir often to prevent sticking. Enjoy your warm, comforting dish! Yes, you can prep creamy chicken pot pie orzo ahead of time. Cook the orzo and prepare the creamy mixture as usual. However, I suggest not mixing them until you are ready to serve. This keeps the orzo from getting too soggy. Store the orzo and creamy mixture separately in the fridge for up to two days. When you're ready to eat, just combine and heat. To store leftovers, place them in an airtight container. It’s best to keep the dish in the fridge. This helps maintain freshness. Creamy chicken pot pie orzo lasts for about three days. If you have a larger batch, you might want to freeze it. Just remember to thaw it in the fridge before reheating. Yes, fresh vegetables work great in this dish! If you choose fresh, you can chop them into small pieces. Cook them just a bit longer than frozen ones. Carrots and celery may take about 8-10 minutes to soften. Fresh peas cook faster, so add them in the last few minutes. Creamy chicken pot pie orzo pairs well with many sides. A simple green salad adds crunch and freshness. Garlic bread or biscuits are also great for soaking up the creamy sauce. You could even serve it with steamed vegetables for a colorful plate. Absolutely! Creamy chicken pot pie orzo is perfect for meal prep. You can make a big batch and divide it into meal containers. Just remember to cool it down before sealing. This way, you have tasty meals ready for busy days. To reheat, you can use either the microwave or stovetop. If using the microwave, heat it in short bursts, stirring in between. This helps evenly warm the dish. On the stovetop, add a splash of chicken broth to keep it creamy. Heat it over low until warmed through. Enjoy it just like when it was fresh! For the full recipe, check out the complete guide to making creamy chicken pot pie orzo. In this post, we explored how to make creamy chicken pot pie orzo. We covered the main ingredients, cooking steps, and handy tips. You can switch proteins or make it gluten-free. Storing leftovers and reheating methods were also discussed. This dish is hearty and perfect for any meal. It’s simple to make and even better to share. Enjoy your cooking and the smiles it brings!

Creamy Chicken Pot Pie Orzo Flavorful Comfort Dish

If you’re craving comfort food, this Creamy Chicken Pot Pie Orzo is the answer. Imagine tender orzo pasta mixed with

- 2 ripe mangoes, peeled and diced - 1 cup Greek yogurt (plain or vanilla) - ½ cup honey or maple syrup - 1 tablespoon lemon juice - 1 teaspoon vanilla extract - A pinch of salt - Chopped mint leaves for garnish Each serving has about 100-150 calories. You get key nutrients like protein, vitamins A and C, and healthy fats. This treat is not only tasty but also good for you. The Greek yogurt adds creaminess and protein, while mangoes bring fiber and natural sweetness. Using honey or maple syrup keeps it simple and sweet. For the full recipe, check the earlier section. Enjoy your cooking! To make the mango yogurt mixture, start by gathering your ingredients. You will need two ripe mangoes, Greek yogurt, honey or maple syrup, lemon juice, vanilla extract, and a pinch of salt. 1. Blend Ingredients: In a blender, add the diced mangoes and Greek yogurt. Pour in the honey or maple syrup, lemon juice, and vanilla extract. Add a pinch of salt. 2. Blend Smooth: Blend on high speed until the mixture is creamy and smooth. Stop to scrape the sides if needed. 3. Taste and Adjust: Before pouring, taste the mixture. If you want it sweeter, add more honey or syrup and blend again. For the right consistency, ensure you blend well. A smooth mix is key for creamy bars. If it seems too thick, add a bit more yogurt or a splash of juice. Now, you need to freeze the mixture properly. 1. Pour into Dish: Pour the mango yogurt mixture into a square or rectangular baking dish. Spread it evenly. 2. Cover Well: Cover the dish tightly with plastic wrap or a lid. This keeps out air and helps the bars freeze evenly. It is crucial to cover the dish. It prevents ice crystals from forming, which can ruin the texture. Once your bars are frozen, it’s time to serve them. 1. Cut the Bars: Remove the dish from the freezer. Let it sit for 5-10 minutes to soften. Use a sharp knife to cut the mixture into bars or squares. 2. Plating Ideas: For a pretty presentation, serve the bars on a wooden board. Garnish with fresh mango slices and a sprinkle of mint leaves. These small touches make your frozen mango yogurt bars look even more inviting. Enjoy your refreshing summer treat! To make the best frozen mango yogurt bars, start with ripe mangoes. Look for mangoes that are slightly soft when you squeeze them. They should smell sweet and fruity. If they are hard, leave them out for a few days to ripen. Adjust the sweetness to your taste. If you like it sweeter, add more honey or syrup. Blend, taste, and repeat until it’s just right for you. A powerful blender or food processor works best for this recipe. It should blend the mangoes and yogurt into a smooth, creamy mix. If you don’t have one, you can use a hand mixer, but it may take longer. For the baking dish, a square or rectangular dish works well. Glass or metal pans are great choices. Make sure it fits in your freezer. To keep your frozen bars fresh, store them in an airtight container. This protects them from freezer burn. If you want to freeze individual bars, let the mixture set in the dish first. Then cut it into bars and wrap each one in plastic wrap. This makes it easy to grab a single bar later. {{image_2}} You can change the flavor of your frozen mango yogurt bars by adding other fruits. Berries like strawberries or blueberries work great. They add color and taste. You can also mix in diced peaches or pineapple for a tropical twist. Fresh fruit keeps the bars fresh and fun. Just blend the fruit with the mangoes for a smooth mix. Want to jazz up your bars? You can add extracts or spices. A splash of coconut extract gives a beachy vibe. Try adding a bit of cinnamon for a warm flavor. You can also mix in lime juice for a tangy taste. Each addition brings a new spin to the bars. Get creative and find your favorite combo! If you want a vegan version, swap Greek yogurt for coconut yogurt. Maple syrup is a great choice for sweetening. Use agave nectar or a sugar substitute for a lower-calorie option. These changes keep the bars creamy and tasty without dairy. You won't miss the yogurt at all! You can store your frozen mango yogurt bars for up to three months. To keep them fresh, place the bars in an airtight container. If you see ice crystals on the bars, they might be freezer-burned but can still be safe to eat. Look for a bright color and a creamy texture. If they smell off, it’s best to toss them. To safely defrost the bars, take them out of the freezer and leave them at room temperature. This usually takes about 10 minutes. If you’re in a hurry, you can put them in the fridge for 30 minutes. Avoid using the microwave, as it can melt them unevenly. The best temperature for serving mango yogurt bars is just below freezing. You want them cold but not rock hard. On hot summer days, keep them in a cooler or a bowl filled with ice. This way, they stay nice and chilled while you enjoy them. Yes, you can make these bars ahead of time! I suggest preparing them at least a day before your event. This way, they have plenty of time to freeze properly. You can store the bars in an airtight container in the freezer. They keep well for up to a month, making them a great option for summer gatherings. If you are lactose intolerant, use coconut yogurt or almond yogurt. Both options work well and still give a creamy texture. For a vegan choice, try cashew yogurt or soy yogurt. These alternatives keep the bars delicious and give you a creamy base without dairy. To choose ripe mangoes, look for a slight softness when you press gently. The skin should have a golden hue, not just green. A ripe mango will also give off a sweet aroma. If your mangoes are not ripe yet, you can leave them at room temperature for a few days until they soften. This will help enhance their sweetness for your bars. These mango yogurt bars are easy and fun to make. We covered all the steps, from simple ingredients to freezing tips. Enjoy the sweet blend of mango and yogurt with different flavors or fruits. Store them well for hot days or gatherings. Remember to choose ripe mangoes for the best taste. You can even make these bars your own with various options. I hope you feel inspired to create and enjoy these treats!

Frozen Mango Yogurt Bars Refreshing Summer Treat

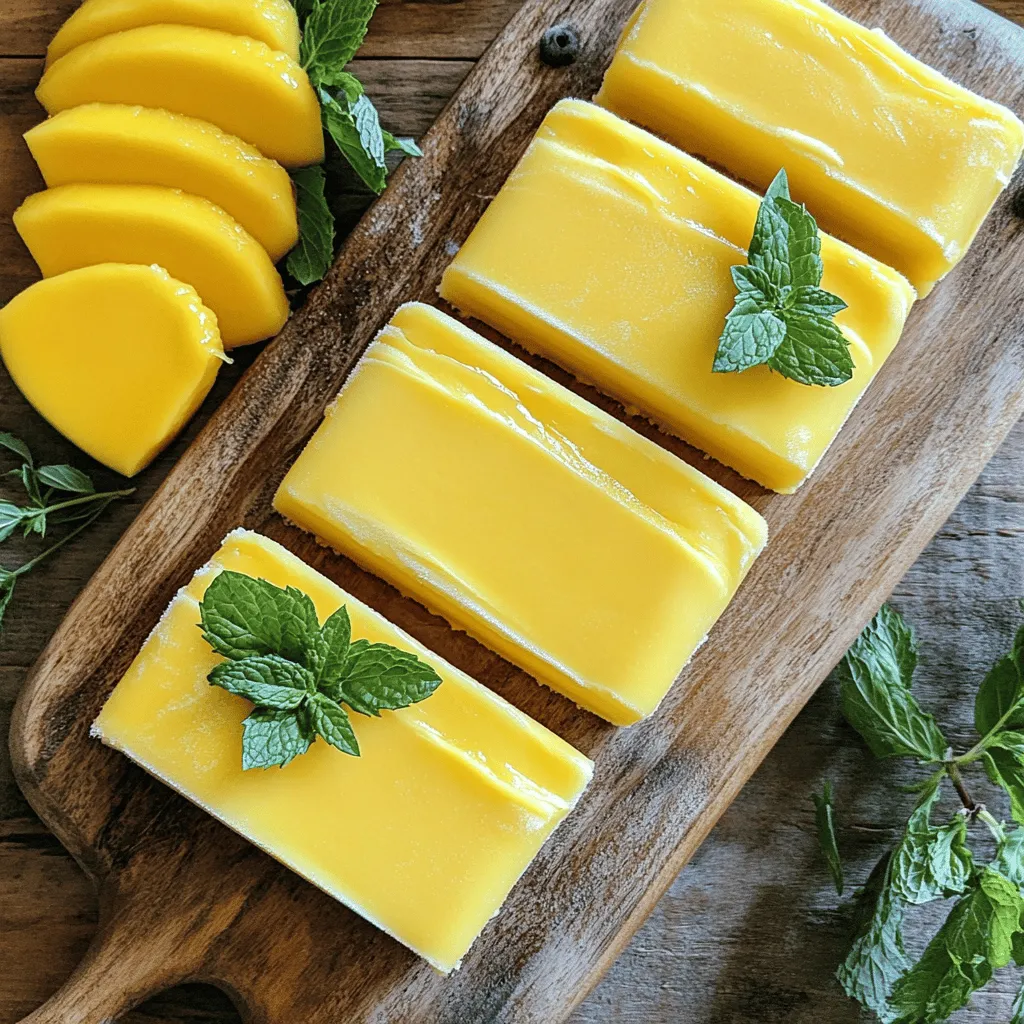
Looking for a cool and healthy snack this summer? These Frozen Mango Yogurt Bars deliver all the sweetness and creaminess

To make Vanilla Choc Chip Protein Nicecream, gather these main ingredients: - 4 ripe bananas, sliced and frozen - 1 scoop vanilla protein powder - 1 teaspoon vanilla extract - 2 tablespoons almond milk (or any milk of your choice) - 1/4 cup dark chocolate chips (or dairy-free chocolate chips) - Pinch of sea salt These ingredients create a creamy and delicious nicecream. The frozen bananas give it a smooth texture, while the protein powder adds a healthy boost. If you don't have an ingredient, here are some easy swaps: - Use coconut milk instead of almond milk for a richer flavor. - Swap chocolate chips for chopped nuts or dried fruit if you prefer. - If you want a different flavor, use chocolate protein powder instead of vanilla. These substitutions help you customize the nicecream to fit your taste. Add fun toppings to make your nicecream more exciting! Here are some ideas: - Sliced fresh bananas - Crushed nuts for crunch - A drizzle of honey or maple syrup - Shredded coconut These toppings will enhance your nicecream and make it even more enjoyable. Feel free to mix and match to find your favorite combination. For the full recipe, check out the details above. Start with ripe bananas. They should be yellow and slightly speckled. Slice them into small pieces. Place the banana slices in the freezer for at least two hours. This step is key for a creamy texture. Frozen bananas create a smooth base for your nicecream. Once the bananas are frozen, grab a food processor. Add the frozen banana slices, one scoop of vanilla protein powder, and one teaspoon of vanilla extract. Pour in two tablespoons of almond milk. This helps the mixture blend smoothly. Blend on high speed until you reach a creamy texture. You might need to stop and scrape down the sides. The process may take a few minutes. After blending, add a pinch of sea salt. This enhances the flavor of the nicecream. Next, gently fold in a quarter cup of dark chocolate chips. Be careful not to break the chips. The chocolate adds a delightful crunch in every bite. Transfer your nicecream into an airtight container. If you want it firmer, freeze it for one hour. If you prefer a softer treat, serve it right away. Use a scoop to serve into bowls. You can enjoy it plain or add your favorite toppings. This recipe is simple and tasty, making it perfect for any day. For the complete recipe, refer to the Full Recipe section. To get the best texture for your Vanilla Choc Chip Protein Nicecream, choose ripe bananas. Ripe bananas are sweeter and have a creamier texture. Freeze the banana slices overnight for a smooth blend. When blending, stop to scrape down the sides. This helps mix everything well. Blend until you reach a soft-serve consistency. If it seems too thick, add a bit more almond milk to loosen it. Not everyone likes the same level of sweetness. You can taste the nicecream mixture before adding the chocolate chips. If you want it sweeter, add a touch of honey or maple syrup. Just remember to blend it well after adding any sweetener. You can also adjust the amount of vanilla protein powder you use. More powder can add more sweetness, so adjust based on your preference. One common mistake is not using enough frozen bananas. If there aren't enough, the nicecream will be too runny. Another mistake is over-blending. This can make the texture too soft and icy. Keep an eye on your mixture as you blend. Lastly, don’t forget to fold in the chocolate chips gently. If you mix too hard, the chips may break apart. Follow the Full Recipe to keep it simple and fun! {{image_2}} You can easily make this nicecream dairy-free. Just swap regular protein powder for a plant-based option. Use almond milk, coconut milk, or oat milk. These choices keep it rich and creamy. You can also try coconut yogurt for a thicker texture. Want to change up the taste? You can add a few things to boost flavor. Try a tablespoon of peanut butter for a nutty twist. You can also mix in a bit of espresso powder for a coffee kick. Want something fruity? Toss in some strawberries or blueberries. They add sweetness and color. For added nutrition, toss in some nuts or seeds. Chopped walnuts or almonds give a nice crunch. You can also sprinkle in chia seeds or flaxseeds. These add fiber and healthy fats. They help make this nicecream even better for you. Explore the [Full Recipe] to make your own Vanilla Choc Chip Protein Nicecream! For freezing your nicecream, use airtight containers. Glass or plastic containers both work well. Make sure they are freezer-safe. You can also use silicone molds for fun shapes. Just remember to cover them tightly. This keeps your nicecream fresh and prevents freezer burn. Vanilla choc chip protein nicecream lasts about one week in the freezer. After that, its taste and texture may change. To enjoy it at its best, eat it within this time frame. If you notice ice crystals forming, it’s a sign that it’s been in there too long. If you don't finish your nicecream right away, you can refreeze it. Just make sure to let it sit out for a few minutes before scooping. This helps soften it. Always store it in a well-sealed container to keep it fresh. Avoid repeated thawing and refreezing. This can affect the texture and flavor. Yes! You can prepare this nicecream ahead of time. Just blend it, then store it in an airtight container. Freeze it for about an hour. This gives it a nice, firm texture. If you want to eat it later, let it sit out for a few minutes before serving. This way, it softens up a bit. If you don’t have protein powder, you can use Greek yogurt. It adds creaminess and protein. You can also try nut butter for a richer flavor. Just remember, it may change the taste a bit. Adjust the sweetness if needed, especially if you add nut butter. Absolutely! This recipe is great for kids. It uses simple, healthy ingredients. The nicecream tastes sweet and creamy, just like ice cream. Kids will love the chocolate chips, too! Plus, it’s a fun way to sneak in some fruit. You can lower the calories by using fewer chocolate chips. Try using just a tablespoon or skip them altogether. You can also reduce the amount of almond milk. If you want to cut calories even more, use unsweetened almond milk. This nicecream is still tasty, even with fewer calories. For more details, check out the Full Recipe. This blog post offered a tasty guide to making Vanilla Choc Chip Protein Nicecream. You learned about key ingredients, how to prepare bananas, and blend the mixture. I shared tips for texture and sweetness. Plus, I provided storage information and answered common questions. Try different flavors and toppings for fun. Enjoy making this simple, healthy treat! Your nicecream adventure starts now—get blending!

Vanilla Choc Chip Protein Nicecream Simple and Tasty

Craving a sweet treat that’s also healthy? Let me introduce you to Vanilla Choc Chip Protein Nicecream! This simple recipe

- 8 oz fettuccine pasta - 1 lb sea scallops, cleaned and patted dry - 1 tablespoon olive oil - 3 cloves garlic, minced - 1 cup heavy cream - 1 cup mozzarella cheese, shredded - ½ cup grated Parmesan cheese - 1 cup cherry tomatoes, halved - 1 tablespoon fresh basil, chopped - Salt and pepper to taste - Zest of 1 lemon Gathering the right ingredients is key for this creamy mozzarella scallop pasta. Start with 8 oz of fettuccine pasta. It will hold the sauce well. Next, you need 1 lb of sea scallops. Make sure they are cleaned and patted dry. This step helps them sear nicely. You’ll need 1 tablespoon of olive oil for cooking. It adds flavor and helps with browning. For that rich taste, use 3 cloves of minced garlic. Garlic gives a nice aroma to the dish. The heart of the sauce is 1 cup of heavy cream. This makes the pasta creamy and smooth. You’ll also need 1 cup of shredded mozzarella cheese. It melts beautifully and adds that stretch we all love. Don't forget ½ cup of grated Parmesan cheese. This cheese adds a salty bite. For a pop of color, use 1 cup of halved cherry tomatoes. They add freshness and sweetness. Finally, grab 1 tablespoon of chopped fresh basil. It gives a nice herbal note. You’ll also want salt and pepper to taste and the zest of 1 lemon for brightness. All these ingredients come together to create a delightful dinner dish. You can find the full recipe with all the steps in the *Full Recipe*. First, grab a large pot and fill it with water. Add a good amount of salt to the water. Bring it to a boil over high heat. Once boiling, add 8 oz of fettuccine pasta. Cook the pasta until it is al dente, following the package instructions. This usually takes about 8 to 10 minutes. When the pasta is ready, drain it but save a bit of the pasta water. Set the pasta aside in a bowl. Now it's time to sear the scallops. Take 1 lb of sea scallops and pat them dry with a paper towel. Season them with salt and pepper. In a large skillet, heat 1 tablespoon of olive oil over medium-high heat. Once the oil is hot, add the scallops. Sear the scallops for about 2 to 3 minutes on each side. They should turn golden brown. Remove them from the skillet and set them aside on a plate. In the same skillet, lower the heat to medium. Add 3 cloves of minced garlic and sauté for about 1 minute. Be careful not to burn the garlic. Next, pour in 1 cup of heavy cream. Stir the cream constantly until it starts to simmer. This should take a couple of minutes. Now for the fun part! Gradually add 1 cup of shredded mozzarella cheese and ½ cup of grated Parmesan cheese to the cream. Stir until both cheeses melt and create a creamy sauce. If the sauce is too thick, mix in a bit of the reserved pasta water until you reach your desired consistency. Toss the cooked fettuccine into the sauce, coating it well. Add 1 cup of halved cherry tomatoes. Gently fold everything together. Carefully add the seared scallops back into the pasta mix. Stir gently to combine without breaking the scallops. Finish by sprinkling 1 tablespoon of chopped fresh basil and the zest of 1 lemon over the dish. Taste and adjust seasoning with more salt and pepper if needed. Now, plate the creamy scallop pasta in bowls and drizzle with a bit of extra olive oil if you like. Enjoy this delightful dish! For the full recipe, check out the instructions above. To make great scallops, start with fresh ones. Look for scallops that smell like the sea, not fishy. Dry them well with a paper towel. This step helps them brown nicely. Use medium-high heat in your skillet. This way, they sear quickly and form a golden crust. Cook them for 2-3 minutes on each side. Avoid moving them around too much. This lets them develop that delicious crust. Your sauce should be creamy but not too thick. After adding the heavy cream, watch it closely. Stir constantly until it simmers. If it gets too thick, add a splash of reserved pasta water. This will help loosen it without losing creaminess. The mozzarella and Parmesan cheeses will also thicken the sauce. So, keep adjusting until you find the right smoothness. When serving, present the pasta in shallow bowls. This makes it look fancy and inviting. Drizzle a bit of olive oil on top for shine. Sprinkle some extra fresh basil for color and flavor. You can also add a few cherry tomato halves for a pop of freshness. For a more filling meal, serve with a side salad or garlic bread. This way, you create a complete dining experience. For the full recipe, check the [Full Recipe]. {{image_2}} You can switch up the pasta to match your taste. Fettuccine is great, but penne or spaghetti works too. Each type gives a unique feel to the dish. For a lighter option, try zucchini noodles or whole wheat pasta. They add extra flavor and texture to your creamy mozzarella scallop pasta. Adding vegetables can boost the dish's nutrition and flavor. Spinach wilts nicely into the creamy sauce. You can also toss in peas or asparagus for color and crunch. Cherry tomatoes add sweetness, but you can replace them with bell peppers or broccoli. This makes your pasta more vibrant and delicious. If you like spicy food, consider adding red pepper flakes. A pinch goes a long way in enhancing the flavor. For more heat, try diced jalapeños or a splash of hot sauce. This twist makes your creamy mozzarella scallop pasta exciting and full of life. For the full recipe, check the previous section. You can keep leftover creamy mozzarella scallop pasta in the fridge. Place it in an airtight container. This helps keep it fresh. It should last for about 3 days. When you are ready to eat, check for any off smells. If it smells fine, you can reheat it. If you want to save it longer, freezing is a good option. Use a freezer-safe container or bag. Make sure to remove as much air as possible. Label it with the date. This pasta dish can stay in the freezer for up to 2 months. When you are ready to use it, let it thaw in the fridge overnight. To reheat, you have a few options. You can use a microwave, stove, or oven. For the microwave, place the pasta in a bowl. Add a splash of water to keep it moist. Cover it and heat in short bursts, stirring in between. On the stove, use a pan over low heat. Stir often until warmed through. If using the oven, cover it with foil and bake at 350°F until hot. Always check the temperature before serving. To make this creamy mozzarella scallop pasta gluten-free, start by choosing gluten-free pasta. Many brands offer great options, such as rice or chickpea pasta. Cook the gluten-free pasta according to package instructions. Then, follow the same steps for the sauce and scallops. This way, you can enjoy the dish without gluten but still keep the flavors. If you want a lighter option instead of heavy cream, you can use half-and-half or whole milk. For a dairy-free choice, coconut milk works well. You can also use a mix of broth and cream cheese for a rich flavor. Each substitute will change the taste a bit but will still give you a creamy sauce. Yes, you can use frozen scallops! Just make sure to thaw them completely before cooking. Place them in the fridge overnight for the best results. Once thawed, pat them dry to remove excess moisture. This helps them sear better and develop that lovely golden crust. To avoid overcooking scallops, follow these tips: First, make sure your skillet is hot enough. Sear scallops for only 2-3 minutes on each side. Look for a golden brown color. If they feel firm to the touch and opaque, they are done. Remove them from the heat quickly to keep them juicy and tender. This recipe showcases a delicious fettuccine dish with scallops and creamy sauce. We covered each ingredient, the cooking steps, and helpful tips. Remember, cooking is all about experimenting. You can swap ingredients and adjust flavors. Storing leftovers is simple, and reheating keeps the meal tasty. Enjoy making this dish your own, and don’t hesitate to share your results! Happy cooking!

Creamy Mozzarella Scallop Pasta Delightful Dinner Dish

Craving a delicious dinner that’s quick and easy? This Creamy Mozzarella Scallop Pasta is your answer! Impressive yet simple, it

To make Beef and Cheese Butter Swim Biscuits, you need a few key ingredients. These ingredients create a tasty and soft biscuit filled with flavor. Here is what you will need: - 2 cups all-purpose flour - 1 tablespoon baking powder - 1/2 teaspoon salt - 1/2 teaspoon garlic powder - 1 cup shredded cheddar cheese - 1 cup cooked ground beef (seasoned to taste) - 1/2 cup buttermilk - 1/2 cup unsalted butter, melted These ingredients work together to give your biscuits a great taste and texture. You can make your biscuits even better with some optional flavor enhancers. Consider adding: - Chopped green onions - Crumbled bacon - Diced jalapeños for a spicy kick - Fresh herbs like parsley or chives Adding these can bring a new twist to your dish. It’s fun to mix and match based on what you like. Cheddar cheese is a classic choice, but you can try other cheeses too. Here are some great options: - Pepper jack for heat - Monterey jack for a mild flavor - Gruyère for a nutty taste - Parmesan for a salty edge Each cheese brings its own taste to the biscuits. Feel free to experiment with different types to find your favorite combination. For the full recipe, check the detailed cooking steps! To make Beef and Cheese Butter Swim Biscuits, you'll first gather your ingredients. You need flour, baking powder, salt, garlic powder, cheddar cheese, cooked ground beef, buttermilk, and melted butter. These simple ingredients create a tasty treat. 1. Preheat the oven. Set it to 425°F (220°C). Grease a 9x13 inch baking dish lightly. 2. Mix dry ingredients. In a large bowl, whisk together the flour, baking powder, salt, and garlic powder. Make sure they blend well. 3. Add cheese and beef. Stir in the shredded cheddar cheese and cooked ground beef. Mix until evenly distributed. 4. Combine wet ingredients. In a separate bowl, mix the buttermilk and melted butter until smooth. 5. Combine wet and dry. Pour the wet mixture into the dry ingredients. Stir gently until just combined. The dough will be a bit sticky. 6. Spoon the dough. Use a spoon or your hands to drop spoonfuls of the dough into the greased baking dish. Let them touch slightly. 7. Add butter. Pour the remaining melted butter over the top of the biscuits evenly. 8. Bake. Place the dish in the oven and bake for 20-25 minutes. Look for golden brown tops and cooked-through biscuits. 9. Cool and serve. Remove from the oven. Let them cool for a few minutes, then serve warm. - Don’t overmix. Overmixing can make your biscuits tough. Mix just until combined. - Use cold butter. If you prefer flakier biscuits, use cold butter instead of melted. - Watch the time. Start checking your biscuits at the 20-minute mark. Ovens vary, and you want them golden, not burnt. These steps will guide you to make delicious Beef and Cheese Butter Swim Biscuits. For the full recipe, refer to the original recipe section. Enjoy the tasty results! When making Beef and Cheese Butter Swim Biscuits, a few mistakes can ruin your dish. First, do not overmix the dough. This can make the biscuits tough. Second, be careful with the butter. If you let it cool too much, it will not blend well. Lastly, do not skip the buttermilk. It adds a nice tang and helps with texture. For the best texture, use cold butter. Cold butter creates flaky layers in your biscuits. Also, use fresh ingredients. Fresh baking powder helps the biscuits rise well. When mixing wet and dry ingredients, just combine them until you see no dry flour. This keeps the biscuits soft and fluffy. Having the right tools makes cooking easier. You need a large mixing bowl for the dough. A whisk helps blend dry ingredients smoothly. Use a spoon or your hands to drop the dough into the baking dish. A 9x13 inch baking dish is perfect for even cooking. Finally, an oven thermometer ensures your oven is at the right temperature for baking. For the full recipe, refer to the section above. {{image_2}} You can change the meat in these biscuits to fit your taste. Try using cooked chicken or turkey. Shredded pork adds a nice twist too. Each meat gives its own flavor, making every batch unique. Just remember, season the meat well before adding it to the dough. This keeps the biscuits tasty and fun. While cheddar cheese shines in this recipe, you can experiment with other cheeses. Try mozzarella for a milder taste. Pepper jack adds a spicy kick. Feta cheese brings a tangy flavor that works well too. Mix different cheeses to create your favorite blend. The key is to pick what you love. Herbs and spices can elevate these biscuits. Fresh chives or parsley add a bright note. You can also sprinkle in some dried oregano or thyme for depth. If you like heat, add red pepper flakes. Just a pinch can change the whole dish. Don't be afraid to get creative! To keep your beef and cheese butter swim biscuits fresh, store them in an airtight container. Layer them with parchment paper to prevent sticking. Make sure to let them cool completely before sealing. They will last up to three days in the fridge. If you want to keep them longer, freezing is a great option. To reheat, preheat your oven to 350°F (175°C). Place the biscuits on a baking sheet. Cover them with foil to prevent drying out. Heat for about 10-15 minutes, or until warm. You can also microwave them for about 30 seconds. However, the oven gives a better texture. For freezing, wrap each biscuit tightly in plastic wrap. Then place them in a freezer-safe bag or container. They can be frozen for up to three months. To use, thaw them in the fridge overnight. Then reheat as mentioned above for the best flavor and texture. For more detailed cooking steps, refer to the Full Recipe. Beef and cheese butter swim biscuits are soft, savory treats. They blend tender biscuits with ground beef and cheese. The biscuits bake in a pool of melted butter, giving them a rich flavor. These biscuits are perfect for breakfast, lunch, or dinner. Yes, you can make these biscuits ahead of time. Prepare the dough and store it in the fridge for up to 24 hours. When you're ready to bake, drop the dough into the pan and pour on the butter. Bake as directed in the full recipe for best results. To make these biscuits gluten-free, swap the all-purpose flour for a gluten-free blend. Look for a blend that includes xanthan gum for the best texture. This change keeps the biscuits soft and fluffy while staying gluten-free. These biscuits pair well with many dishes. Serve them alongside a fresh salad or a hot bowl of soup. For a fun twist, enjoy them with a spicy dipping sauce. They also make a great side for grilled meats or veggies. At high altitude, you may need to make a few changes. Increase the oven temperature by 15 to 25 degrees Fahrenheit. You might also reduce the baking powder slightly to prevent over-rising. Keep an eye on the biscuits while they bake, as they may cook faster. Beef and Cheese Butter Swim Biscuits are easy and fun to make. We covered key ingredients, steps, and baking tips. I shared mistakes to avoid and equipment you need. You also learned about tasty variations and how to store leftovers. These biscuits are perfect for any meal or snack. Try them your way and enjoy! You’ll impress everyone with your cooking skills.

Savory Beef and Cheese Butter Swim Biscuits Recipe

Get ready to impress your family with my Savory Beef and Cheese Butter Swim Biscuits recipe! These biscuits are packed

- 1 lb flank steak, thinly sliced - 1 cup long-grain rice - 2 cups beef broth - 1 cup queso dip (prepared or store-bought) - 1 tablespoon olive oil - 1 medium onion, diced - 2 cloves garlic, minced - 1 cup bell peppers, diced (mix of red and green) - 1 tablespoon chili powder - 1 teaspoon cumin - Salt and pepper to taste - Fresh cilantro, chopped - Lime wedges - Crispy tortilla chips For the best flavor, choose fresh flank steak. Look for bright red meat with good marbling. When picking rice, opt for high-quality long-grain rice for a fluffy texture. A rich beef broth adds depth to the dish. You can either make your queso dip or buy a quality store-bought version. Fresh vegetables, like bell peppers and onions, should feel firm and crisp. For garnishes, fresh herbs like cilantro enhance the dish’s taste. Lime wedges add a fresh, zesty kick. If you enjoy crunch, serve crispy tortilla chips on the side. They make a great addition to this savory meal. You can find the full recipe at the beginning of this article. Start by boiling 2 cups of beef broth in a medium pot. Once it bubbles, add 1 cup of long-grain rice. Cover the pot and lower the heat to a simmer. Cook for 15 to 18 minutes, or until the rice is soft and the broth is gone. Fluff the rice with a fork and set it aside. While the rice cooks, grab your flank steak. Slice it thinly and season it well. Use salt, pepper, 1 tablespoon of chili powder, and 1 teaspoon of cumin. Mix the spices on the meat so the flavor gets deep in. Heat 1 tablespoon of olive oil in a large skillet over medium-high heat. Once hot, add the seasoned steak slices. Make sure to lay them flat in the pan. Don’t crowd the pan; you may need to do it in turns. Sear for 2 to 3 minutes on each side. You want a nice brown crust but not overcooked. Remove the steak and keep it warm. In the same skillet, add 1 medium diced onion and 1 cup of diced bell peppers. Cook for 5 to 7 minutes until they soften. Next, toss in 2 minced garlic cloves and cook for 1 more minute. The garlic will make your kitchen smell great! Now, return the cooked steak to the skillet. Pour in 1 cup of queso dip. Stir everything together so the steak and veggies are coated in the creamy cheese. Heat it for a couple of minutes until warm. To serve, pile a generous amount of rice on a plate. Top it with the steak and queso mix. For a pop of color, sprinkle fresh chopped cilantro on top. Add lime wedges on the side for a zesty kick. You can also serve with crispy tortilla chips for a nice crunch. Check out the Full Recipe for more detailed cooking tips! To get the best steak, start with a good cut. Flank steak is great for this dish. Cut it thin to help it cook fast. Season it well with salt and spices. Heat your skillet hot before adding the steak. Sear it for just a few minutes on each side. This locks in flavors and keeps it juicy. Let it rest for a few minutes after cooking. This helps the juices spread evenly. One big mistake is using too much water. Follow the ratio of one cup of rice to two cups of broth. Always bring the liquid to a boil before adding rice. After adding, cover the pot and lower the heat. Avoid lifting the lid while it cooks. This keeps steam inside for fluffy rice. Once it’s done, fluff it with a fork to separate the grains. Spices make your dish shine! You can add more chili powder for heat. Cumin gives a warm, earthy taste. If you like it smoky, try adding smoked paprika. Fresh herbs like cilantro add brightness. Feel free to mix and match spices based on your taste. Remember, a little goes a long way, so start with small amounts. Store your leftovers in an airtight container. This keeps your steak and queso rice fresh. You can keep it in the fridge for up to three days. To reheat, add a splash of broth or water. This helps keep it moist. If you want to store it longer, freeze it in portions. Just remember to thaw it in the fridge overnight before reheating. For the best taste, enjoy it within a month. {{image_2}} You can easily switch out the steak for tasty veggies. Try using mushrooms, zucchini, or eggplant. These options give you a nice meaty texture. Tofu is another great choice. It absorbs flavors well and adds protein. Simply season and cook it like the steak. You can still enjoy the creamy queso with these swaps. While long-grain rice is a classic choice, you can try other types too. Jasmine rice adds a floral note that pairs well with the dish. Alternatively, short-grain rice offers a stickier texture. If you want a healthier option, quinoa or brown rice works great. Just keep in mind that cooking times may vary. You can use store-bought queso for quick prep. It saves time and tastes good. However, making homemade queso lets you control the flavors. Start with cheese, milk, and spices. Add jalapeños for spice or mix in veggies for more taste. Both options work well, so choose what fits your time and mood. For the full recipe, check out the details above. After enjoying your Steak & Queso Rice, store any leftovers in an airtight container. This helps keep the dish fresh. Let it cool at room temperature for about 30 minutes before sealing. Keep it in the fridge for up to three days. You can freeze Steak & Queso Rice if you want to save it for later. Divide the leftovers into smaller portions. Place each portion in a freezer-safe bag or container. Remove as much air as possible to avoid freezer burn. This dish can last in the freezer for up to three months. To reheat, first, thaw the rice in the fridge overnight if frozen. Place the rice in a microwave-safe bowl. Add a splash of water to keep it moist. Cover with a lid or a damp paper towel. Heat in the microwave for 2-3 minutes, stirring halfway through. For the best taste, you can also reheat it in a skillet over medium heat. Stir until heated through. Enjoy your flavorful meal just like it was fresh! If you can't find flank steak, you can use sirloin or skirt steak. Both have great flavor and tenderness. You can also try chicken breast or tofu for a lighter option. Just remember to adjust cooking times as needed. Yes, you can prepare this dish ahead of time. Cook the rice and steak, then store them separately in the fridge. This helps keep the rice fluffy and the steak tender. Just reheat them when you are ready to serve. Steak & Queso Rice can last up to three days in the fridge. Make sure to store it in an airtight container. This keeps the flavors fresh and the food safe to eat. Yes, you can use brown rice! It adds a nutty flavor and is healthier. However, it takes longer to cook. You will need about 40-45 minutes for brown rice to become tender. Great sides include a fresh salad, guacamole, or crispy tortilla chips. You could also serve some grilled veggies for added color and taste. These sides complement the flavors of Steak & Queso Rice nicely. This blog post covered how to make a delicious Steak & Queso Rice dish. We explored key ingredients, step-by-step cooking methods, and tips for success. I shared ideas for variations, proper storage, and answered common questions. Remember, great meals start with quality ingredients and careful prep. Whether you’re cooking steak or opting for a vegetarian twist, enjoy the process. Your kitchen will be filled with great flavors and fun. Happy cooking!

Savory Steak & Queso Rice Flavorful Dinner Delight

Are you ready to dive into a delicious dish that combines the hearty flavors of steak with creamy queso and

Older posts
Newer posts
← Previous Page1 … Page44 Page45 Page46 … Page48 Next →

dsad

© 2025 savorystride • Built with GeneratePress

Our Policies

  • Copyright Policy
  • Cookie Policy
  • GDPR Policy
  • Privacy Policy
  • Disclaimer
  • Terms Of Use

More Information

  • Home
  • About
  • Contact
  • Appetizers
  • Dessert
  • Dinner
  • Drinks
©2025, savorystride About Back To Top