Skip to content
DisclaimerTerms Of UseGDPR PolicyCookie Policy

savorystride

  • Home
  • Drinks
  • Appetizers
  • Dinner
  • Dessert
  • About
  • Contact
  • Privacy Policy
DisclaimerTerms Of UseGDPR PolicyCookie Policy

Hazel

To make Apple Puff Pastry Rolls, you need a few simple ingredients. Each one adds flavor and texture to this treat. Here’s what you need: - Apples: Choose between Granny Smith or Honeycrisp. Granny Smith gives a tart flavor, while Honeycrisp adds sweetness. - Essential spices: Use cinnamon and sugar. They bring warmth and sweetness to the filling. - Puff pastry details: You need one package of puff pastry. Make sure it’s thawed and ready to roll out. - Optional toppings: For a special touch, add powdered sugar on top. You can also drizzle caramel sauce for extra sweetness. Each ingredient plays a key role in making your rolls delicious. When you pick fresh apples and quality puff pastry, you ensure a tasty result. Check out the Full Recipe for exact measurements and steps! 1. Preheat the oven and prepare the baking sheet. Set your oven to 400°F (200°C). Line a baking sheet with parchment paper. This helps the rolls not to stick. 2. Mixing apple filling ingredients. In a large bowl, take your sliced apples. Add lemon juice, cinnamon, brown sugar, and granulated sugar. Toss the mixture well. Make sure all apple slices are coated in the sweet mix. 3. Rolling out the puff pastry. On a clean, lightly floured surface, roll out one sheet of puff pastry. This helps smooth any creases. Cut the pastry into four squares, each about 5x5 inches. This size is perfect for the filling. 1. Filling the pastry squares. Place a generous spoonful of the apple mixture in the center of each pastry square. Don't overfill, as they need to close well. 2. Sealing the edges correctly. Fold each square over diagonally to make a triangle. Press the edges firmly to seal them. You can use a fork to crimp the edges. This adds a nice touch and keeps the filling inside. 3. Applying the egg wash. Brush the tops of each pastry with the beaten egg. This gives your rolls a beautiful, golden color when baked. Make sure to cover all the exposed pastry. 1. Baking time and temperature. Place the filled pastries on your prepared baking sheet. Bake them in the preheated oven for 20-25 minutes. 2. Signs the pastries are ready. Look for a golden brown color and puffed-up shapes. When they look deliciously golden, they are ready to come out. Let them cool slightly before serving. Enjoy your warm, flaky apple puff pastry rolls! For the full recipe, check the earlier section. When making apple puff pastry rolls, the pastry matters. Choose high-quality puff pastry for the best results. A good brand will have layers that puff up nicely. This helps create those flaky, airy textures we love. To get flaky layers, keep everything cold. Chill your dough before rolling it out. Use a light hand when rolling to avoid crushing the layers. If you work too hard, the pastry won’t puff as well. The right apples can make a big difference. I recommend Granny Smith or Honeycrisp apples. They hold their shape and have a nice tartness. These apples add great flavor to your rolls. To avoid mushy filling, slice your apples thinly. This helps them cook through without turning to mush. Toss them with lemon juice to keep their color and enhance their taste. Serving your apple puff pastry rolls can be fun. Try placing them on a nice plate for a classy touch. You can also arrange them in a basket for a rustic look. Garnish with powdered sugar for a sweet touch. A drizzle of caramel sauce can elevate your dish. It adds an extra layer of flavor and looks beautiful on the plate. {{image_2}} You can make apple puff pastry rolls even more fun. Adding nuts or raisins gives a nice crunch and sweetness. Try walnuts or pecans for a nutty taste. Use about 1/4 cup for a great mix. You can also add spices like nutmeg and cloves. A pinch of each can make your filling pop with flavor. If you want to switch things up, you can use other fruits. Pears or peaches work well in place of apples. They add their unique taste and texture. You can even create a fruit medley. Combine apples, pears, and peaches for a delicious mix. This variation makes your rolls exciting and fruity. For those on a vegan diet, you have options too. Use non-dairy milk as an egg wash. Almond or soy milk works great for that golden look. You can find puff pastry that is vegan-friendly at many stores. Just check the label to ensure it fits your needs. This way, everyone can enjoy these tasty treats. To keep your apple puff pastry rolls fresh, place them in an airtight container. Store them in the fridge. They stay good for about 2-3 days. If you want to keep them longer, you can freeze them. Wrap each roll tightly in plastic wrap. Then place them in a freezer bag. They can last up to 3 months in the freezer. When it's time to enjoy your leftovers, reheating them right is key. To keep that flakiness, use the oven. Preheat your oven to 350°F (175°C). Place the rolls on a baking sheet. Heat them for about 10-15 minutes. You can also use an air fryer. Set it to 350°F (175°C) for 5-8 minutes. Both methods help keep the pastry crispy and delicious. Apple puff pastry rolls can last for about 2-3 days in the fridge. Make sure to store them in an airtight container. If you want to keep them longer, you can freeze them. They stay good in the freezer for up to 2 months. Just wrap them tightly in plastic wrap before placing them in a freezer bag. Yes, you can prepare the apple filling and puff pastry ahead of time. Make the filling and store it in the fridge for a day. You can also cut the pastry squares and keep them ready. Just assemble the rolls when you are ready to bake. This makes it easy to serve fresh rolls at any time. These rolls pair well with many tasty options. You can serve them with a scoop of vanilla ice cream or a dollop of whipped cream. For extra sweetness, drizzle some caramel sauce on top. You can even enjoy them with a warm cup of tea or coffee for a cozy treat. To check if the rolls are ready, look for a golden brown color on the top. The pastry should be puffed and flaky. You can also gently tap the bottom; it should sound hollow. If you see these signs, your apple puff pastry rolls are done and ready to enjoy! In this blog post, we covered how to make delicious apple puff pastry rolls. From choosing the right apples to layering flaky pastry, I shared every detail. Plus, you’ve learned tips for perfecting your rolls and creative serving ideas. Remember, these pastries can be customized with various fruits and flavors. Keep your leftovers fresh by following proper storage methods. Now, it’s time for you to bring these tasty treats to life and enjoy the process. Happy baking!

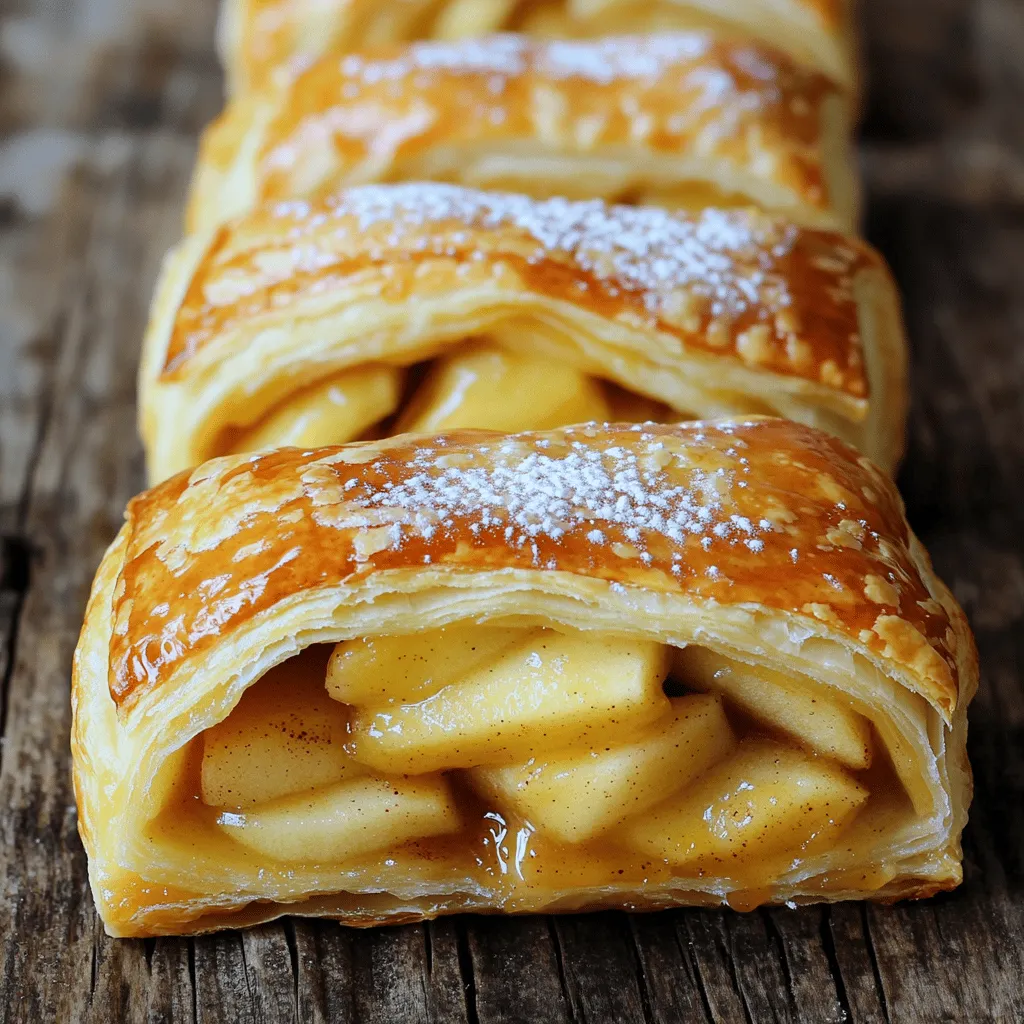
Apple Puff Pastry Rolls Tasty and Simple Treat

Are you ready for a sweet treat that’s both simple and tasty? Apple Puff Pastry Rolls combine the crispness of

To make a great Malaysian chicken curry, you need these key items: - 1 kg chicken, cut into pieces - 2 tablespoons vegetable oil - 2 medium onions, finely chopped - 4 cloves garlic, minced - 1-inch piece of ginger, grated - 2 tablespoons curry powder - 1 tablespoon turmeric powder - 1 teaspoon cumin powder - 1 teaspoon coriander powder - 2 cups coconut milk - 2 medium potatoes, diced - 1-2 green chilies, slit - 1 tablespoon brown sugar - Salt to taste - Fresh cilantro, chopped These ingredients create the rich flavors that define this dish. The chicken gives protein, while coconut milk adds creaminess. The spices bring warmth and depth. You can enhance your curry with these extra items: - 1 tablespoon fish sauce - 1-2 stalks lemongrass, bruised - 1 tablespoon tamarind paste - 1 cup spinach or kale These options add layers of taste. Fish sauce gives umami, while lemongrass offers a fresh citrus note. Tamarind paste adds a tangy kick. Do you lack some ingredients? Here are some swaps: - Use chicken thighs instead of chicken pieces. - Canola oil works if you don't have vegetable oil. - Replace coconut milk with almond milk for a lighter option. - Sweet potatoes can replace regular potatoes. These substitutions keep your dish delicious. Always adjust the spices based on what you use. For the full recipe, check out the details above. Start by gathering your ingredients. Here’s what you need: - 1 kg chicken, cut into pieces - 2 tablespoons vegetable oil - 2 medium onions, finely chopped - 4 cloves garlic, minced - 1-inch piece of ginger, grated - 2 tablespoons curry powder - 1 tablespoon turmeric powder - 1 teaspoon cumin powder - 1 teaspoon coriander powder - 2 cups coconut milk - 2 medium potatoes, diced - 1-2 green chilies, slit - 1 tablespoon brown sugar - Salt to taste - Fresh cilantro for garnish Once you have everything, chop the onions, garlic, and ginger. Dice the potatoes and slit the green chilies. This makes cooking easier. 1. Heat the vegetable oil in a large pot over medium heat. 2. Add the chopped onions and cook for about five minutes. Stir until they look golden. 3. Next, add minced garlic and grated ginger. Cook for one to two minutes. 4. Then, mix in the curry powder, turmeric, cumin, and coriander. Cook for another minute to bring out the flavors. 5. Now, add the chicken pieces. Stir well to coat them in the spices. Brown the chicken on all sides for about five to seven minutes. 6. Pour in the coconut milk and add the diced potatoes and green chilies. Stir and bring to a gentle simmer. 7. Reduce the heat to low. Cover the pot and cook for about 30 minutes. Stir occasionally to stop sticking. 8. Finally, add brown sugar and salt. Taste and adjust the seasoning. Simmer for another five minutes. 9. Garnish with fresh cilantro before serving. This cooking process draws out rich flavors in the chicken and potatoes. You will love how the spices blend together. To check if the chicken is done, cut into a piece. The meat should be white, not pink. For the potatoes, poke them with a fork. If it goes in easily, they are ready. Use these tips to ensure your dish cooks perfectly every time. For a detailed view of the complete process, check the Full Recipe. To spice your curry just right, use fresh spices. Fresh spices add bold flavors. Start by toasting whole spices in a pan. This brings out their oils. You can also mix curry powder with turmeric and cumin. Adjust the spice level with green chilies. Add more for a hotter curry. Taste as you go. This way, you can find your perfect balance. One big mistake is rushing the cooking process. Take your time when browning the chicken. If you skip this step, your curry will lack flavor. Another mistake is not using enough salt. Salt helps enhance all the flavors. Lastly, don’t forget to taste the curry before serving. Adjust the sweetness with brown sugar if needed. Garnishing makes your dish look great! Use fresh cilantro for a vibrant pop of color. You can also sprinkle some sliced red chilies for heat. A squeeze of lime adds freshness. Serve the curry in a colorful bowl to impress. Remember, we eat with our eyes first! For the full recipe, check the section above. {{image_2}} You can easily make a vegetarian or vegan version of Malaysian chicken curry. Instead of chicken, use tofu or chickpeas. These ingredients soak up the flavors well. For the coconut milk, it is already vegan! Just check that your curry powders do not have animal products. Add extra veggies like bell peppers and carrots for more texture. You still get a rich, creamy dish without meat. Different regions in Malaysia have unique takes on chicken curry. In Penang, for instance, they use more lemongrass and kaffir lime leaves. This gives it a fresh, bright taste. In the south, they may add more coconut milk for a richer sauce. Each style reflects local ingredients and spices. Feel free to explore these variations to find your favorite. You can add many other ingredients for extra flavor. Consider using pandan leaves for a fragrant touch. You might also try adding nuts like cashews or peanuts for crunch. If you want more heat, add more chilies or some chili paste. Each ingredient can change the dish's flavor and texture. Have fun experimenting to create your unique Malaysian chicken curry. For the full recipe, check out the recipe section. After you finish your Malaysian chicken curry, let it cool down. Store leftovers in an airtight container. Make sure to keep it in the fridge. It will stay fresh for about three to four days. Always label the container with the date, so you know when to eat it next. When you're ready to enjoy your leftovers, reheat them slowly. Use a pot on low heat for even warming. Stir it often to avoid sticking. You can also microwave it in short bursts, stirring in between. Add a splash of coconut milk to boost the flavor and keep it moist. If you want to save some for later, freezing is a great option. Let the curry cool completely first. Pour it into a freezer-safe container or a zip-top bag. Press out as much air as possible before sealing. Your curry will stay good for up to three months in the freezer. When ready to eat, thaw it overnight in the fridge before reheating. Enjoy the full recipe for a delightful meal! Malaysian Chicken Curry has roots in Malaysia. It blends Malay, Chinese, and Indian flavors. This mix creates a rich and unique dish. You can find it in homes and restaurants across the country. Each region adds its touch, making it special. The use of spices like turmeric and curry powder is key. These flavors tell a story of Malaysia's diverse culture. Yes, you can make Malaysian Chicken Curry ahead of time. Cooking it a day early allows flavors to deepen. Store it in the fridge in an airtight container. Reheat it on the stove or microwave before serving. This dish tastes great even after a day, making it perfect for meal prep. The spice level of Malaysian Chicken Curry can vary. You control the heat by adjusting green chilies. Use one for a mild dish or two for a kick. The coconut milk helps balance the heat, making it enjoyable. If you're sensitive to spice, start low and adjust as needed. Malaysian Chicken Curry pairs well with several sides. Here are some great options: - Steamed jasmine rice - Roti canai (flaky flatbread) - Naan bread - Cucumber salad - Pickled vegetables These sides enhance the meal and offer a nice contrast. Yes, Malaysian Chicken Curry can be gluten-free. Just ensure your curry powder and other ingredients do not contain gluten. Most spices are naturally gluten-free. Serve it with rice or gluten-free bread for a safe meal. It's a tasty option for those avoiding gluten. For more details, check out the Full Recipe. Here is the full recipe for Malaysian Chicken Curry. This dish is rich and full of flavor. You will need the following ingredients: - 1 kg chicken, cut into pieces - 2 tablespoons vegetable oil - 2 medium onions, finely chopped - 4 cloves garlic, minced - 1-inch piece of ginger, grated - 2 tablespoons curry powder - 1 tablespoon turmeric powder - 1 teaspoon cumin powder - 1 teaspoon coriander powder - 2 cups coconut milk - 2 medium potatoes, diced - 1-2 green chilies, slit (adjust for spice level) - 1 tablespoon brown sugar (or palm sugar) - Salt to taste - Fresh cilantro, chopped (for garnish) To make this curry, follow these steps: 1. Heat the vegetable oil in a large pot over medium heat. Add the chopped onions and sauté until they turn translucent and slightly golden, about 5 minutes. 2. Stir in the minced garlic and grated ginger. Cook for 1-2 minutes until fragrant. 3. Mix in the curry powder, turmeric powder, cumin powder, and coriander powder. Cook for another minute to let the spices bloom. 4. Add the chicken pieces to the pot, stirring well to coat them in the spices. Cook until the chicken is browned on all sides, about 5-7 minutes. 5. Pour in the coconut milk and add the diced potatoes along with the slit green chilies. Stir to combine, then bring the mixture to a gentle simmer. 6. Reduce the heat to low, cover the pot, and let the curry cook for about 30 minutes. Stir occasionally to prevent sticking. 7. Add the brown sugar and salt to taste. Allow it to simmer for an additional 5 minutes before removing from heat. 8. Garnish with fresh cilantro just before serving. This recipe serves 4-6 people. Here are some nutritional facts per serving (approximate values): - Calories: 380 - Protein: 25g - Fat: 26g - Carbohydrates: 20g - Fiber: 3g For a visual guide, check out this [cooking video](#) on how to prepare Malaysian Chicken Curry. Watching the process can help you master this dish! In this post, we explored the essential and optional ingredients for Malaysian chicken curry. We covered step-by-step instructions to help you prepare and cook the dish. I shared tips to perfect the flavor and avoid common mistakes. We also discussed fun variations and how to store your leftovers safely. Malaysian chicken curry is a delicious dish full of rich flavors. With practice, you can master this recipe and impress others with your cooking skills. Enjoy your culinary journey!

Malaysian Chicken Curry Flavorful Home Cooking Guide

Are you ready to spice up your cooking with an amazing dish? This Malaysian Chicken Curry guide is your ticket

- 2 ribeye steaks (about 1 inch thick) - 1 cup shrimp, peeled and deveined - Salt and pepper to taste - 2 tablespoons olive oil - 1 tablespoon garlic, minced - 1 cup heavy cream - 1 teaspoon lemon zest - 2 tablespoons fresh parsley, chopped - 1/4 teaspoon cayenne pepper (optional) When cooking, freshness matters. Always pick fresh shrimp. Look for shrimp that smell sweet and have a firm texture. Avoid any that smell fishy or have a slimy feel. Next, choose the right steak cut. Ribeye steaks are great because they have good marbling. This makes them juicy and tender when cooked. Look for steaks with a nice red color and some white fat streaks. This fat adds flavor while cooking. Always let your steak sit out for about 30 minutes before cooking. This helps it cook evenly. For the full recipe, check the earlier section. Start by seasoning the ribeye steaks. Use a generous amount of salt and pepper. This adds great flavor. Let the steaks sit at room temperature for about 30 minutes. This resting time helps them cook evenly. Heat a large skillet over medium-high heat. The oil should shimmer when hot. Add the steaks to the skillet. Cook for about 4-5 minutes on each side for medium-rare. If you prefer it more cooked, adjust the time. After cooking, take the steaks off the heat. Cover them with foil on a plate. This keeps them warm and juicy. In the same skillet, turn the heat down to medium. Add the minced garlic and sauté it for about 30 seconds. This step brings out a lovely flavor. Next, add the shrimp. Cook them for 2-3 minutes until they turn pink. Be careful not to overcook the shrimp. They should feel tender and juicy. Once the shrimp are done, pour in the heavy cream. Stir the mixture and bring it to a simmer. Then, stir in lemon zest, parsley, and cayenne pepper, if you like a bit of heat. Let the sauce cook for about 3-4 minutes. This thickens the sauce nicely. Finally, slice the steaks against the grain. Drizzle the creamy shrimp sauce over the top. Enjoy this delicious dish right away! For the full recipe, see the section on ingredients. To get the best doneness for your steak, use a meat thermometer. Insert it into the thickest part of the steak. Aim for 130°F for medium-rare and 145°F for medium. This tool helps you avoid overcooking. If you don’t have a thermometer, look for these signs. For medium-rare, the steak should feel soft but springy. If you press it, the meat should have some give. For medium, it feels firmer. The color should be a nice pink inside. Seasonings can change your dish. Try adding garlic powder, onion powder, or smoked paprika for deeper flavors. A pinch of smoked salt can also boost the taste. When using herbs, fresh is best. Fresh parsley can brighten up your sauce. Dried herbs work too, but use less. Dried herbs are stronger than fresh ones. Pair your steak with sides that complement it. Roasted vegetables or mashed potatoes work well. A simple salad can add a fresh crunch. For plating, slice the steak against the grain. This makes it easier to eat. Drizzle the creamy shrimp sauce over the steak. Garnish with extra parsley for color. This adds a nice touch to your meal. {{image_2}} If you want to switch things up, try lobster or crab instead of shrimp. Both add a rich flavor and make the dish feel special. You can also make this dish vegetarian. Use mushrooms or tofu to create a similar sauce. Both options are tasty and satisfying. When choosing your steak, ribeye is great, but filet mignon is also a top choice. Ribeye has more fat, which gives it flavor and tenderness. Filet mignon is leaner and very tender. Other recommended cuts include sirloin or New York strip. Each cut has its own flavor and texture. For those who love heat, add spices like paprika or chili flakes to the sauce. This will give your dish a nice kick. You can also incorporate vegetables. Spinach or bell peppers can add color and nutrients. Just sauté them with the garlic before adding the shrimp. For the full recipe, check out the complete guide. To keep your steak with creamy shrimp sauce fresh, use airtight containers. Glass or plastic containers work well for this. Make sure the food cools down first. Place the steak and shrimp sauce in separate containers. This helps maintain texture and flavor. You can store them in the fridge for up to three days. When you reheat steak, do it gently. The best way is in a skillet over low heat. Add a splash of water or broth to keep it moist. Cover the skillet with a lid. Heat it for about 5-10 minutes until warm. For the shrimp sauce, use a saucepan on low heat. Stir it slowly to avoid burning. If it gets too thick, add a little cream or broth. This keeps the creamy texture smooth and rich. Enjoy every bite of your delicious meal again! To make the steak more tender, choose the right cut. Ribeye is great because it has fat, which adds flavor. You can also marinate the steak in a mix of oil, vinegar, and herbs for a few hours. Letting the steak rest after cooking helps too. This keeps the juices inside. Yes, you can prepare the sauce ahead of time. Cook the shrimp and sauce, then cool it down. Store it in the fridge for up to two days. When you're ready, just reheat it on low heat before serving. You may need to add a splash of cream to get the right texture again. Some great sides include roasted vegetables or mashed potatoes. You can also serve it with a fresh salad or garlic bread. Each of these adds flavor and balance to the meal. Try to choose sides that complement the richness of the sauce. Yes, you can make this dish dairy-free. Use coconut cream instead of heavy cream. It gives a creamy texture without the dairy. For added flavor, you can stir in some nutritional yeast. This will add a cheesy taste without using cheese. Cook the shrimp for about 2-3 minutes. They will turn pink when they are done. Avoid overcooking them as they can become tough. Just keep an eye on the color for perfect shrimp every time. For the full recipe, check out the Surf & Turf Delight section. In this post, we explored the essential ingredients for a delicious ribeye and shrimp dish. You learned how to prepare and cook your steaks, create the creamy shrimp sauce, and perfect doneness. I shared tips on enhancing flavor and serving suggestions to impress your guests. You can even try variations with different seafood and steak cuts. Remember, fresh ingredients and careful cooking make a difference. Enjoy experimenting in your kitchen and create a meal that stands out!

Steak with Creamy Shrimp Sauce Irresistible Dinner Dish

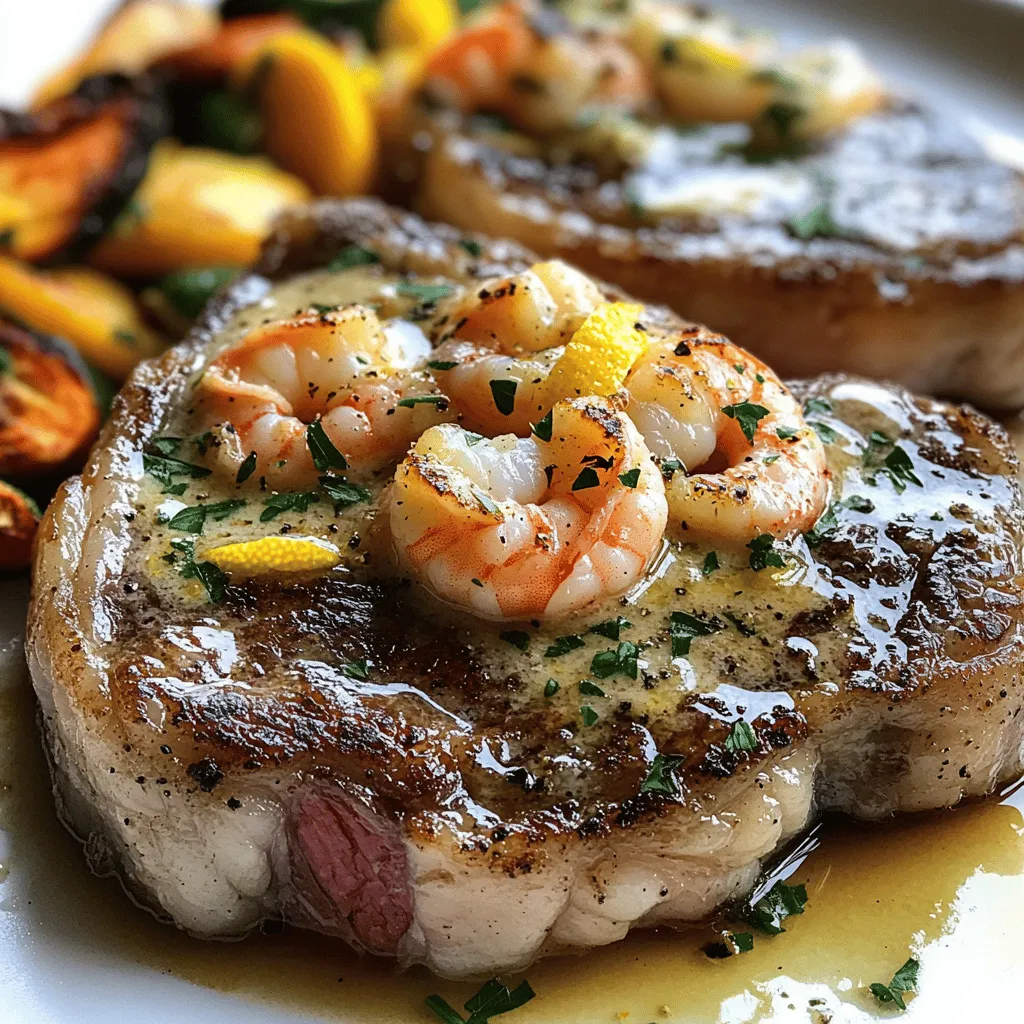
Want to impress your dinner guests? Try making steak with creamy shrimp sauce! This dish combines the rich flavors of

- 1 cup all-purpose flour - 1/2 cup unsalted butter - 1 cup water - 4 large eggs The main ingredients create the eclair's unique texture. All-purpose flour gives structure. Unsalted butter adds richness. Water helps the dough puff up. Eggs bind everything and create a light shell. - 1/4 teaspoon salt - 1 tablespoon sugar - 1 teaspoon vanilla extract (optional, for flavor depth) Adding salt enhances the taste. A little sugar can help balance flavors. Vanilla extract adds a nice touch, but it’s not a must. These extras make your pastry shells even better. For the full recipe, check out the detailed instructions on making these delicious unfilled eclair pastry shells! 1. Preheating the oven Start by setting your oven to 425°F (220°C). This high heat helps the shells puff up nicely. 2. Combining water, butter, salt, and sugar In a medium saucepan, mix together 1 cup of water, 1/2 cup of unsalted butter, 1/4 teaspoon of salt, and 1 tablespoon of sugar. Heat this over medium heat. Stir occasionally until it boils. The butter should melt completely at this point. 1. Adding flour and stirring until combined Once the mixture boils, add 1 cup of all-purpose flour all at once. Stir quickly and hard for about 1-2 minutes. The dough should form a ball and pull away from the sides of the pan. 2. Incorporating eggs into the mixture Remove the pan from heat. Let it cool for a few minutes. Then add 4 large eggs, one at a time. Mix well after each egg. The dough should look glossy and smooth. This step takes some effort, but it’s worth it! 1. Piping the dough onto the baking sheet Place the dough in a piping bag fitted with a large round tip. If you don’t have one, use a resealable bag and snip a corner. Pipe 4-inch long lines on a lined baking sheet. Leave space between each line since they will puff up. 2. Best baking time and temperature Bake the shells in your preheated oven for 25-30 minutes. Don’t open the oven door for the first 20 minutes. This keeps them from deflating. They should turn a lovely golden brown when done. After baking, let them cool on a wire rack. Poke a small hole in each shell to let steam escape. This keeps them crisp for later use. For the complete recipe, check the [Full Recipe]. Enjoy your baking! To make great eclair shells, pay attention to your oven. Set the temperature to 425°F (220°C). This high heat helps the dough rise and puff up. If it's too low, your shells may flatten. Do not open the oven door during the first 20 minutes of baking. This lets out steam and can cause deflation. Trust the process, and let the heat work its magic. Once baked, let the eclair shells cool on a wire rack. This keeps them crisp and prevents sogginess. If you leave them on the baking sheet, they may trap moisture. After they cool, poke small holes in the bottom of each shell. This step releases steam and helps maintain their crisp texture. You want perfect shells ready for filling later. {{image_2}} You can fill your unfilled eclair pastry shells with many tasty options. Here are a few classic ideas: - Cream options and custard: Whipped cream is light and fluffy. Pastry cream adds richness. You can also try chocolate cream for a sweet twist. Each of these options brings its own unique taste to the eclair. - Fruit-flavored fillings: You can add fruit purees or jams. Strawberry or raspberry flavors brighten up each bite. You can even mix fresh fruit with cream for a delightful surprise. Experiment with your favorite fruits to find the perfect match! Once your shells are filled, you can make them even more special with toppings: - Powdered sugar dusting: A light dusting of powdered sugar adds sweetness. It also gives a beautiful look to your eclairs. Just sprinkle it on before serving for a classy touch. - Chocolate ganache drizzle: Melted chocolate makes a great topping. Pour it over the filled eclairs for a rich flavor. You can use dark, milk, or white chocolate. Let the ganache cool slightly before drizzling for the best effect. When you personalize your eclairs, each one becomes a unique treat. Enjoy creating your perfect dessert! For more tips and a full guide, check out the Full Recipe. To keep your unfilled eclair shells fresh, store them in an airtight container. This protects them from moisture and keeps them crispy. You can place a paper towel inside the container to absorb any extra moisture. This simple trick helps maintain their texture. The ideal storage duration is up to two days at room temperature. If you need to store them longer, consider freezing them. In the freezer, these shells can last for up to three months. Just make sure to wrap them well in plastic wrap before placing them in a freezer bag. When you're ready to fill your eclair shells, choose your favorite filling. This could be cream, custard, or even fruit. When filling, make a small hole in the bottom of each shell. This helps the filling go in easily and keeps the shell intact. Check for signs of freshness in your shells. They should be crisp and light. If they feel soggy or soft, it’s best to toss them. Fresh shells will hold their shape and be perfect for filling. Yes, you can freeze unfilled eclair pastry shells. To do this, let them cool completely. Once cool, place them in an airtight container or a freezer bag. Make sure to separate layers with parchment paper to prevent sticking. They can last up to three months in the freezer. When you are ready to use them, thaw in the fridge overnight. Then, reheat in a 350°F oven for about 10 minutes for a fresh texture. If your pastry doesn't puff, it could be due to a few reasons. First, check your oven temperature. If it's too low, the shells won't rise well. Also, ensure you mixed the dough enough. The flour needs to be fully incorporated. Lastly, avoid opening the oven door while baking. This can cause the shells to collapse. If you follow these tips, you should see better results next time. Unfilled eclair shells can last for about two days at room temperature. Store them in an airtight container to keep them crisp. If you want to keep them longer, freeze them as mentioned earlier. Just make sure to check for any signs of moisture or staleness before using. Fresh shells are best for filling and serving. You learned how to make unfilled eclair pastry shells, from ingredients to tips. Key ingredients include flour, butter, and eggs. Follow the steps to prepare, create, and bake these light shells. Don't forget about cool tricks for perfect shells, storage advice, and fun filling ideas. With practice, you can master these treats. Enjoy your eclairs fresh or frozen, and share them with friends and family. Happy baking!

Unfilled Eclair Pastry Shells Easy Baking Guide

Looking to master the art of baking unfilled eclair pastry shells? You’re in the right place! This easy baking guide

To make delicious chocolate cheesecake bars, you'll need a few key items. Here’s a simple list of the main ingredients: - 1 cup graham cracker crumbs - 1/4 cup unsweetened cocoa powder - 1/2 cup sugar - 1/2 cup unsalted butter, melted - 16 oz cream cheese, softened - 1 cup powdered sugar - 2 large eggs - 1 teaspoon vanilla extract - 1/2 cup semi-sweet chocolate chips - 1/4 cup sour cream - Pinch of salt Each ingredient plays a big role in the taste and texture of your bars. The graham cracker crumbs form a sturdy crust, while cocoa powder adds rich chocolate flavor. Cream cheese gives the filling its creamy texture. Sugar balances the flavors, and eggs help set the filling as it bakes. Adding a garnish can elevate your chocolate cheesecake bars. Here are some ideas: - Fresh raspberries - Mint leaves These garnishes not only look nice but also add a fresh taste. The tartness of raspberries contrasts beautifully with the sweet chocolate. Mint leaves bring a hint of coolness. Feel free to use them or skip them if you prefer. Either way, your bars will still be a hit! For the full recipe, check out the detailed instructions and tips to make these bars shine. - First, preheat your oven to 325°F (160°C). This sets the right heat for baking. - Next, line an 8x8 inch baking pan with parchment paper. Leave some paper hanging over the sides. This helps with easy removal later. - In a large bowl, combine 1 cup of graham cracker crumbs, 1/4 cup of unsweetened cocoa powder, and 1/2 cup of sugar. - Then, pour in 1/2 cup of melted unsalted butter. Mix until the crumbs feel wet and sandy. - Press this mixture into the bottom of the pan. Use a measuring cup to flatten it evenly. - Bake the crust for 10 minutes in the oven. Once baked, take it out and let it cool while you make the filling. - In another bowl, beat 16 oz of softened cream cheese with 1 cup of powdered sugar. Mix until smooth. - Add 2 large eggs, one by one. Make sure to mix well after each egg. - Stir in 1 teaspoon of vanilla extract, 1/2 cup of semi-sweet chocolate chips, 1/4 cup of sour cream, and a pinch of salt. Mix until everything is smooth and creamy. - Pour the cheesecake filling over the cooled crust. Spread it out evenly using a spatula. - Place the pan back in the oven and bake for 25-30 minutes. The edges should be set, but the center might jiggle slightly. - After baking, turn off the oven and crack the door open. Leave the cheesecake bars inside to cool for about an hour. This helps prevent cracks. - Once cooled, move the pan to the fridge. Chill for at least 4 hours, or better yet, overnight. This helps the bars set well. For the complete process, check the Full Recipe. For creamy cheesecake bars, you must mix the ingredients well but not too much. I start by beating the cream cheese until it is smooth. Then, I add the powdered sugar gradually. This method keeps the mixture light and fluffy. When you add the eggs, do so one at a time. Mix each egg in fully before adding the next. This helps keep the structure just right. To ensure even baking, I recommend keeping an eye on the edges. They should be set while the center is still slightly jiggly. If you bake too long, the bars may crack. After baking, turn off the oven and leave the bars inside. This slow cooling helps prevent cracks. If you need a gluten-free crust, try using almond flour or gluten-free graham crackers. Both options work well and add unique flavors. For a dairy-free version, swap cream cheese with a dairy-free cream cheese. Silken tofu blended until smooth is another great substitute. It keeps the texture creamy and rich. When serving your cheesecake bars, cut them into neat squares. Use a sharp knife for clean edges. For a fun twist, you can layer the bars with fresh raspberries on top. They add color and flavor. You can also sprinkle some chocolate shavings for a fancy touch. Mint leaves make a nice garnish, adding a fresh scent. For a festive look, try serving them on a colorful plate. Arrange the bars in a fun pattern. This will impress your guests and make the dessert even more delightful. For the complete recipe, check the [Full Recipe]. {{image_2}} To make no-bake chocolate cheesecake bars, you need a few simple steps. - Ingredients: - 1 cup graham cracker crumbs - 1/4 cup unsweetened cocoa powder - 1/2 cup sugar - 1/2 cup unsalted butter, melted - 16 oz cream cheese, softened - 1 cup powdered sugar - 1 teaspoon vanilla extract - 1/2 cup semi-sweet chocolate chips - 1 cup whipped cream 1. First, mix the graham cracker crumbs, cocoa powder, sugar, and melted butter in a bowl. 2. Press this mixture into a pan to form the crust. 3. In another bowl, beat the cream cheese and powdered sugar until smooth. 4. Fold the whipped cream into the cream cheese mix. 5. Add the chocolate chips and vanilla extract. Mix well. 6. Spread this filling over the crust. 7. Chill in the fridge for at least 4 hours. Pros: - Quick and easy to make. - No oven needed. Cons: - Needs chilling time. - May not set as firm as baked bars. For vegan chocolate cheesecake bars, you can swap some ingredients. - Substitutes for traditional ingredients: - Use almond milk or coconut milk instead of dairy. - Replace cream cheese with vegan cream cheese. - Use maple syrup instead of powdered sugar. - Recipe adjustments: 1. Prepare the crust with vegan butter. 2. Follow the same steps for mixing the filling. 3. Ensure all ingredients are labeled vegan. Vegan chocolate cheesecake bars taste rich and creamy. They are perfect for plant-based diets. Adding flavors can make your chocolate cheesecake bars unique. - Different types of chocolate: - Use dark chocolate for a richer taste. - White chocolate can give a sweeter flavor. - Adding fruits and nuts: - Mix in chopped nuts like walnuts or almonds for crunch. - Swirl in raspberry or strawberry puree for a fruity twist. These additions can elevate your bars. Experiment with different combinations to find your favorite. Check out the Full Recipe for more ideas! To store leftovers, place the chocolate cheesecake bars in an airtight container. This keeps them fresh and tasty. You can also cover the pan tightly with plastic wrap. They will stay good in the fridge for up to five days. The longer they sit, the more flavor they develop. However, I recommend enjoying them within three days for the best taste. For freezing the bars, first, let them cool completely. Then, cut them into squares and place them in a single layer on a baking sheet. Freeze them for about an hour. Once they are firm, transfer the squares to a freezer-safe bag or container. They can last up to three months in the freezer. To thaw, simply take them out and place them in the fridge overnight. This keeps them creamy and delicious. If you need them fast, you can let them sit at room temperature for about 30 minutes. Then, your tasty treat is ready to enjoy! You can tell when the bars are done by looking at the edges. They should look firm and set. The center should jiggle slightly when you shake the pan. This means it is not overbaked. To check for doneness, insert a toothpick into the center. If it comes out mostly clean but with some moist crumbs, the bars are ready. Yes, you can make these bars ahead of time. To prepare them in advance, bake the bars as normal. After baking, let them cool completely. Then, wrap them in plastic wrap or foil. Store them in the fridge for up to three days. This helps the flavors deepen and makes them easy to serve later. If you want to replace cream cheese, you have options. You can use Greek yogurt or ricotta cheese. These will give a different taste but still work well. For a dairy-free option, try cashew cream or silken tofu blended until smooth. Each alternative may change the texture a bit but will still taste great. To slice the bars without a mess, use a sharp knife. Dip the knife in hot water before cutting. Wipe it clean after each slice to keep edges neat. This method prevents the creamy filling from sticking to the knife. For best results, wait until the bars are fully chilled before cutting. In this article, we explored making delicious chocolate cheesecake bars. We covered key ingredients, including graham cracker crumbs and cream cheese. I shared step-by-step instructions, along with tips for perfect texture and creative presentations. You can try no-bake or vegan variations, too. Storing your bars properly keeps them fresh longer. Overall, these tasty treats are easy to make and sure to impress. Enjoy creating your own chocolate cheesecake bars!

Chocolate Cheesecake Bars Easy and Delectable Treat

Are you ready to indulge in a rich and creamy treat? These Chocolate Cheesecake Bars are both easy to make

To make crispy garlic butter potatoes, you need the following ingredients: - 1.5 pounds baby potatoes, halved - 4 tablespoons unsalted butter - 4 cloves garlic, minced - 1 teaspoon fresh rosemary, chopped (or 1/2 teaspoon dried) - 1 teaspoon fresh thyme, chopped (or 1/2 teaspoon dried) - Salt and pepper to taste - 1 tablespoon olive oil - 2 tablespoons fresh parsley, chopped (for garnish) - Zest of 1 lemon These ingredients come together to create a simple yet tasty side dish. You will need a few key tools for this recipe: - A large mixing bowl - A baking sheet - A small saucepan - A spatula or large spoon - A knife and cutting board These tools help you prepare and cook the potatoes evenly. Don’t have all the ingredients? Here are some easy swaps: - Use regular potatoes instead of baby potatoes. - Swap olive oil for any cooking oil you like. - If you lack fresh herbs, dried herbs work just fine. - Use vegan butter if you want a dairy-free option. These substitutions keep the recipe flexible and fun. For the full recipe, check out the detailed instructions. To start, choose fresh baby potatoes. You want them small and tender. Wash the potatoes well. Cut each potato in half and place them in a large bowl. Drizzle with olive oil. Add salt and pepper to taste. Toss everything gently until the potatoes are well coated. This step helps the potatoes roast evenly. Next, melt butter in a small saucepan over medium heat. Add minced garlic, chopped rosemary, and thyme. Stir the mixture for 1-2 minutes. Watch it closely as garlic can burn quickly. You want it fragrant but not browned. This sauce gives the potatoes their rich flavor. Preheat your oven to 425°F (220°C). Spread the coated potatoes cut side down on a baking sheet. Roast them for 20-25 minutes. Look for a golden brown color and crispy edges. After roasting, drizzle the garlic butter sauce over the potatoes. Toss them gently to coat. Return the pan to the oven for 5-10 more minutes. This step helps all the flavors mix well. Finally, garnish with lemon zest and parsley before serving. Enjoy your crispy garlic butter potatoes! For the full recipe, check the details above. To get your potatoes super crispy, choose baby potatoes. They cook evenly and stay tender inside. Cut them in half to allow more surface area for browning. Toss them with olive oil, salt, and pepper before roasting. Make sure the baking sheet is hot when you add the potatoes. This helps them start crisping right away. Don’t crowd the pan; give them space to breathe. Flip them halfway through cooking to ensure all sides brown nicely. For a boost of flavor, add fresh herbs like rosemary and thyme. These herbs give a lovely aroma and taste. Mince the garlic finely and add it to the butter. Cook it just until fragrant to avoid burning. You can also sprinkle some lemon zest on top for brightness. If you like heat, add a pinch of red pepper flakes. This will wake up the flavors and add a nice kick to your dish. One common mistake is not preheating the oven. Always preheat your oven to 425°F (220°C) before roasting. This step is key for crispy results. Another mistake is overcrowding the baking sheet. If the potatoes are too close, they will steam instead of roast. Lastly, be careful not to burn the garlic. Cook it just until you smell its rich aroma. Follow these tips for perfect crispy garlic butter potatoes every time! For the full recipe, check out the Crispy Garlic Butter Potatoes section. {{image_2}} You can switch up the herbs in this recipe. For a fresh twist, try using basil or oregano instead of rosemary or thyme. If you like a kick, add some red pepper flakes. These changes can add new flavors and keep things exciting. You can also cook these potatoes in different ways. The air fryer gives them a great crunch. Set your air fryer to 400°F and cook for about 15-20 minutes. For stovetop cooking, use a large skillet. Heat some olive oil and cook the potatoes until they’re golden brown and tender, about 20-25 minutes. Both methods work well and give tasty results. To make this dish a full meal, add protein. Grilled chicken or shrimp pairs great with these crispy potatoes. You can also toss in cooked bacon bits for extra flavor. Just mix in your protein with the potatoes before serving. This way, you get a tasty side and a satisfying main dish all in one. For the full recipe, check out the main section. You can store leftover crispy garlic butter potatoes in an airtight container. Place them in the fridge. They stay fresh for up to three days. Make sure they cool down first. This helps keep them crispy for your next meal. If you want to keep them longer, consider freezing. To reheat, use your oven for the best results. Set it to 350°F (175°C). Place the potatoes on a baking sheet. Bake for about 10-15 minutes until hot and crispy again. You can also use a skillet. Heat the skillet on medium heat and toss the potatoes. This makes them crispy without drying them out. If you want to freeze these potatoes, make sure they are completely cool. Then, place them in a freezer-safe bag or container. Remove as much air as possible. They can last for up to two months. To enjoy them later, thaw in the fridge overnight before reheating. For the best flavor, enjoy them fresh! Check out the Full Recipe for tips on making these tasty potatoes. I recommend using baby potatoes. They are small and cook evenly. Their thin skin helps them get crispy. Yukon Gold or red potatoes also work well. Both have a nice flavor and texture. Choose firm potatoes without any spots or wrinkles for the best results. Yes, you can make this recipe vegan. Substitute the butter with a plant-based butter. You can also use olive oil instead. The garlic and herbs will still add great taste. This way, you keep the flavor while making it suitable for all diets. To adjust for larger servings, simply increase the amount of potatoes. You can double the ingredients easily. Just make sure to use a larger baking sheet. This helps the potatoes roast evenly. Keep an eye on cooking time, as more potatoes may take longer to crisp up. If you want the full recipe, check the detailed instructions above. This blog post shared the best ingredients and tools for perfect roasting. I covered how to prepare your potatoes and make a tasty garlic butter sauce. You learned tips for crispiness and flavor, plus how to avoid common mistakes. I also shared fun variations and storage tips for leftovers. Now, you can create a delicious dish that everyone will love. Enjoy your cooking adventure!

Crispy Garlic Butter Potatoes Delightful Side Dish

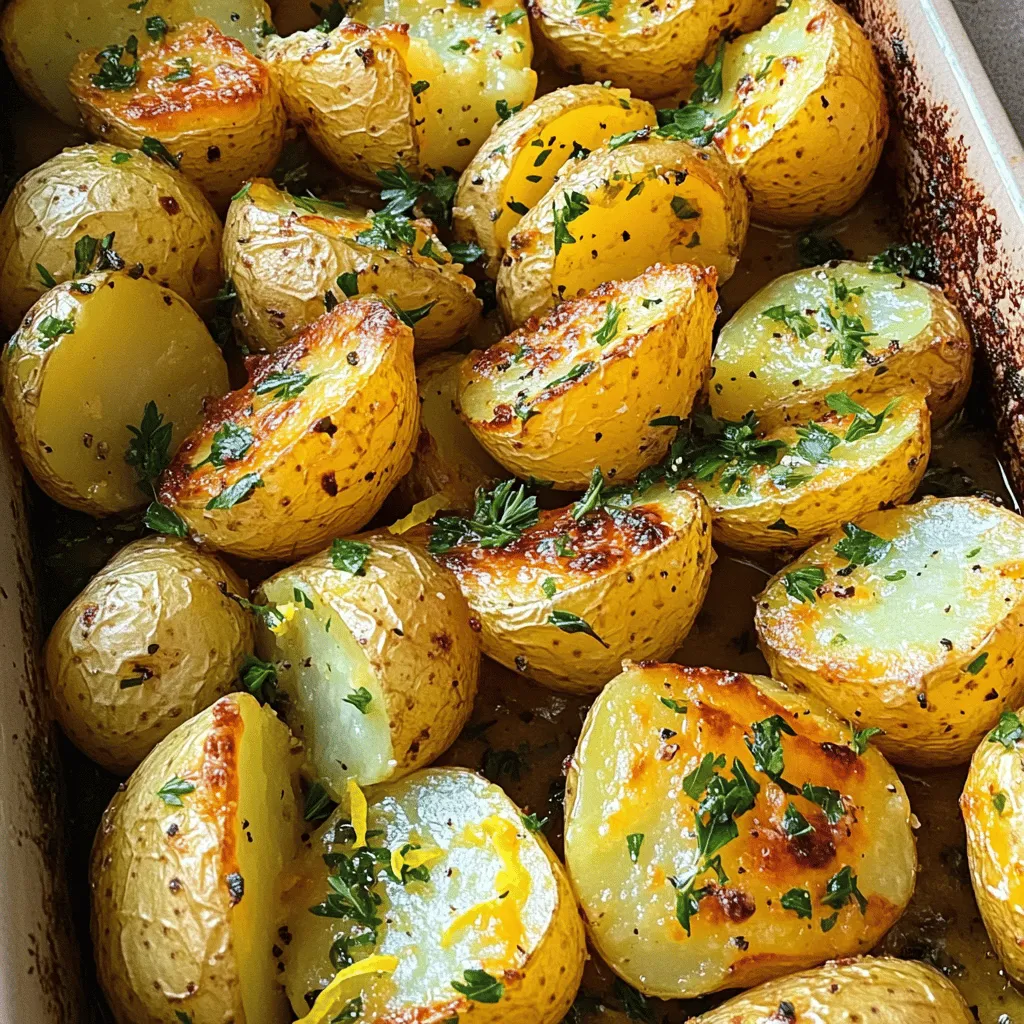
Looking for the ultimate side dish? Crispy Garlic Butter Potatoes are your answer! With a golden, crunchy crust and a

For this dish, you will need: - 4 salmon fillets - 1 cup cherry tomatoes, halved - 1 cup asparagus, trimmed The salmon gives you protein and rich flavor. Cherry tomatoes add sweetness, while asparagus brings crunch. Together, they make each bite tasty and fresh. This is what you’ll need for the seasoning: - 2 tablespoons olive oil - 3 cloves garlic, minced - 1 lemon (zest and juice) - 1 teaspoon dried oregano - Salt and pepper to taste The olive oil adds a nice richness. Garlic gives it a strong aroma. Lemon zest and juice brighten the dish, while oregano adds an herbaceous touch. Salt and pepper will enhance all the flavors. To serve this meal, I recommend: - Fresh parsley, chopped (for garnish) Garnishing with parsley adds a pop of color. You can also serve it with a side of rice or a simple salad. This makes the meal balanced and even more enjoyable. Check the Full Recipe for more details! Start by gathering your ingredients. You will need: - 4 salmon fillets - 2 tablespoons olive oil - 3 cloves garlic, minced - 1 lemon (zest and juice) - 1 teaspoon dried oregano - Salt and pepper to taste - 1 cup cherry tomatoes, halved - 1 cup asparagus, trimmed - Fresh parsley, chopped (for garnish) Now, preheat your oven to 400°F (200°C). This temperature helps cook the salmon perfectly. In a mixing bowl, add the olive oil, minced garlic, lemon zest, lemon juice, oregano, salt, and pepper. Whisk it all together until it blends well. On a large baking sheet, place the salmon fillets in the center. Brush both sides with your garlic lemon mix. This adds flavor and keeps the salmon moist. Next, surround the salmon with halved cherry tomatoes and trimmed asparagus. Drizzle any leftover sauce over these veggies. Bake everything in your preheated oven for 12-15 minutes. The salmon should be opaque and flake easily with a fork. The veggies will become tender and tasty. Make sure to check your salmon around the 12-minute mark. If your fillets are thicker, they might need a few extra minutes. To add more flavor, feel free to sprinkle more herbs on top. Garnish your dish with fresh parsley for a bright finish. This adds a nice touch to your meal. For the full recipe, you can refer back to the earlier section. When picking salmon, aim for wild-caught if you can. It has better taste and is healthier. Look for fillets that are bright pink and moist. Avoid dull or brown spots. Fresh salmon also has a mild smell, not a strong fishy one. You can use skin-on or skinless fillets for this recipe. Skin-on can add extra flavor and crispiness. Cooking time can change based on your oven and fillet thickness. For thinner fillets, check for doneness at 10 minutes. For thicker ones, it may take up to 15 minutes. The salmon is done when it flakes easily with a fork and is opaque in color. If you want crispy edges, broil for the last two minutes. Feel free to switch up the flavors! You can add herbs like thyme or dill for a fresh twist. For a spicy kick, sprinkle some red pepper flakes on top. If you love citrus, add orange zest along with the lemon. These small changes can make a big difference and keep the dish exciting. Don't forget to check the full recipe for more ideas! {{image_2}} You can swap out the cherry tomatoes and asparagus with other vegetables. Bell peppers, zucchini, or broccoli work well too. Just make sure to cut them into similar sizes. This helps everything cook evenly. Roasting time stays about the same, but check for doneness. If you want a change from salmon, try chicken or shrimp. Chicken breasts are a great option. Use the same garlic lemon sauce to keep the flavor. For shrimp, cook them for a shorter time, about 8-10 minutes. They cook fast and should be pink and firm. Add fresh herbs to boost flavor. Basil, dill, or thyme can make a big difference. You can also use different spices, like paprika or chili flakes. A splash of white wine adds a nice touch too. Experiment to find what you love! For the full recipe, check our One-Pan Lemon Garlic Salmon. After cooking One-Pan Lemon Garlic Salmon, let it cool for a bit. Place leftovers in an airtight container. Store in the fridge for up to three days. Make sure to keep salmon and veggies together for the best flavor. If you want to keep it fresh, eat it sooner rather than later. You can freeze cooked salmon if you want to save some for later. Wrap each piece tightly in plastic wrap. Then, place the wrapped salmon in a freezer bag. Label the bag with the date. You can keep it in the freezer for up to three months. When you're ready to eat, thaw it in the fridge overnight. Reheating your One-Pan Lemon Garlic Salmon is easy. You can use the oven or microwave. For the oven, preheat it to 350°F (175°C). Place the salmon on a baking sheet and cover it with foil. Heat for about 15 minutes. If using a microwave, put the salmon on a microwave-safe plate. Heat for 1-2 minutes, checking to avoid overcooking. Enjoy your meal just like the first time! To make One-Pan Lemon Garlic Salmon, first gather your ingredients. You need four salmon fillets, garlic, olive oil, lemon, oregano, and veggies like cherry tomatoes and asparagus. 1. Preheat the oven to 400°F (200°C). 2. In a bowl, mix olive oil, minced garlic, lemon zest, lemon juice, oregano, salt, and pepper. 3. Place the salmon fillets on a baking sheet. Brush them with the lemon mix. 4. Add halved cherry tomatoes and trimmed asparagus around the salmon. Drizzle with any leftover sauce. 5. Bake for 12-15 minutes until the salmon is done and the veggies are tender. This one-pan meal is quick and easy. You can find the Full Recipe in this article. One-Pan Lemon Garlic Salmon pairs well with many sides. Here are some tasty options: - Rice: Steamed white or brown rice works well. - Quinoa: This grain adds protein and a nice texture. - Salad: A fresh green salad with light dressing adds crunch. - Potatoes: Roasted or mashed potatoes balance the meal nicely. Feel free to mix and match based on your mood! Cooking One-Pan Lemon Garlic Salmon takes about 25 minutes. You spend 10 minutes prepping the ingredients. Then, the salmon bakes in the oven for 12-15 minutes. This quick meal is perfect for busy days! This blog post covered key tips to make One-Pan Lemon Garlic Salmon. You learned about choosing fresh salmon and vegetables, along with the perfect seasoning mix. I shared steps for preparation, cooking, and baking. Don’t forget my tricks for adjusting cooking times based on your ingredients. In the end, this dish is versatile and easy to store, making it perfect for meal prep. With the right approach, you’ll enjoy delicious, healthy meals with minimal fuss. Now, it’s time to get cooking!

One-Pan Lemon Garlic Salmon Quick and Tasty Meal

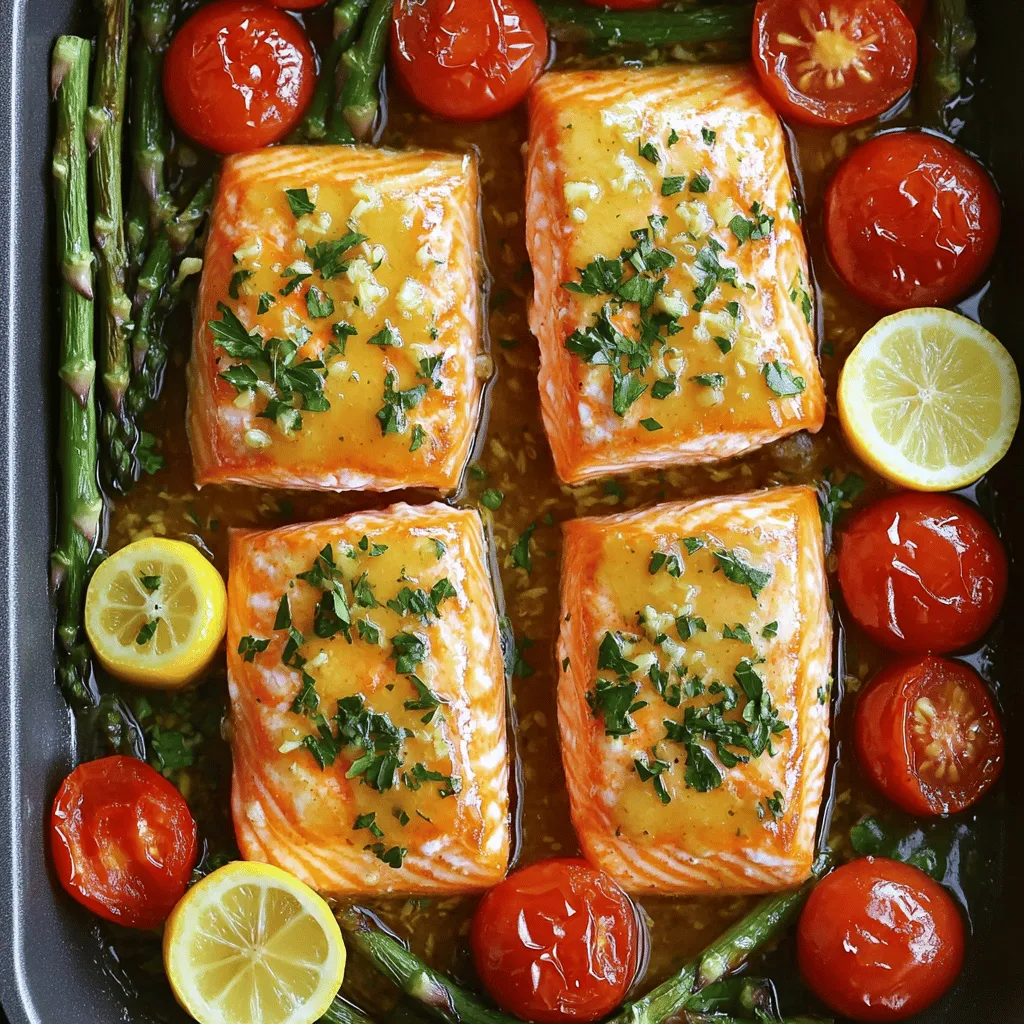
Looking for a quick and tasty meal? One-Pan Lemon Garlic Salmon is your answer. This dish is easy to make

- 2 cups penne pasta - 1 pound boneless, skinless chicken breast, diced - 2 cups fresh broccoli florets - 1 medium onion, finely chopped - 2 cloves garlic, minced - Salt and pepper to taste - 1 teaspoon Italian seasoning - 1 cup heavy cream - 1 cup grated Parmesan cheese - 2 tablespoons olive oil When I make Creamy Broccoli and Chicken Penne, I always start with fresh, high-quality ingredients. The penne pasta gives the dish its heartiness, while the chicken adds protein and flavor. Broccoli not only adds color but also a crunch that contrasts nicely with the creamy sauce. For aromatics, I like using a finely chopped onion and minced garlic. They add depth and richness to the dish. A little salt and pepper help enhance the flavors, while Italian seasoning brings a warm, herbal note. The creamy part is my favorite! Heavy cream makes the sauce rich, and grated Parmesan cheese adds that cheesy goodness. A splash of olive oil helps with cooking the chicken and gives a nice finish to the whole dish. These ingredients blend perfectly to create a comfort dish that warms the heart. You can find the full recipe to make this delightful meal at home. - Boil the penne in salted water until al dente. - Drain and set aside. - Heat olive oil in a skillet over medium-high heat. - Season and sauté the chicken until golden brown, about 5-7 minutes. - Cook onion and garlic in the same skillet for 2-3 minutes. - Add broccoli and sauté until tender, about 3-4 minutes. - Add heavy cream and Parmesan to the skillet with chicken and veggies. - Stir until the sauce is creamy and well mixed. - Mix in the cooked penne, ensuring it coats well. - Adjust sauce consistency with a splash of pasta water if needed. - Taste and season with salt and pepper to your liking. - Garnish with fresh parsley before serving. For a detailed guide with every step mapped out, check the Full Recipe. To cook pasta just right, follow these tips: - Use a big pot and lots of water. This keeps the pasta from sticking. - Add salt to the water for flavor. About 1 tablespoon per 4 quarts works well. - Stir the pasta often while it cooks. This helps it stay separate. - Check for al dente by tasting it a minute before the time runs out. To make your dish pop, try these ideas: - Add a pinch of red pepper flakes for some heat. - Mix in Italian herbs like basil or oregano for extra flavor. - A squeeze of lemon juice brightens the sauce and adds freshness. - Swap some cream for a bit of chicken broth for a lighter taste. Your dish should look as good as it tastes: - Serve the pasta in shallow bowls. This makes it look fancy. - Drizzle a little olive oil on top for shine. - Add more grated Parmesan and cracked black pepper for a gourmet touch. - Fresh parsley makes a nice pop of color and flavor. Try these tips next time you cook Creamy Broccoli and Chicken Penne, and watch how they elevate your dish! For the complete recipe, check out the Full Recipe. {{image_2}} You can easily switch the chicken for other meats. Turkey works well and is lean. Shrimp adds a nice touch and cooks fast. For a vegetarian option, use chickpeas or tofu. Both will soak up flavors and keep the dish hearty. Feel free to get creative with veggies. Bell peppers add color and sweetness. Spinach gives a boost of nutrition and cooks quickly. You can also use seasonal vegetables like zucchini or asparagus to keep things fresh. Just chop them up and add during the sauté step. If you want a lighter sauce, try using half-and-half instead of heavy cream. For a dairy-free option, coconut milk works great too. You can also make homemade pasta sauces, like a simple marinara or basil pesto. Both add a fresh twist to your dish. You can find these recipes in the Full Recipe section. To keep your creamy broccoli and chicken penne fresh, store it in an airtight container. Place it in the fridge within two hours of cooking. This will help prevent bacteria growth. The dish stays fresh for about three to four days. Always check for any off smells or changes in texture before eating. If you want to save leftovers for later, freezing is a great option. First, let the dish cool completely. Then, portion it into freezer-safe bags. Remove as much air as possible before sealing to avoid freezer burn. This dish can last for up to three months in the freezer. When you're ready to enjoy it again, thaw the penne overnight in the fridge. To reheat, place it in a skillet over medium heat. Add a splash of cream or pasta water to help revive the sauce. Stir until heated through, and enjoy your creamy comfort dish! For the full recipe, refer back to the main article. To make this dish, follow these steps: 1. Cook the Penne: Boil salted water and cook the penne until al dente. Drain it well. 2. Sauté the Chicken: Heat olive oil in a skillet. Add diced chicken, salt, and pepper. Cook until golden brown. 3. Sauté the Vegetables: In the same skillet, add chopped onion and minced garlic. Cook until the onion is soft. Add broccoli and cook until tender but bright green. 4. Make the Cream Sauce: Lower the heat. Return chicken to the skillet. Add heavy cream and stir. Gradually mix in Parmesan cheese until it melts. 5. Combine Everything: Add the cooked penne and stir to coat. If too thick, add a splash of pasta water. 6. Season to Taste: Adjust with salt and pepper. Let it simmer for a few minutes. 7. Serve: Garnish with fresh parsley and enjoy your creamy dish. Yes, you can prepare this dish in advance. Cook the penne and chicken, then store them separately. Keep the cream sauce in an airtight container. - Storage: Place everything in the fridge. Use within 2-3 days for best taste. - Reheating: Gently reheat in a pan. Add a splash of cream or pasta water to bring back creaminess. This dish pairs well with several sides: - Garlic Bread: Crunchy and buttery, it complements the creamy sauce. - Simple Salad: A fresh green salad with a light vinaigrette balances the meal. - Steamed Vegetables: Add color and nutrients with steamed carrots or green beans. Yes, this recipe is great for kids. To make it even more appealing: - Adjust the Flavors: Use less garlic and seasoning if your kids prefer milder tastes. - Add Fun Shapes: Use fun pasta shapes to make the dish more exciting. - Involve Kids: Let them help with stirring or adding toppings like cheese. This way, kids will enjoy making and eating this dish! For the complete instructions, check the Full Recipe. This blog post covered how to make a delicious creamy broccoli and chicken penne dish. We discussed the key ingredients, like penne pasta, chicken, and broccoli. Then, I shared easy steps for cooking each component and tips for enhancing flavor and presentation. Lastly, we looked at storage and variations to keep things fresh. Cooking can be simple and fun. You can impress your family or friends with this recipe. Enjoy every bite and make it your own!

Creamy Broccoli and Chicken Penne Comfort Dish

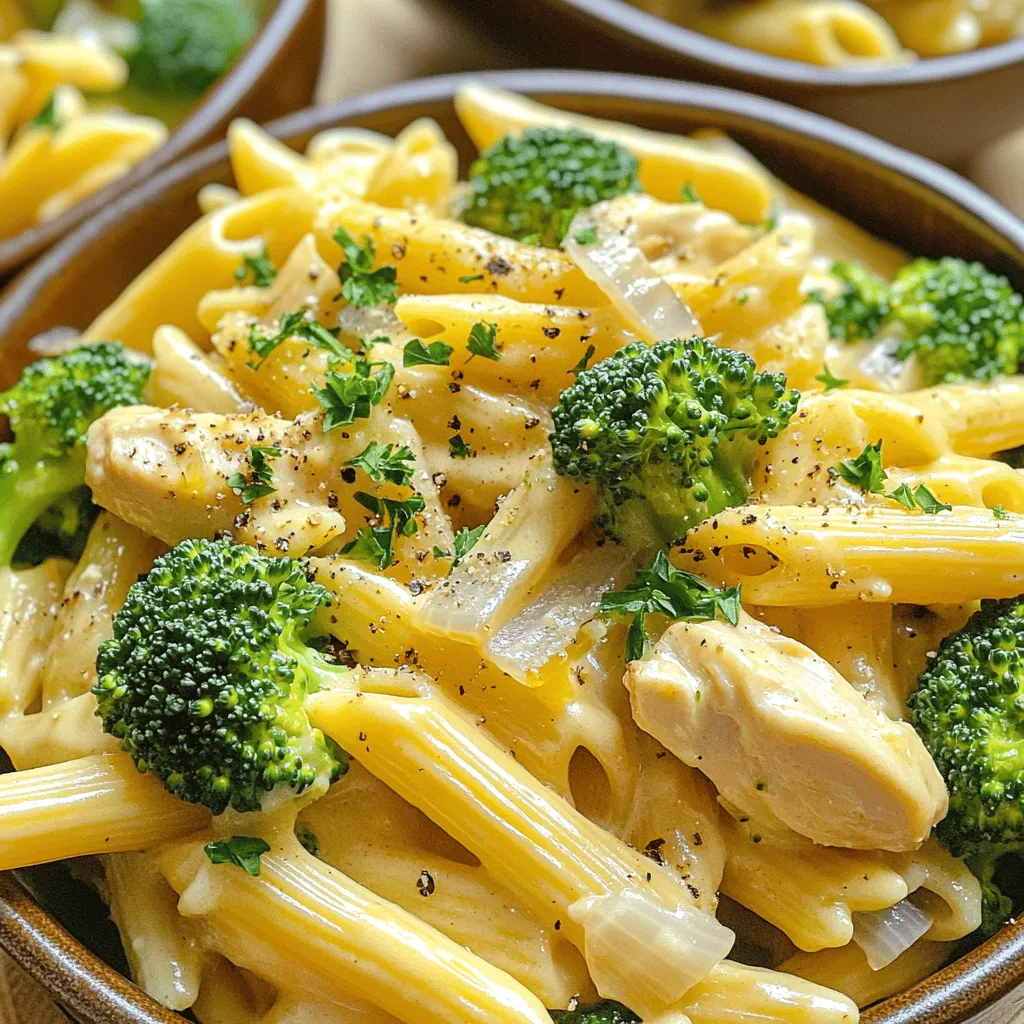
Welcome to my kitchen! Today, I’m excited to share my favorite comfort dish: Creamy Broccoli and Chicken Penne. This creamy

To make these tasty stuffed shells, you need the following ingredients: - 20 jumbo pasta shells - 2 cups cottage cheese - 1 cup ricotta cheese - 1 cup shredded mozzarella cheese (plus extra for topping) - 1/2 cup grated Parmesan cheese - 1 cup fresh spinach, chopped - 1 egg, beaten - 2 cloves garlic, minced - 1 teaspoon dried oregano - 1 teaspoon salt - 1/2 teaspoon black pepper - 2 cups marinara sauce - Fresh basil leaves for garnish You can swap some ingredients to fit your taste or diet: - Use cream cheese instead of cottage cheese for a richer filling. - Greek yogurt can replace ricotta for a healthier option. - If you want less fat, try low-fat mozzarella or Parmesan. - For a gluten-free version, look for gluten-free pasta shells. Toppings can add extra flavor and style: - Sprinkle extra mozzarella on top before baking. - Add crushed red pepper for a spicy kick. - Fresh parsley or chives can brighten the dish. - A drizzle of balsamic glaze can add sweetness. These ingredients and options make your Cottage Cheese Stuffed Shells fun and easy to prepare. For the full recipe, check out the detailed steps above. Enjoy! Start by boiling water in a big pot. Add salt to the water. Once the water boils, add the jumbo pasta shells. Cook them until they are firm but not soft. This means they should be al dente. After cooking, drain the shells and let them cool for a few minutes. This makes them easy to handle. In a large bowl, gather your cheeses. You need cottage cheese, ricotta, and mozzarella. Add grated Parmesan and fresh spinach. Crack one egg into the mix for binding. Then, add minced garlic, oregano, salt, and black pepper. Stir everything until it is mixed well. Make sure the filling is creamy and colorful. Take each cooked shell and fill it with the cheese mixture. You can use a spoon or a piping bag to help. Place each filled shell in a greased baking dish. Spread them out so they don’t touch. Once all the shells are filled, it’s time for the sauce. Pour the marinara sauce over the stuffed shells. Make sure each shell gets covered. Then, sprinkle extra mozzarella cheese on top. Cover the dish with aluminum foil and bake in your preheated oven at 375°F (190°C) for 25 minutes. After that, remove the foil and bake for another 15 minutes. The cheese should be bubbly and golden. You can find the full recipe [Full Recipe]. To make sure your shells are stuffed just right, use a piping bag or a spoon. Fill each shell until it’s full but not overflowing. If you overstuff, the cheese will spill out while baking. Cook the shells until they are al dente. This helps them hold their shape. One mistake is using cold filling. Always let the filling come to room temperature. This makes it easier to stuff. Another mistake is not covering the shells with sauce. If they dry out, they won’t taste great. Lastly, don’t skip the cheese on top. It gives a nice, melty finish. For a smooth filling, mix the cheeses well. Use a fork or a mixer to blend them evenly. If the filling seems too thick, add a little marinara sauce or milk. This will help it spread easily. Aim for a creamy texture, not runny or too dry. These tips will help you make the best Cottage Cheese Delight Stuffed Shells. For more details, check the Full Recipe. {{image_2}} You can make your cottage cheese stuffed shells even better by adding veggies. I love using fresh spinach, but you can add other greens too. Think about using chopped kale or even zucchini. Just make sure to chop them small so they mix well. You can also add bell peppers, mushrooms, or onions for more flavor. Sauté the veggies lightly before mixing them into the cheese filling. This step adds taste and makes the filling colorful. If you want a heartier meal, try adding ground meat. Ground beef, turkey, or chicken works great in the filling. Brown the meat in a skillet and drain any excess fat. Then, mix it with the cheese filling. This adds protein and makes the dish more filling. You can also spice it up with some Italian herbs to match the flavors of the marinara sauce. For those who need a dairy-free option, you can still enjoy stuffed shells. Substitute cottage cheese with a dairy-free cheese blend. Look for brands that use nuts or soy for a creamy texture. You can also use tofu as a base. Just blend it until smooth and mix it with your favorite dairy-free spices. Ensure you check the labels for any hidden dairy in other ingredients like sauces or cheeses. This way, everyone can enjoy this tasty dish! To store leftover stuffed shells, let them cool first. Place them in an airtight container. Make sure to cover them well. They will stay fresh in the fridge for up to three days. You can freeze stuffed shells for later use. Wrap each shell in plastic wrap or foil. Then, place them in a freezer-safe bag. They can last in the freezer for up to three months. When you are ready to eat, just thaw in the fridge overnight. To reheat the shells, preheat your oven to 350°F (175°C). Place the shells in a baking dish. Add a splash of marinara sauce to keep them moist. Cover with foil to avoid burning. Bake for about 20 minutes. Check that they are warm inside before serving. Enjoy the creamy goodness! For the full recipe, check out the complete guide above. You can tell when the stuffed shells are cooked by checking the cheese. It should be bubbly and golden brown on top. The sauce should be hot and steaming. If you see this, your shells are ready to enjoy! Keep an eye on the time too. Bake them for about 40 minutes total. If you want to be precise, use a food thermometer. The internal temperature should reach 165°F (74°C). Yes, you can make these stuffed shells ahead of time. Prepare the shells and fill them with the cheese mixture. Then, cover them with sauce and cheese. Instead of baking right away, wrap the dish tightly with plastic wrap or foil. Store it in the fridge for up to a day. When you’re ready to bake, just pop it in the oven. You may need to add a few extra minutes to the cooking time. Several sides go great with Cottage Cheese Stuffed Shells. Here are some ideas: - A fresh garden salad with vinaigrette - Garlic bread for extra crunch - Steamed broccoli for a healthy touch - Roasted vegetables for added flavor - A classic Caesar salad for a twist These sides will balance your meal and make it even more delightful. For the full recipe, check the details above. Cottage cheese stuffed shells are tasty and fun to make. We covered key ingredients, easy steps, and tips for great results. You can add veggies or meat for variety. Storing and reheating is simple too. With practice, you’ll make perfect stuffed shells every time. Enjoy your cooking adventure and share these tasty treats with others!

Cottage Cheese Stuffed Shells Tasty and Easy Recipe

Looking for a tasty and easy dinner idea? Cottage cheese stuffed shells are your answer! This dish combines cheesy goodness

For my chimichurri shrimp, I use fresh and simple ingredients. Here’s what you need: - 1 lb large shrimp, peeled and deveined - 1/4 cup fresh parsley, finely chopped - 1/4 cup fresh cilantro, finely chopped - 3 cloves garlic, minced - 1/2 teaspoon red pepper flakes - 1/4 cup olive oil - 2 tablespoons red wine vinegar (or lemon juice for a twist) - Salt and pepper to taste - Juice of 1 lime These ingredients create a vibrant and tasty dish. The shrimp cook quickly and soak up the chimichurri sauce. You can add some optional ingredients for even more flavor. Consider these: - 1 teaspoon of smoked paprika for a smoky taste - A pinch of cumin for warmth - Fresh oregano leaves for a herby touch These ingredients can enhance the dish. Feel free to mix and match based on your taste. Each serving of chimichurri shrimp gives you a boost of nutrients. Here’s a quick look: - Calories: ~220 - Protein: ~25g - Fat: ~12g - Carbohydrates: ~2g This dish is low in carbs and high in protein. It’s a great option for a healthy meal. Enjoy your chimichurri shrimp with a side of veggies or rice for a complete meal. For the full recipe, check the instructions later in this article! To make the chimichurri sauce, grab a medium bowl. Add 1/4 cup of fresh parsley and 1/4 cup of fresh cilantro, both finely chopped. Next, include 3 minced garlic cloves and 1/2 teaspoon of red pepper flakes. Pour in 1/4 cup of olive oil and 2 tablespoons of red wine vinegar. You can use lemon juice for a twist instead of vinegar. Mix everything until it blends well. Now, taste the chimichurri sauce. Add salt and pepper as needed. If you want it tangier, try adding more lemon juice. This sauce brings fresh flavor to the shrimp. In another bowl, take 1 pound of large shrimp that are peeled and deveined. Squeeze the juice of 1 lime over the shrimp. Add a pinch of salt and pepper. Toss the shrimp to coat them evenly. Let them marinate for about 10 to 15 minutes. This step adds flavor and helps the shrimp absorb the tangy lime juice. Heat a large skillet over medium-high heat. Once hot, add the marinated shrimp to the skillet. Cook for about 2 to 3 minutes on each side. You want them to turn pink and opaque. This means they are done. After cooking, take the skillet off the heat. Pour the chimichurri sauce over the shrimp and toss to coat. Serve your chimichurri shrimp over rice or with some crusty bread for dipping. Enjoy this hearty dish! For the complete details, check the Full Recipe. To make the best chimichurri, fresh herbs are key. Use parsley and cilantro for a bright taste. Chop them finely to release their flavor. Garlic adds depth, so don’t skip it. Red pepper flakes bring just the right amount of heat. Adjust the vinegar for tanginess. If you want a twist, try lemon juice instead. Mix all these in a bowl and season with salt and pepper. This sauce should make your taste buds dance. For perfect shrimp, choose large, fresh shrimp. Peel and devein them to make cleaning easy. Marinate the shrimp in lime juice for flavor and tenderness. Let them sit for 10-15 minutes. This step enhances their taste. Cook shrimp over medium-high heat for about 2-3 minutes on each side. They should turn pink and opaque. Don't overcook them; they can become rubbery. Chimichurri shrimp pairs well with many sides. Serve it over rice for a hearty meal. Crusty bread also works well for dipping. You can add a fresh salad to balance the dish. For a fun twist, serve it in tacos with fresh veggies. This dish is not only tasty but also looks great on a plate. Check out the Full Recipe to explore more ways to enjoy this dish. {{image_2}} You can play with different herbs in chimichurri. While parsley and cilantro work well, you can also try basil or mint. These herbs add unique tastes to your dish. Fresh thyme or oregano can also add depth. Just chop the herbs finely and mix them into your sauce. If you like it hot, add more red pepper flakes. You could also use fresh chili peppers. Diced jalapeños or serranos bring a nice kick. For a smoky flavor, try smoked paprika. Adjust the heat to your taste when mixing your chimichurri sauce. Using chimichurri as a marinade is a fantastic idea. Coat your shrimp in the sauce before grilling. Let them soak for about 30 minutes. This gives them a great flavor. Grill until they turn pink and slightly charred for the best results. Serve them with the extra chimichurri sauce for more flavor. You can find the full recipe for chimichurri shrimp in the earlier sections. After you enjoy your chimichurri shrimp, store leftovers in an airtight container. Keep the container in the fridge. The shrimp can last for about two days. Make sure to keep the shrimp and sauce together for the best flavor. If you separate them, the shrimp may dry out. To reheat chimichurri shrimp, use a skillet on low heat. This way, you avoid overcooking them. Stir gently until they warm up. You can also microwave the shrimp in short bursts. Cover them with a damp paper towel to prevent drying out. If you have extra chimichurri sauce, you can freeze it. Pour the sauce into ice cube trays. Once frozen, transfer the cubes to a bag. This method lets you use small amounts later. Just thaw the cubes in the fridge before use. I recommend using large shrimp for chimichurri. They hold the sauce well. Look for shrimp that are fresh or frozen. If using frozen, thaw them first. You can also use wild-caught shrimp for better taste and texture. Yes, you can make chimichurri sauce ahead of time. This allows the flavors to blend. Store the sauce in a sealed jar in the fridge. Use it within a week for the best taste. Just give it a good stir before using. To adjust the spice level, change the amount of red pepper flakes. For a milder flavor, use less. If you want more heat, add more flakes. You can also use fresh chili peppers for a different heat. This will give your dish a fresh kick. - Full Recipe Chimichurri shrimp blends bold flavors with simple steps. We explored key ingredients, from herbs to shrimp types. You learned how to make the chimichurri sauce, marinate the shrimp, and cook them just right. I shared tips to perfect your dish and ideas for variations. Plus, we covered how to store leftovers for later. Enjoy creating your tasty chimichurri shrimp, and remember: experimenting can lead to your best meal yet. Happy cooking!

Chimichurri Shrimp Flavorful and Simple Recipe

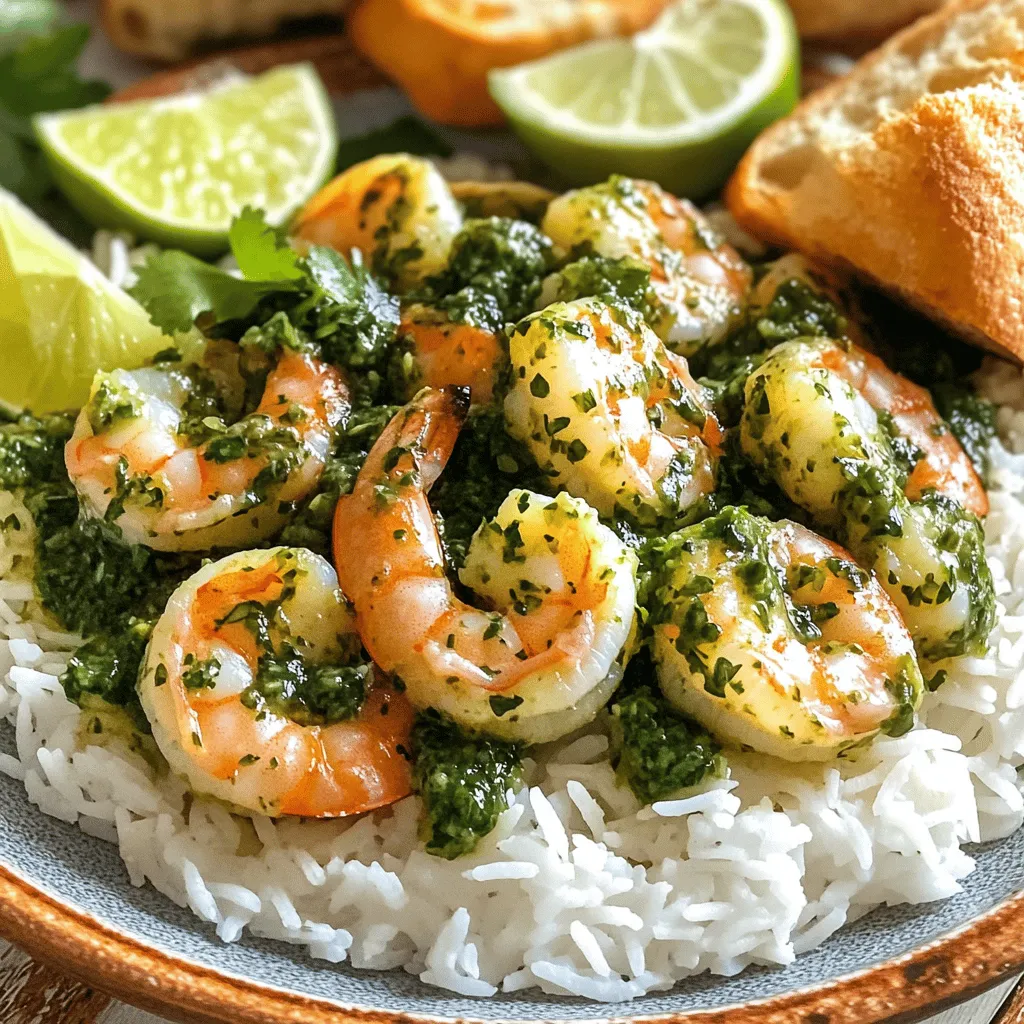
If you’re craving a dish that’s both easy and bursting with flavor, you’ve come to the right place. My Chimichurri

Older posts
Newer posts
← Previous Page1 … Page42 Page43 Page44 … Page49 Next →

dsad

© 2025 savorystride • Built with GeneratePress

Our Policies

  • Copyright Policy
  • Cookie Policy
  • GDPR Policy
  • Privacy Policy
  • Disclaimer
  • Terms Of Use

More Information

  • Home
  • About
  • Contact
  • Appetizers
  • Dessert
  • Dinner
  • Drinks
©2025, savorystride About Back To Top